Author: nora_weisser

  • Migration as a catalyst for test architecture redesign

    When our team decided to move our Playwright tests from C# to TypeScript, I thought the job was clear. We would rewrite the tests in a new language, check that they still pass, and move on.

    It didn’t work out that way. Almost every test I opened had something behind it that didn’t survive the move: data that only existed on one environment, a login at the start of every test, a setup step somebody used to do by hand before a run. If we had translated those tests line by line, we would have ended up with the same problems, just in TypeScript.

    So we treated the migration as a chance to rebuild how the framework works.

    In this post I want to share what we changed and what I would do the same way again. Some of it is specific to Playwright, but most of it applies to any test framework migration.

    A bit of context first: the product is an enterprise web application with several user roles, and we had around 200 Playwright UI and API tests in C#, running in Azure Pipelines.

    Why TypeScript

    Playwright written with .NET does its job, but TypeScript is Playwright’s home language. The test runner, fixtures and tracing are designed for it first, new features usually arrive there before other languages, and there’s far more community material when you get stuck. We also expected to write less framework code of our own. And AI coding assistants handle Playwright in TypeScript much better than in C#, which mattered for how we planned to do the migration (more on that later).

    Deciding which tests to migrate

    We didn’t move every test across as it was. Going through the old suite one test at a time, we kept asking whether each check really needed a browser. Quite often it didn’t. Many checks, like whether a role is allowed to do something, can be tested faster and more reliably through the API, and some logic is better covered by unit tests closer to the code.

    We rebalanced coverage across unit, API and UI levels. In the end we cut the number of end-to-end tests by 40%, while keeping every critical user path covered in the UI.

    The framework underneath changed even more than the tests: how tests get their data, how they log in, where setup lives and how the project is organised. That’s where most of our old problems were, and the rest of this post is about those changes.

    Test data the tests can rely on

    The first thing that broke during the migration was test data.

    Our old tests used whatever happened to be on the environment. IDs and user names were hardcoded in the test code, so a suite that passed on one environment could fail on another simply because the records it expected weren’t there.

    We fixed this by giving every test suite its own precondition data. It describes everything the suite needs before the first test runs: the initial user data, folder structure and the test files themselves. On top of that, every environment has its own JSON with the data that already exists there, such as IDs and names, so the nightly run can use it straight away. Our rule was to create only what a suite needs, and only when it needs it.
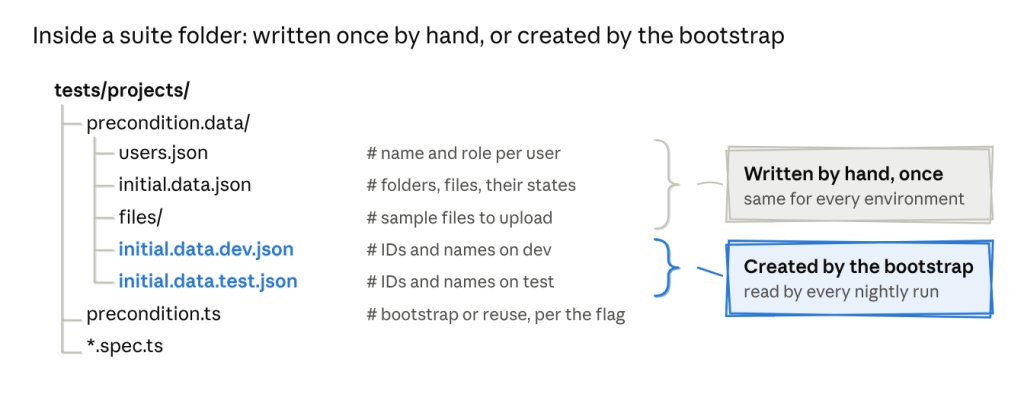
    Now, if I want to know what a suite depends on, I open its folder. Nothing is hidden in a shared environment or in someone’s head.

    We also separated two kinds of data.

    Values that never change, like roles, statuses and permission levels, live in enums and constants. Everything a test creates, such as project names and descriptions, is generated with Faker, so each run works with fresh records.

    export enum Role {
    Admin = 'admin',
    Manager = 'manager',
    Contributor = 'contributor',
    }
    import { faker } from '@faker-js/faker';
    export interface Project {
    name: string;
    description: string;
    }
    export const newProject = (): Project => ({
    name: `Project ${faker.string.alphanumeric(8)}`,
    description: faker.lorem.sentence(),
    });

    I didn’t expect this part to matter for speed, but it did. Once tests stopped sharing records, we could run them in parallel without them getting in each other’s way.

    Generating data or reusing it

    The precondition files describe what a suite needs, but someone still has to put that data on the environment. Before the migration, that someone was usually a person. We prepared data by hand on new environments, tests passed only where the data had been set up, and when a test failed it was hard to tell what state it had run against.

    We looked at two obvious options.

    1. Generating everything before each run keeps tests clean and isolated, but it’s slow and puts a lot of load on the database.
    2. Reusing existing data, which is what the old suite did, is fast, but over time the data drifts and tests quietly start depending on each other.

    We ended up with something in between. It took more work to build, but it gave us the speed of reusing data with most of the reliability of generating it.

    One environment variable, DATA_GENERATION, decides which path a suite takes:
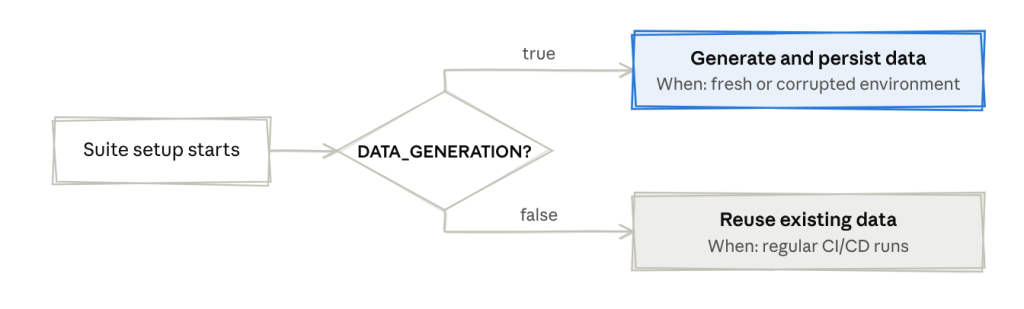
    When it’s true, the setup creates everything from the precondition files and saves what it created. We use this on a new environment, or when the data has got into a bad state. When it’s false, which is the default for CI runs, the setup skips all of that and loads the data from the last bootstrap.

    // tests/precondition.ts
    export async function prepareSuiteData(): Promise<SuiteData> {
    const shouldGenerateData = process.env.DATA_GENERATION === 'true';
    if (!shouldGenerateData) {
    return loadSuiteData();
    }
    const suiteData = await createFromPreconditions(precondition);
    await saveSuiteData(suiteData);
    return suiteData;
    }

    Nobody prepares data by hand anymore, and setting up a new environment is one pipeline run with the flag switched on.

    Logging in once per role

    In the old suite, almost every test started with a login through the UI. That made runs slow, and because login involves redirects and timeouts, it was also one of our most common sources of flaky failures. A test about permissions could fail because the login page was slow that morning. Environments with two-factor authentication couldn’t be tested at all.

    Now authentication happens once per role, in a setup step that runs before the tests.

    For each role, the setup reads the password and 2FA secret from our secret vault, logs in, and saves the browser storage state to a file in an .auth folder: admin.json, manager.json and contributor.json. It also stores the role’s API token, so tests that call the API directly can reuse it.

    // auth.setup.ts
    import { test as setup } from '@playwright/test';
    import { roles } from './config/roles';
    import { getSecrets } from './helpers/secrets';
    import { login, getApiToken, saveApiToken } from './helpers/auth';
    for (const role of roles) {
    setup(`authenticate as ${role}`, async ({ page, request }) => {
    const credentials = await getSecrets(role); // password and 2FA secret from the vault
    await login(page, credentials); // UI login, including the 2FA step
    await page.context().storageState({ path: `.auth/${role}.json` });
    await saveApiToken(role, await getApiToken(request, credentials));
    });
    }

    In a test, choosing a role is one line at the top of the describe block:

    test.describe('Manager permissions', () => {
    test.use({ storageState: '.auth/manager.json' });
    test('UI80105: Manager adds a project shared with all users - should be visible to everyone', async ({ page }) => {
    // the test starts already logged in as a manager
    });
    });

    Saved sessions come with their own risks. They expire, and a test can end up depending on something the login step left behind without anyone noticing. We handle expiry with a session refresh, so an old session gets renewed instead of failing the run.

    One thing we got almost for free: because the setup generates the 2FA code from the secret, we can finally run the suite against environments with MFA enabled.

    Running in CI from the start

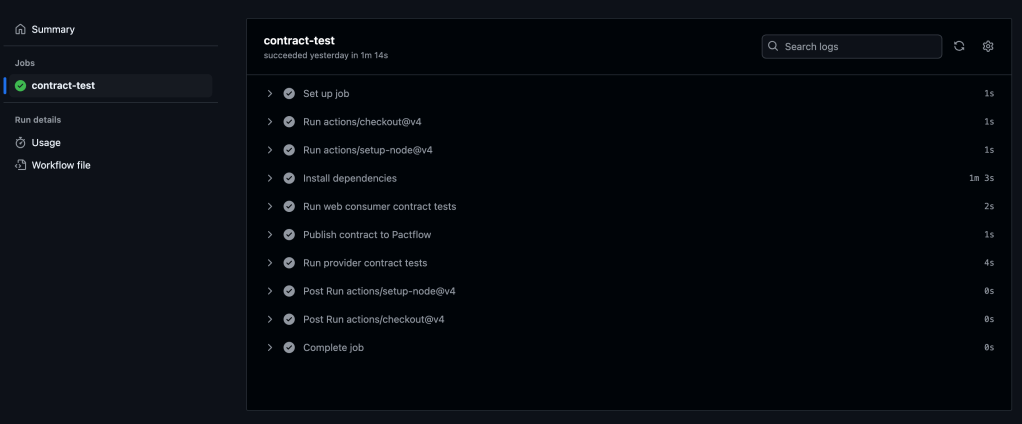
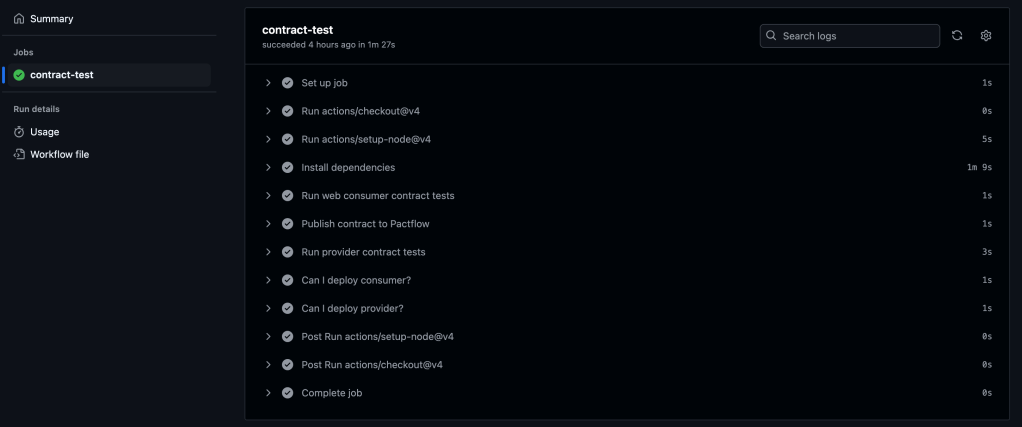
    We put migrated tests into the pipeline from the first days of the migration instead of waiting until everything was moved.

    Looking back, this was one of our better decisions. Problems with data, sessions and parallel runs showed up while the design was still easy to change, not after we had built 200 tests on top of it.

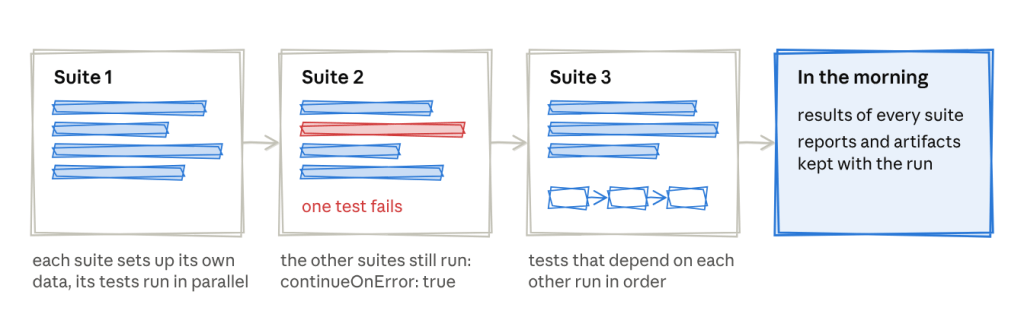
    The pipeline runs every weekday night on a fresh Ubuntu agent. Suites run one after another, because each suite sets up its own data, while the tests inside a suite run in parallel. The few tests in a file that really depend on each other run in order. We also set continueOnError: true in Azure Pipelines, so when one suite fails, the others still run and we see the full picture in the morning. Reports and artifacts are kept with each run, so most failures can be investigated without running anything locally.
    Where AI helped, and where it didn’t

    Converting around 200 tests is a lot of repetitive work, so we used GitHub Copilot for much of it.

    What I learned is that AI is good at following a structure, but it can’t decide what that structure should be. It only produced consistent tests after we had agreed on what a good test looks like.

    So before migrating anything with Copilot, we wrote an instructions file for the repository, which we called our constitution. It has rules split into MUST, SHOULD and WON’T, plus our file naming conventions, where things live, how tests are named and tagged, how the API services and clients are built, and how secrets and environments are configured in the pipeline.

    I can’t share our internal file, but I later wrote one in the same style for a workshop, and it’s public: AGENTS.md in my ai-assisted-testing-demo repo. It’s written for a small todo app rather than an enterprise product, but the structure is the same. A few lines from it:

    ## MUST
    - Locator priority. getByRole() → getByLabel() → getByPlaceholder() → getByText().
    - Web-first assertions only. Never page.waitForTimeout().
    - Seed data through the API, not the UI.
    ## WON'T
    - No getByTestId, no XPath, no CSS selectors.
    - No new tooling without being asked.

    The most useful rules turned out to be the ones that say what not to do. Without them, the assistant happily adds a hard wait or a new dependency to make a test pass.

    Then we wrote one migration prompt that walks through a C# test step by step and says where each old pattern should go:

    StepC# (before)TypeScript (after)
    1. Test dataHardcoded GUIDsData loaded from the environment: JSON.parse(process.env.PROJECT_DATA)
    2. Authenticationawait Login(AdminUser) inside each testtest.use({ storageState }) at describe level
    3. Test methods[Test] async Task ...test('TC{ID}: description', async ({ pages, adminAPIService }) => { ... })
    4. SetupData fetched or created inside the testtest.beforeEach() with module-level variables
    5. TeardownAddTearDownActions(...)test.afterEach()
    6. Real-time eventsRunAndWaitForResponseAsynca runAndWaitForSignalR(ws, callback, event) helper

    With both in place, the tests Copilot produced looked like the ones we wrote by hand, and code reviews could focus on whether the logic was right rather than on style. When the output was messy, it usually meant our own rules were unclear in that area, which was useful to find out.

    What the framework looks like now

    config/ environment and app configuration
    helpers/
    apifactory/ API service and client layer
    datafactory/ test data management
    fixtures/ Playwright fixture definitions
    pages/ Page Object Models
    tests/
    {suite_name}/ one folder per test suite
    *.spec.ts test specs
    precondition.data.ts the suite's initial data definition
    precondition.ts suite setup: auth and seed data, adjusted per suite
    playwright.config.ts

    Test names follow one pattern, so a failure in the report already tells you what broke:

    {UI|API}{TestID}: Specific scenario - expected outcome
    UI80105: Manager adds a project shared with all users - should be visible to everyone
    API80201: Contributor adds a project via API - should be forbidden

    Tags let us choose what to run: @ui for end-to-end UI scenarios, @api for API scenarios and @smoke for the smoke set.

    So far we’ve migrated around 200 tests. The suite runs about 30% faster than before, and we see around 40% fewer flaky failures.

    The tests themselves are also shorter and easier to read, they depend much less on existing data, and more checks now run at the API level instead of through the UI. Along the way we switched to accessibility-first locators like getByRole and getByLabel, and we ended up with a written guide that other teams can use for their own migrations.

    Takeaways for your own migration

    1. Don’t just translate, decide the target architecture first. The language change is the easy part.
    2. Question every test, not only the framework. Ask whether each check really needs a browser. Moving checks down to the API and unit level makes the suite faster and less flaky.
    3. Fix test data before anything else. Documented preconditions and isolated data make everything else possible, including parallel runs.
    4. Choose your data strategy deliberately. Always generating and always reusing both have costs. A flag that switches between them gives you speed and reliability.
    5. Log in once per role. Saved sessions make tests faster and more stable, and they can make MFA environments testable.
    6. Put CI in place on day one. Let the pipeline tell you what’s broken while the design is still easy to change.
    7. Give AI rules before you give it work. A clear constitution and an explicit migration prompt turn an assistant into a consistent pair of hands.

    What’s next

    We’re finishing the remaining suites, automating the creation of organisations, projects and users, expanding coverage, and tagging a proper smoke checklist.

    If you’ve been through a migration like this, I’d be curious to hear what surprised you. You can find me on LinkedIn.
  • What is RAG and how to evaluate it.

    Understanding how LLMs work.

    When I first started learning about LLMs, it helped me to think of them in a very simple way: at their core is just a model trained on a massive amount of human-generated text, which ultimately tries to predict the next word (token). The scale of the training is huge, we are talking about billions of different sentences from websites, blogs, news, forums, etc. At their core, language models generate text by predicting the most probable next token, a paradigm popularized in large-scale models such as Language Models are Few-Shot Learners paper.

    How simple it is, and how powerful. It can present that knowledge in a coherent and understandable way. This ability is possible thanks to a neural network architecture based on an attention mechanism known as transformers, introduced in the paper Attention Is All You Need paper.

    Limitations of LLMs

    That said, while LLMs are impressive, they definitely have limitations that are important to keep in mind.

    First of all, the knowledge cut-off. Model training is an expensive and time-consuming process. It takes large volumes of data and months to train an LLM. Events happening after the training is finished are simply not part of its knowledge.

    Second, there’s the problem of hallucinations. This issue has been studied extensively, for example in benchmarks like TruthfulQA, which show that models can produce convincing but incorrect answers, even when they appear confident. This happens because the model generates statistically plausible responses rather than verifying facts against a reliable source.

    Finally, there’s a limitation around private or proprietary knowledge. LLMs don’t have access to internal company data, confidential documents, or anything that isn’t publicly available in their training data.

    So naturally, this raises a question: if LLMs have these limitations, can they really be adopted widely in real-world applications?

    Introducing Retrieval-Augmented Generation (RAG)

    This is where Retrieval-Augmented Generation (RAG), introduced in Retrieval-Augmented Generation for Knowledge-Intensive NLP Tasks paper (https://arxiv.org/abs/2005.11401), comes into the picture. As the creator of LlamaIndex, Jerry Liu, says:
    “RAG is just a hack” , but a very powerful one.

    Building Intuition: How RAG Works

    What would you do to help an LLM answer a specific question? Logically, we would provide the information directly in the prompt, or maybe even link to a source like Wikipedia, right?

    What we can do is copy and paste a piece of information (context) together with our query directly into the LLM. And here it is, it is able to comprehend the additional information we provided, distill it, and respond with more precise and accurate information. This is an oversimplified example of what RAG is doing. 

    What is RAG and Why It Matters

    The main idea of RAG is to provide additional information, which can be achieved in different ways. A new LLM can be trained from scratch to include new data, or an existing model can be fine-tuned. However, both approaches require a significant amount of data and computational resources. Training models can therefore be costly and not always yield the best results. RAG, on the other hand, is often more cost-effective, flexible, and does not require powerful compute resources or long training times.

    As the name implies, retrieval-augmented generation can be explained in three steps:

    • It retrieves relevant information from a data source external to the LLM (Wikipedia, for example)
    • It augments the input to the LLM with that external information
    • Finally, the LLM generates a more accurate result

    What Does a RAG System Look Like?

    The Generation Pipeline

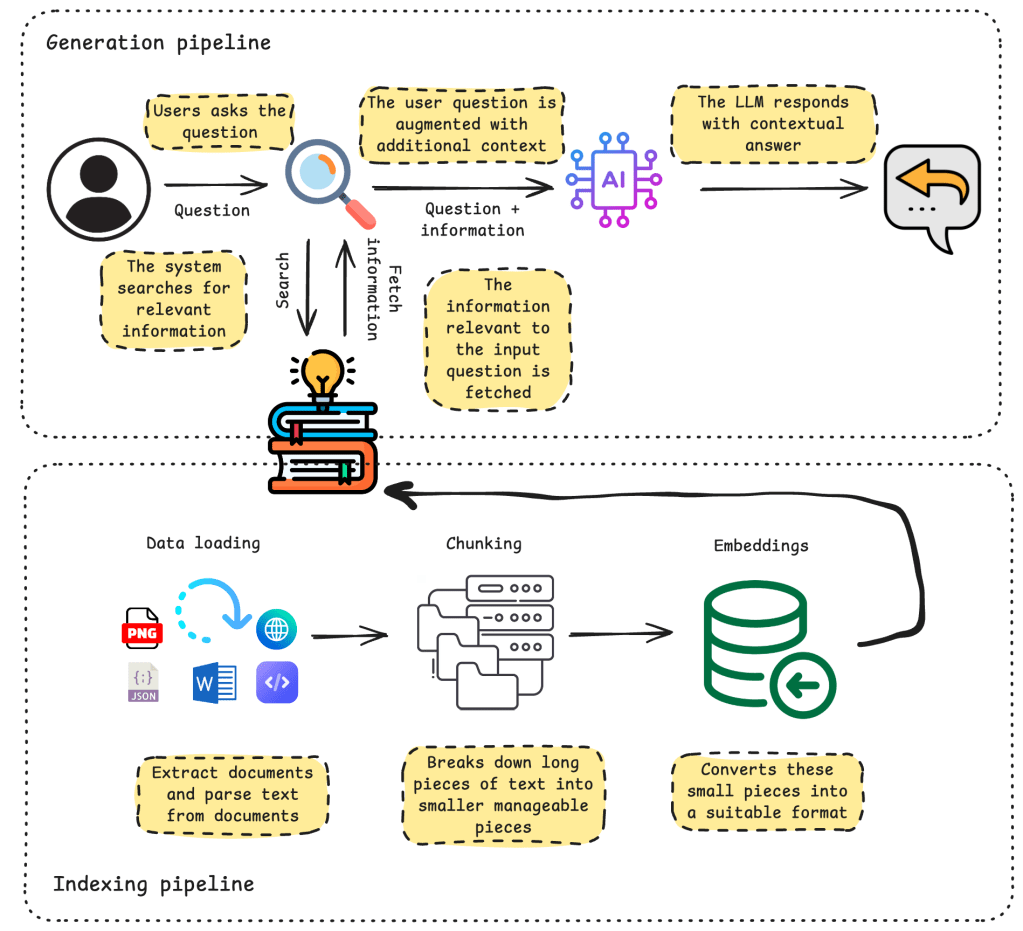
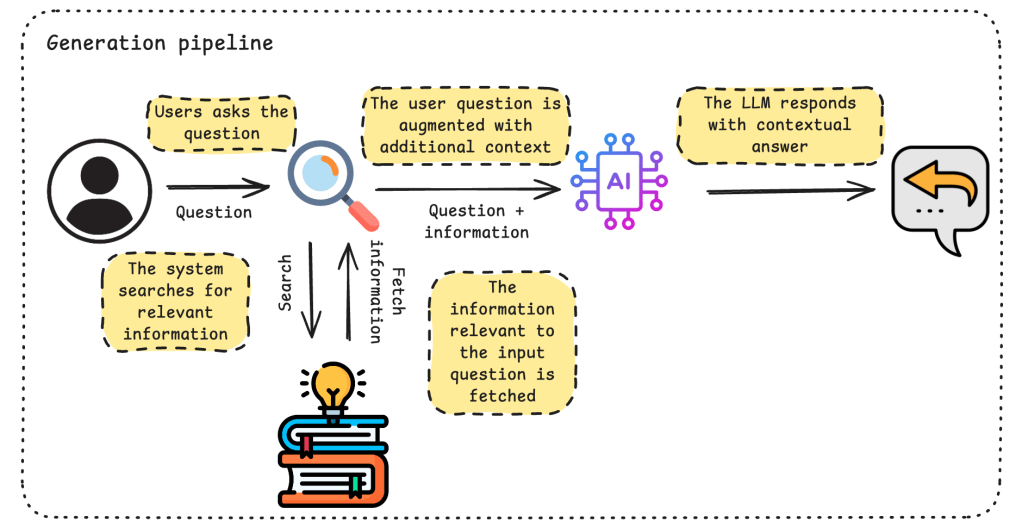
    The main flow of RAG can be represented in five steps:

    • The user asks a question
    • The system searches for information relevant to the user input
    • The relevant information is retrieved and added to the input question
    • This enriched input is passed to an LLM
    • The LLM responds with a contextual answer

    A generation pipeline is the step-by-step process that takes a user’s input, optionally adds relevant context, and passes it through an LLM to produce a final answer. This is the generation pipeline in its simplest form. 

    Indexing pipeline

    Before the generation pipeline can work effectively, the system must first prepare and organize the external data sources. This involves answering key questions:

    Data source considerations

    • Where is the data located?
    • Is it publicly available (e.g., Wikipedia) or internal (e.g., company handbooks)?
    • Does it come from third-party databases?
    • Are we using a single source or multiple sources?

    Data characteristics

    • What formats are used (PDF, Word, JSON, plain text)?
    • Is the data accessed via APIs?
    • Is the information spread across multiple documents?

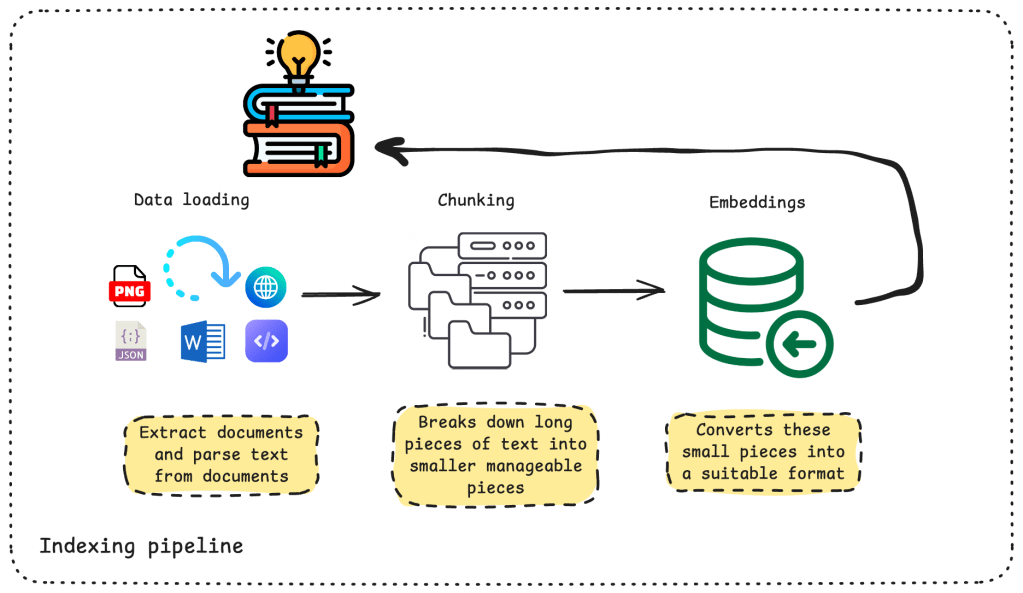
    To address these requirements, we need to implement another series of steps:

    • Connect to the identified external sources
    • Extract documents and parse text from them
    • Break down long pieces of information into smaller, manageable chunks
    • Convert these chunks into a suitable format (e.g., embeddings)
    • Store this information

    This process is commonly referred to as the indexing pipeline. Its goal is to transform raw, unstructured data into a format that can be efficiently searched and retrieved at query time. The quality of this step is critical, decisions made here, such as how documents are chunked or embedded, directly impact how well relevant information can be retrieved later.

    The diagram above illustrates how raw data flows through the indexing pipeline and is transformed into a structured representation (typically a vector index) that the retrieval system can use.

    How Indexing and Generation Work Together

    In practice, the indexing and generation pipelines are tightly connected: the way data is prepared during indexing directly influences the quality of the retrieved context and, ultimately, the final answer generated by the LLM.

    Evaluating a RAG System

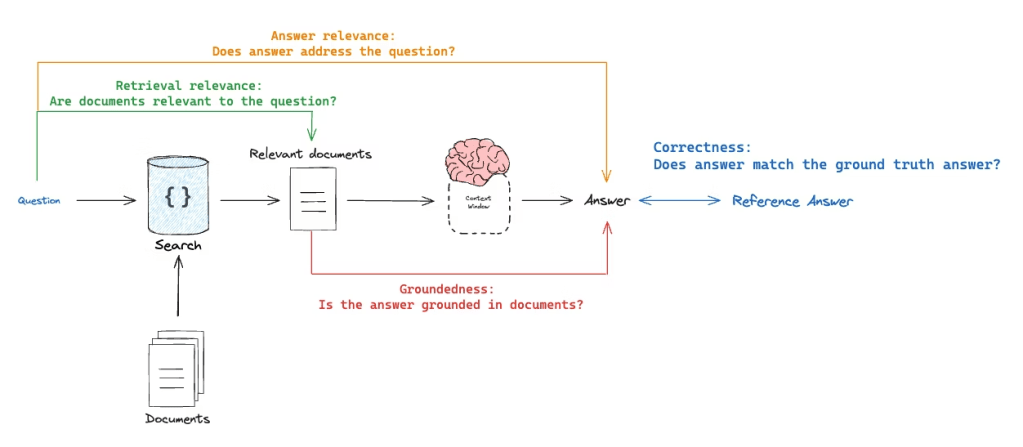
    When thinking about evaluating a RAG system, we need to look at what’s happening at every step along the way: the prompt, the retrieved context, and the generated response.

    Did we retrieve the right information?
    Is the context actually relevant to the user’s question? Because if the retriever brings back weak or unrelated information, even the best LLM won’t be able to produce a good answer. The output is only as good as the input it receives.

    Did the LLM actually pay attention to the retrieved context?
    Even though RAG is designed to reduce hallucinations, the model can still ignore or underuse the provided information. This can happen for several reasons, such as poor prompt design, noisy or overly long context, or limitations in how attention is distributed.

    Does the answer actually address the original question?
    At the end of the day, this is what matters most. Even if retrieval and generation seem correct in isolation, the final response needs to be clearly relevant and useful to the user’s intent.

    Source: https://docs.langchain.com/langsmith/evaluate-rag-tutorial 

    What’s Next

    In the next article, I will introduce our RAG application and walk through a practical example of how to evaluate it using one of the popular frameworks.

  • Visual testing with Playwright and Docker

    1. Introduction
    2. The challenge: different machines, different results. 
    3. How we did it
      1. Dockerfile
      2. Docker Compose
      3. Standardized Screenshots
      4. CI Integration
      5. Exclude visual tests from regular execution
    4. Why It Matters

    Introduction

    As part of an open-source project by the Women Coding Community, we’re building a Playwright test suite to ensure our frontend works reliably. While functional tests cover most interactions, we noticed that for some static pages, like FAQs or other content-heavy sections, visual testing could add real value. Even minor CSS changes or layout shifts can break the page in ways users notice, but automated functional tests often miss these subtle regressions.

    This is where visual testing comes in. It lets us capture screenshots of key pages and automatically compare them against a reference, so we can catch unintended visual changes before they reach our users.

    Playwright makes it easy to implement visual testing in just a few lines of code:

    test('Verify FAQ Page Outline', async ({ page }) => {
      await page.goto('/mentorship/faqs');
      await expect(page).toHaveScreenshot('faq-page.png', { fullPage: true });
    });

    The challenge: different machines, different results. 

    While this code works on a single machine, it may fail on another due to subtle rendering differences. Fonts, spacing, and other visual details vary between operating systems: Windows renders fonts differently than macOS, which renders differently than Linux. For users, this is expected and harmless. But for visual tests, it creates false positives when running on different developer machines or in our CI pipeline.

    See the difference in the screenshots shared in this article:

    Different rendering in Chromium on Ubuntu and Safari on macOS

    For example, a screenshot taken on a macOS laptop may fail if the same test runs on a Linux-based CI environment. 

    The solution? Docker. It gives us a consistent environment so tests pass reliably everywhere.

    How we did it

    Reference: check PR here.

    Dockerfile

      We built DockerFile on the official Playwright image, which includes browsers and system dependencies. Then we installed our project dependencies and copied the code.

      FROM mcr.microsoft.com/playwright:v1.57.0-noble
      WORKDIR /app
      ENV CI=true
      RUN npm install -g pnpm
      COPY package.json pnpm-lock.yaml ./
      RUN pnpm install --frozen-lockfile
      COPY src ./src
      COPY public ./public
      COPY playwright-tests ./playwright-tests
      COPY next.config.mjs tsconfig.json jest.config.ts jest.setup.js ./
      USER pwuser

      Docker Compose

      Docker Compose was introduced to make running visual tests easy and consistent. It lets developers start and run everything with a single command, using the same setup locally and in CI. This avoids environment differences and reduces “works on my machine” issues.

      Our Compose file:

      • Defines a service playwright responsible for running the tests.
      • Builds the Docker image using our Dockerfile.
      • Sets /app as the default working directory.
      • Loads environment variables from .env.local for consistency with local development.
      • Mounts volumes for:
        • Project directory – so the container can access source code without copying it every time.
        • Screenshots – so new screenshots persist and visual diffs remain across container runs.
        • Playwright reports – so test reports are available locally and in CI artifacts.

      Standardized Screenshots

      We use a consistent viewport:

      use: {
        ...devices['Desktop Chrome'],
        viewport: { width: 1280, height: 720 },
      },

      And a predictable snapshot path:

      snapshotPathTemplate: 'playwright-tests/screenshots/{arg}{ext}',

      This eliminates layout differences caused by varying screen sizes and makes visual diffs easy to review.

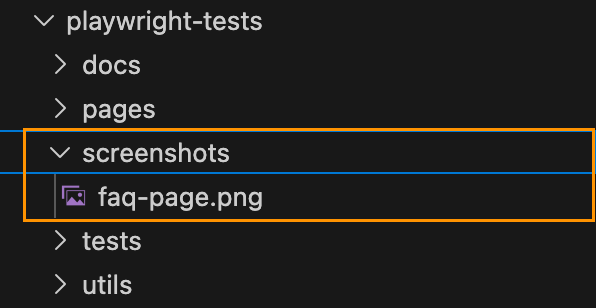
      After test execution, screenshots are saved in the screenshot folder located inside the playwright-tests root directory.

      CI Integration

      To run visual tests inside Docker in CI, we configured environment variables:

      API_BASE_URL: https://wcc-backend.fly.dev/api
      API_KEY: ${{ secrets.API_KEY }}

      We updated CI commands.

      Run tests without updating screenshots:
      pnpm test:e2e:docker
      Run tests and update screenshots for intentional UI changes:
      pnpm test:e2e:docker:update

      These commands are defined in package.json:

      "test:e2e:docker": "docker compose run --rm playwright pnpm playwright test",
      "test:e2e:docker:update": "docker compose run --rm playwright pnpm playwright test --update-snapshots"

      This setup ensures tests run consistently in CI and locally, while keeping secrets secure and allowing controlled screenshot updates when needed.

      Exclude visual tests from regular execution

      Visual tests can be slower and more prone to false positives compared to regular tests. 

      To manage this:

      • Introduced an @visual tag for all visual tests.
      • Excluded these tests from standard runs using –grep-invert.
      • Only run them in the controlled Docker environment.

      Example test:

      test('Verify FAQ Page Outline', { tag: '@visual' }, async ({ page }) => {
        await page.goto('/mentorship/faqs');
        await expect(page).toHaveScreenshot('faq-page.png', { fullPage: true });
      });

      Standard test command in package.json:

      "test:e2e": "playwright test --grep-invert @visual"

      This prevents false positives during regular development, while maintaining reliable visual tests in Docker.

      Why It Matters

      With this setup, we can catch real visual regressions while ignoring harmless OS-level differences. Docker guarantees a consistent testing environment, and Playwright makes capturing and comparing screenshots simple.

      Our users may see slightly different fonts depending on their OS—but our tests are now reliable, reproducible, and actionable, keeping our UI looking great everywhere.

      PR: https://github.com/Women-Coding-Community/wcc-frontend/pull/186

    1. Model-Based Testing with Playwright

      Introduction

      This is actually my first time working with Playwright using the Model-Based Testing (MBT) approach, and I’ve been learning it recently. Honestly, it’s been a pretty cool experience! What really stood out to me is how easy it can be to test all the possible paths of your app without writing a bunch of repetitive test code. You basically define your app’s behavior in a model, and Playwright can automatically generate tests that cover everything, whether it’s valid logins or invalid ones. 

      I’m pretty excited about how MBT, combined with Playwright, can keep things organized, scalable, and maintainable. So, if you’re like me and just getting started with this, I’ll walk you through how I set things up, step by step, and what I learned along the way.

      What is Model Based Testing?

      Model Based Testing is the testing methodology that leverages model-based design for designing and executing test cases. The model represents the system’s states, the transitions between those states, the actions that trigger the transitions, and the expected outcomes. 

      State Machine Models

      The state machine model is one of the most popular models in MBT. It represents a system in terms of its states and the transitions between them.

      • States: Represent various configurations or conditions of the system.
      • Transitions: Describe the movement between states, triggered by specific events or actions.
      • Actions: Input or conditions that cause a transition from one state to another.

      This type of the model suits the systems with discrete states (e.g. login flow, traffic lights, etc.). It is simple to understand and visualize. 

      Example: Login Flow

      Let’s consider a simple login form with two fields (Email and Password) and a Submit button.

      When the user submits the login form, the system checks the credentials and triggers the SUBMIT action. If the credentials are valid (user@example.com and password), the system transitions from the formFilledValid state to the success state, displaying the “Welcome!” message. However, if the credentials are invalid, the system transitions from the formFilledInvalid state to the failure state, displaying the “Invalid credentials.” message.

      1. States

      Definition: Represent various configurations or conditions of the system.

      In the login machine, the states are:

      idle:

      • The initial state when the login form is first loaded.
      • In this state, the email and password fields should be visible.

      formFilledValid:

      • Represents the state when the form is filled out with valid credentials (user@example.com / password).

      formFilledInvalid:

      • Represents the form being filled with invalid credentials (wrong@example.com / wrongpass).

      success:

      • A final state indicating successful login (e.g., “Welcome!” message is shown).

      failure:

      • A final state indicating login failure (e.g., “Invalid credentials.” message is shown).
      1. Events/Actions

      Definition: Inputs or conditions that cause a transition from one state to another.

      These are the inputs sent to the machine that trigger transitions:

      • FILL_FORM: Filling the form with valid data.
      • FILL_FORM_INVALID: Filling the form with invalid data.
      • SUBMIT: Submitting the login form (used in both valid and invalid paths).
      1. Transitions

      Definition: Describe the movement between states, triggered by specific events.

      The transitions in this case are:

      • Transition 1: From the formFilledValid state to the success state, triggered by the SUBMIT action when the credentials are correct.
      • Transition 2: From the formFilledInvalid state to the failure state, triggered by the SUBMIT action when the credentials are incorrect.

      You can find this example in the GitHub repository. Here’s how it looks:

      Login Flow with XState

      Now, let’s model this login flow with a state machine using XState.

      XState is a state management and orchestration solution for JavaScript and TypeScript apps.

      Refer to official documentation on how to start and create a machine. 

      Install xstate and xstate/test. XState is used to define the state machine logic, while @xstate/test allows us to generate tests automatically based on the defined model. This reduces boilerplate and ensures consistency between model and tests.

      npm install xstate @xstate/test

      Import the necessary xstate libraries into your spec file:

      import { createMachine } from "xstate";
      import { createModel } from "@xstate/test";

      Create a state machine:

      import { createMachine } from 'xstate';
      import { expect } from '@playwright/test';
      
      export const loginMachine = createMachine({
        id: 'login',
        initial: 'idle',
        states: {
          idle: {
            on: {
              FILL_FORM: 'formFilledValid',
              FILL_FORM_INVALID: 'formFilledInvalid'
            },
            meta: {
              test: async ({ page }) => {
                await expect(page.getByPlaceholder('Email')).toBeVisible();
                await expect(page.getByPlaceholder('Password')).toBeVisible();
              }
            }
          },
          formFilledValid: {
            on: {
              SUBMIT: 'success'
            },
            meta: {
              test: async ({ page }) => {
                const email = await page.getByPlaceholder('Email');
                const password = await page.getByPlaceholder('Password');
                await expect(email).toHaveValue('user@example.com');
                await expect(password).toHaveValue('password');
              }
            },
          },
          formFilledInvalid: {
            on: {
              SUBMIT: 'failure'
            },
            meta: {
              test: async ({ page }) => {
                const email = await page.getByPlaceholder('Email');
                const password = await page.getByPlaceholder('Password');
                await expect(email).toHaveValue('wrong@example.com');
                await expect(password).toHaveValue('wrongpass');
              }
            }
          },
          success: {
            type: 'final',
            meta: {
              test: async ({ page }) => {
                const msg = await page.locator('#message');
                await expect(msg).toHaveText('Welcome!');
              }
            }
          },
          failure: {
            type: 'final',
            meta: {
              test: async ({ page }) => {
                const msg = await page.locator('#message');
                await expect(msg).toHaveText('Invalid credentials.');
              }
            }
          }
        }
      });

      Key Parts of the State Machine:

      States:

      • idle: Initial state when the form is empty, waiting for user input.
      • formFilledValid: State after the form is filled with valid credentials.
      • formFilledInvalid: State after the form is filled with invalid credentials.
      • success: Final state when the user has successfully logged in.
      • failure: Final state when the login fails due to incorrect credentials.

      Transitions:

      • FILL_FORM: Transition that occurs when the user fills out the form correctly.
      • FILL_FORM_INVALID: Transition when the user fills out the form with invalid credentials.
      • SUBMIT: Transition that occurs when the user submits the form.

      You can visualize this model using XState Visualizer or Stately, which automatically generates a graphical representation of your state machine, making it easier to understand and communicate the flow.

      Meta properties

      The meta properties define assertions or checks that validate whether the state machine has transitioned successfully between states.

      !! Important to highlight that meta properties themselves do not involve actions or events (like clicking buttons or submitting forms). They are purely for validating if the system has reached a specific state.

      Example: In the idle state, we should assert that the form’s input fields (Email and Password) are visible and present on the page. This ensures that the system is in the correct state and ready to receive user input:

      meta: {
         test: async ({ page }) => {
           await expect(page.getByPlaceholder('Email')).toBeVisible();
           await expect(page.getByPlaceholder('Password')).toBeVisible();
         }
      }

      Add your tests

      Creating the tests is super easy since we let xstate generate our test plans for us. The snippet below basically generates the tests dynamically based on the model.

      1. Create a test model with events
      import { createModel } from '@xstate/test';
      import { loginMachine } from './loginMachine';
      import { Page } from '@playwright/test';
      
      type TestContext = { page: Page };
      
      
      async function fillForm(context: TestContext, email: string, password: string) {
        const { page } = context;
        await page.locator('#email').fill(email);
        await page.locator('#password').fill(password);
      }
      
      const testModel = createModel(loginMachine).withEvents({
        FILL_FORM: async (context: unknown) => {
          const { page } = context as TestContext;  
          await fillForm({ page }, 'user@example.com', 'password');
        },
        FILL_FORM_INVALID: async (context: unknown) => {
          const { page } = context as TestContext;  
          await fillForm({ page }, 'wrong@example.com', 'wrongpass');
        },
        SUBMIT: async (context: unknown) => {
          const { page } = context as TestContext; 
          await page.getByRole('button', { name: 'Login' }).click();
        }
      });

      2. Iterate through available test paths and execute test cases.

      import { test } from '@playwright/test';
      
      test.describe('Login Machine Model-based Tests', () => {
        test.beforeEach(async ({ page }) => {
          await page.goto('http://localhost:3000');
        });
      
        const testPlans = testModel.getShortestPathPlans();
      
        for (const plan of testPlans) {
          for (const path of plan.paths) {
            test(path.description, async ({ page }) => {
              await path.test({ page });
            });
          }
        }
      
        test('should cover all paths', async () => {
          testModel.testCoverage();
        });
      });

      The full code snippet:

      import { test, Page } from '@playwright/test';
      import { createModel } from '@xstate/test';
      import { loginMachine } from './loginMachine';
      
      type TestContext = { page: Page };
      
      async function fillForm(context: TestContext, email: string, password: string) {
        const { page } = context;
        await page.locator('#email').fill(email);
        await page.locator('#password').fill(password);
      }
      
      const testModel = createModel(loginMachine).withEvents({
        FILL_FORM: async (context: unknown) => {
          const { page } = context as TestContext;  
          await fillForm({ page }, 'user@example.com', 'password');
        },
        FILL_FORM_INVALID: async (context: unknown) => {
          const { page } = context as TestContext;  
          await fillForm({ page }, 'wrong@example.com', 'wrongpass');
        },
        SUBMIT: async (context: unknown) => {
          const { page } = context as TestContext; 
          await page.getByRole('button', { name: 'Login' }).click();
        }
      });
      
      test.describe('Login Machine Model-based Tests', () => {
        test.beforeEach(async ({ page }) => {
          await page.goto('http://localhost:3000');
        });
      
        const testPlans = testModel.getShortestPathPlans();
      
        for (const plan of testPlans) {
          for (const path of plan.paths) {
            test(path.description, async ({ page }) => {
              await path.test({ page });
            });
          }
        }
      
        test('should cover all paths', async () => {
          testModel.testCoverage();
        });
      });

      Execute Test Cases

      To run test cases, execute this command:

      npx playwright test

      As a result, all the paths will be derived and executed:

      What can be done even better.

      Consider the two snippets below, which demonstrate two different approaches to identifying the same element (an email input field):

      1. Using the id attribute:
      const email = await page.locator('#email');

      2. Using the getByPlaceholder() method:

      const email = await page.getByPlaceholder('Email');

      While both methods work, they introduce unnecessary variability in locator strategies. This can lead to confusion.

      To avoid this inconsistency, we can introduce a more structured way to define and reuse locators. One effective approach is to adopt the Page Object Model (POM) pattern.

      Advantages of Model-Based Testing approach

      • Ensures all possible user paths (valid/invalid logins) are tested. With a proper model, you’ll never forget a test case again! Every valid and invalid login, every happy path and error state, it’s all there, mapped out.
      • One model defines both behavior and tests, easy to update. This is a huge win. Once you’ve got your model, it doubles as both a behavior map and a test generator. So when the app changes, you just tweak the model. 
      • Tests are generated automatically from the model. This is absolute magic. The model can automatically produce test cases, helping you focus on designing better logic instead of managing test scripts.
      • State diagrams help explain app behavior clearly. These diagrams aren’t just for testers, they’re great for showing developers, designers, and even PMs how the app behaves. Everyone can see the “big picture”. 
      • Encourages thinking through logic before coding. You’re forced (in a good way!) to plan how the system should behave before jumping into code.

      Disadvantages of Model-Based Testing approach

      • More effort than needed for simple flows. If you’re testing a basic login form or something tiny, setting up a full model might feel like overkill. The setup time pays off for complex systems, but not always for quick one-off tests.
      • Requires understanding XState and state machines. Here is a bit of a learning curve. If you are new to the concept of states, transitions and actions, you definitely need to spend some time to understand it, but with practice it gets easier. 
      • The model must stay in sync with the actual UI. As soon as the UI changes, it needs a bit of discipline to align it with the existing model. 
      • Harder to model non-deterministic flows. Some parts of an app (like random data, unpredictable user input, or flaky network calls) can be tricky to represent in a model.

      Conclusion

      Model-Based Testing with Playwright and XState is a super powerful way to keep your tests organized, maintainable, and easy to scale. By turning your app’s behavior into a state machine, you can automatically generate tests that cover all the possible paths, no more wondering if you missed something. This approach really shines when you’re working with flows that have clear steps, like login forms, authentication, or multi-step processes. It’s all about making testing smarter, not harder!

      Resources:

      1. Repository with source code.
      2. Another perspective from Erik Van Veenendaal, internationally recognized testing expert and author of a number of books.
    2. PactumJS Hands-On: Leverage stores for Authentication 

      PactumJS Hands-On: Leverage stores for Authentication 

      Introduction

      When testing APIs that require authentication or involve dependent requests, hardcoding tokens and dynamic values can quickly lead to fragile and hard-to-maintain tests. PactumJS offers a solution for this – stores, which allow you to capture and reuse values like tokens, IDs, and other response data.

      In this article, you’ll learn how to:

      • Handle authentication using Pactum stores
      • Chain requests by capturing and reusing dynamic values
      • Clean up test data using afterEach hooks

      Recap: POST Add Room request resulting 401 status code

      In the previous article, we created a test case Create a New Room but encountered a 401 Unauthorized error due to missing authentication:

      // tests/rooms.spec.js
      
      import pactum from 'pactum';
      const { spec, stash } = pactum;
      
      it('POST: Create a New Room', async () => {
          await spec()
              .post('/room')
              .withJson({ '@DATA:TEMPLATE@': 'RandomRoom' })
              .expectStatus(200)
              .expectJson({
                  "success": true
              })
      })

      Since the /room endpoint requires authentication, we need to log in and attach a valid session token to our request.

      Storing and Reusing Tokens

      Pactum allows you to store response values and reuse them across requests using the .stores() method.

      To simulate authentication:

      await spec()
        .post('/auth/login')
        .withJson({ '@DATA:TEMPLATE@': 'ExistingUser' })
        .stores('token', 'token');

      This captures the token field from the login response and stores it under the key ‘token’.

      To use the stored token in subsequent requests:

      .withHeaders('Cookie', 'token=$S{token}')

      Chaining Requests

      You can also extract and store specific values like IDs from response bodies using the built-in json-query support in PactumJS. This allows you to query deeply nested JSON data with simple expressions.

      For example, to capture a roomId based on a dynamic roomName from the response:

      .stores('roomId', `rooms[roomName=${roomName}].roomid`);

      Then use it dynamically in future endpoints:

      .get('/room/$S{roomId}')

      Clean-Up Phase

      Cleaning up test data in afterEach ensures that your tests remain isolated and repeatable — a critical practice in CI/CD pipelines.

      In this example you can delete all the rooms, which have been created for the test:

      afterEach(async () => {
          await spec()
            .delete('/room/$S{roomId}')
            .withHeaders('Cookie', 'token=$S{token}');
        });

      Full Example: Creating a Room with Authentication

      Here’s a full test case demonstrating the use of authentication, value storage, and chaining:

      // tests/rooms.spec.js
      
      describe('POST Create a New Room', () => {
      
          beforeEach(async () => {
              await spec()
                  .post('/auth/login')
                  .withJson({
                      '@DATA:TEMPLATE@': 'ExistingUser'
                  }).stores('token', 'token')
          });
      
      
          it('POST: Create a New Room', async () => {
              await spec()
                  .post('/room')
                  .inspect()
                  .withHeaders('Cookie', 'token=$S{token}')
                  .withJson({ '@DATA:TEMPLATE@': 'RandomRoom' })
                  .expectStatus(200)
                  .expectJson({
                      "success": true
                  })
      
              const roomName = stash.getDataTemplate().RandomRoom.roomName;
      
              await spec()
                  .get('/room')
                  .inspect()
                  .expectStatus(200)
                  .stores('roomId', `rooms[roomName=${roomName}].roomid`);
      
              await spec()
                  .get(`/room/$S{roomId}`)
                  .inspect()
                  .expectStatus(200)
                  .expectJson('roomName', roomName);
          })
      
          afterEach(async () => {
              await spec()
                  .delete('/room/$S{roomId}')
                  .inspect()
                  .withHeaders('Cookie', 'token=$S{token}')
          });
      
      })

      Understanding the Stash

      In the full example above, you may have noticed the use of stash.getDataTemplate():

      const roomName = stash.getDataTemplate().RandomRoom.roomName;

      The stash object in Pactum provides access to test data and stored values during runtime. Specifically, stash.getDataTemplate() allows you to retrieve values generated from the data template used earlier in .withJson({ ‘@DATA:TEMPLATE@’: ‘RandomRoom’ }).

      This is useful here to extract values from dynamically generated templates (like roomName) to use them in later requests.

      Bonus: Fetching Rooms without authentication

      Here’s a simple test for fetching all rooms without authentication:

      // tests/rooms.spec.js
      
      describe('GET: All Rooms', () => {
        it('should return all rooms', async () => {
          await spec()
            .get('/room')
            .expectStatus(200);
        });
      });

      Conclusion.

      Pactum’s store feature enables you to:

      • Authenticate without hardcoding credentials
      • Chain requests by dynamically storing and reusing values

      By combining this with beforeEach and afterEach hooks, you can effectively manage test preconditions and postconditions, ensuring your test cases remain clean, maintainable.

    3. PactumJS in Practice: Using Data Templates to Manage Test Data – Part 2

      PactumJS in Practice: Using Data Templates to Manage Test Data – Part 2

      Utilize faker Library to Compile Dynamic Test Data

      Introduction

      In Part 1, we explored how to make API tests more maintainable by introducing data templates for the /auth/login endpoint. We saw how to use @DATA:TEMPLATE, @OVERRIDES, and @REMOVES can simplify test logic and reduce duplication.

      Now, in Part 2, we’ll apply the same approach to another key endpoint: POST /room – Create a new room

      This endpoint typically requires structured input like room names, types, and status — perfect candidates for reusable templates. We’ll define a set of room templates using Faker for dynamic test data, register them alongside our auth templates, and write test cases that validate room creation.

      Let’s dive into how data templates can help us test POST /room more effectively, with minimal boilerplate and maximum clarity.

      Exploring the API Endpoint

      Step 1: Inspecting the API with DevTools

      Before automating, it’s helpful to understand the structure of the request and response. Visit https://automationintesting.online and follow the steps shown in the GIF below, or use the guide here:

      1. Open DevTools: Press F12 or right-click anywhere on the page and select Inspect to open DevTools.
      2. Navigate to the Network Tab. Go to the Network tab to monitor API requests.
      3. Trigger the API Call: On the website, fill in the room creation form and submit it. Watch for a request to the /room endpoint using the POST method.

      Inspect the API Details. 

      Once you click the POST rooms request, you will see the following details:

      1. URL and method details.
      1. Headers tab: Shows request URL and method
      2. Payload tab: Shows the room data you sent (like number, type, price, etc.)
      1. Response tab: Shows the response from the server (confirmation or error)

      Example payload from this API request:

      {
        "roomName":"111",
        "type":"Single",
        "accessible":false,
        "description":"Please enter a description for this room",
        "image":"https://www.mwtestconsultancy.co.uk/img/room1.jpg",
        "roomPrice":"200",
        "features":[
            "WiFi",
            "TV",
            "Radio"
        ]
      }

      Field Breakdown:

      • roomName: A string representing an identifier for the room (e.g., “111”).
      • type: Room type; must be one of the following values: “Single”, “Double”, “Twin”, “Family”, “Suite”.
      • accessible: A boolean (true or false) indicating whether the room is wheelchair accessible.
      • description: A text description of the room.
      • image: A URL to an image representing the room.
      • roomPrice: A string representing the price of the room.
      • features: An array of one or more of the following feature options: “WiFi“, “Refreshments“, “TV“, “Safe“, “Radio“, “Views“.

      ⚠️ Note: This breakdown is based on personal interpretation of the API structure and response; it is not taken from an official specification.

      In order to generate payload for the room, we will use faker library. This library allows you to generate realistic test data such as names, prices, booleans, or even images on the fly. This helps reduce reliance on hardcoded values and ensures that each test run simulates real-world API usage.

      Step 2: Installing the faker Library

      To add the faker library to your project, run:

      npm install @faker-js/faker

      Step 3: Registering a Dynamic Room Template

      Use faker to generate dynamic values for each room field:

      // helpers/datafactory/templates/randomRoom.js
      
      import { faker } from '@faker-js/faker/locale/en';
      import pkg from 'pactum';
      const { stash } = pkg;
      
      const roomType = ["Single", "Double", "Twin", "Family", "Suite"];
      const features = ['WiFi', 'Refreshment', 'TV', 'Safe', 'Radio', 'Views'];
      
      export function registerRoomTemplates() {
        stash.addDataTemplate({
          RandomRoom: {
            roomName: faker.word.adjective() + '-' + faker.number.int({ min: 100, max: 999 }),
            type: faker.helpers.arrayElement(roomType),
            description: faker.lorem.sentence(),
            accessible: faker.datatype.boolean(),
            image: faker.image.urlPicsumPhotos(),
            features: faker.helpers.arrayElements(features, { min: 1, max: 6 }),
            roomPrice: faker.commerce.price({ min: 100, max: 500, dec: 0 })
          }
        });
      }

      Step 4: Writing the Test Case

      Register the template:

      //helpers/datafactory/templates/registerDataTemplates.js
      
      import { registerAuthTemplates } from "./auth.js";
      
      export function registerAllDataTemplates() {
          registerAuthTemplates();
          registerRoomTemplates();
        }

      With the template registered, you can now use it in your test:

      import pactum from 'pactum';
      const { spec, stash } = pactum;
      
      it('POST: Create a New Room', async () => {
          await spec()
              .post('/room')
              .withJson({ '@DATA:TEMPLATE@': 'RandomRoom' })
              .expectStatus(200)
              .expectJson({
                  "success": true
              })
      })

      This approach ensures that each test scenario works with fresh, random input — increasing coverage and reliability.

      Step 5: Running the Test

      Run your tests using:

      npm run test

      Most likely you got 401 Unauthorized response, which means authentication is required.

      Don’t worry — we’ll handle authentication, by passing the token from the login endpoint to other calls, in the next article.

    4. PactumJS in Practice: Using Data Templates to Manage Test Data – Part 1

      PactumJS in Practice: Using Data Templates to Manage Test Data – Part 1

      Introduction

      In this hands-on guide, we’ll explore how to improve the maintainability and flexibility of your API tests using data templates in PactumJS. Our focus will be on the authentication endpoint: POST /auth/login

      Recap: A Basic Login Test

      In the previous article we wrote a basic test case for a successful login:

      it('should succeed with valid credentials', async () => {
        await spec()
          .post('/auth/login')
          .inspect()
          .withJson({
            username: process.env.USERNAME,
            password: process.env.PASSWORD,
          })
          .expectStatus(200);
      });

      While this works for one case, hardcoding test data like this can quickly become difficult to manage as your test suite grows.

      Improving Test Maintainability with Data Templates

      To make our tests more scalable and easier to manage, we’ll introduce data templates — a PactumJS feature that allows you to centralize and reuse test data for different scenarios, such as valid and invalid logins.

      Step 1: Define Auth Templates

      Create a file auth.js inside your templates directory /helpers/datafactory/templates/ and register your authentication templates:

      // helpers/datafactory/templates/auth.js
      
      import pkg from 'pactum';
      const { stash } = pkg;
      import { faker } from '@faker-js/faker/locale/en';
      import dotenv from 'dotenv';
      dotenv.config();
      
      export function registerAuthTemplates() {
        stash.addDataTemplate({
          ExistingUser: {
              username: process.env.USERNAME,
              password: process.env.PASSWORD,
          },
          NonExistingUser: {
              username: 'non-existing-user',
              password: 'password',
          }
      });
      }
      

      Step 2: Register All Templates in a Central File

      Next, create a registerDataTemplates.js file to consolidate all your template registrations:

      //helpers/datafactory/templates/registerDataTemplates.js
      import { registerAuthTemplates } from "./auth.js";
      
      export function registerAllDataTemplates() {
          registerAuthTemplates();
          registerRoomTemplates();
        }

      Step 3: Use Templates in Your Test Setup

      Finally, import and register all templates in your test suite’s base configuration:

      // tests/base.js
      
      import pactum from 'pactum';
      import dotenv from 'dotenv';
      dotenv.config();
      import { registerAllDataTemplates } from '../helpers/datafactory/templates/registerDataTemplates.js';
      
      const { request } = pactum;
      
      before(() => {
        request.setBaseUrl(process.env.BASE_URL);
        registerAllDataTemplates()
      });
      

      Writing Login Tests with Templates

      Now let’s implement test cases for three core scenarios:

      // tests/auth.test.js
      
      describe('/auth/login', () => {
      
        it('should succeed with valid credentials', async () => {
          await spec()
            .post('/auth/login')
            .withJson({ '@DATA:TEMPLATE@': 'ExistingUser' })
            .expectStatus(200)
            .expectJsonSchema(authenticationSchema);
        });
      
        it('should fail with non-existing user', async () => {
          await spec()
            .post('/auth/login')
            .withJson({ '@DATA:TEMPLATE@': 'NonExistingUser' })
            .expectStatus(401)
            .expectJsonMatch('error', 'Invalid credentials');
        });
      
        it('should fail with invalid password', async () => {
          await spec()
            .post('/auth/login')
            .withJson({
              '@DATA:TEMPLATE@': 'ExistingUser',
              '@OVERRIDES@': {
                password: faker.internet.password(),
              },
            })
            .expectStatus(401)
            .expectJsonMatch('error', 'Invalid credentials');
        });
      
      });

      💡 Did You Know?

      You can use:

      • @OVERRIDES@ to override fields in your template (e.g. testing invalid passwords)
      • @REMOVES@ to remove fields from the payload (e.g. simulating missing inputs)

      Example:

      it('should return 400 when username is missing', async () => {
        await spec()
          .post('/auth/login')
          .withJson({
            '@DATA:TEMPLATE@': 'ExistingUser',
            '@REMOVES@': ['username']
          })
          .expectStatus(400);
      });

      Conclusion

      Data templates in PactumJS are a simple yet powerful way to make your API tests more maintainable and scalable. By centralizing test data, you reduce duplication, improve readability, and make your test suite easier to evolve as your API grows.

      In this part, we focused on authentication. In the next article, we’ll explore how to apply the same pattern to other endpoints — like POST /room — and build more complex test scenarios using nested data and dynamic generation.

    5. Getting started with PactumJS: Project Structure and Your First Test Case

      Getting started with PactumJS: Project Structure and Your First Test Case

      Introduction

      As discussed in the previous article, PactumJS is an excellent choice for API automation testing. 

      As your API testing suite grows, maintaining a clean and organized repository structure becomes essential. We’ll explore a folder structure for your PactumJS-based testing framework, provide tips and tricks for configuration and scripting, and walk through executing tests with reporting.

      For demonstration, we’ll use the Restful Booker API as our test target.

      Set Up Your Project and Install Dependencies

      Prerequisites

      To follow along, make sure you have the following:

      1. Node.js v10 or above
      2. Basic understanding of JavaScript or TypeScript
      3. Node.js modules
      4. Testing frameworks like Mocha

      If you’re new to any of the above, it’s worth reviewing basic tutorials, for example, on Automation University: on Node.js and test runners like Mocha.

      Install Dependencies

      Start by creating a fresh Node.js project:

      mkdir api_testing_with_pactumjs
      cd api_testing_with_pactumjs
      npm init -y

      Then install necessary packages via NPM:

      # install pactum
      npm install -D pactum
      
      # install a test runner
      npm install -D mocha

      Organise your files

      api_testing_with_pactumjs/
      ├── helpers/
      │   └── datafactory/
      ├── tests/
      │   └── auth.spec.ts
      ├── setup/
      │   └── base.js
      ├── .env.example
      ├── .gitignore
      ├── README.md
      ├── package-lock.json
      └── package.json
      1. tests/ folder contains your test specifications organized by feature or endpoint, such as auth.spec.ts. This keeps tests modular and easy to locate.
      2. helpers/ folder houses centralized reusable logic and utilities. This separation keeps test files focused on what they test rather than how, improving readability and maintainability.
      3. setup/ folder contains global setup files like base.js to configure common test environment settings, such as base URLs and global hooks.
      4. .env.example — A sample environment configuration file listing required environment variables, serving as a reference and template for developers.
      5. .env (not shown in repo) is used locally to store sensitive configuration and secrets, enabling easy environment switching without code changes.
      6. .gitignore file includes folders and files like .env to prevent committing sensitive data to version control.
      7. package.json is a central place for managing project dependencies (like pactum, dotenv, mocha) and defining test scripts (e.g., npm run test, npm run test:report). This facilitates CI/CD integration and consistent test execution.

      Write a Basic Test

      As an example for our demo we will take the Restful-Booker Platform built by Mark Winteringham. This application has been created for bed-and-breakfast (B&B) owners to manage their bookings.

      To explore and test the available API endpoints, you can use the official Postman Collection.

      Let’s write our first set of API tests for the /auth/login endpoint which generates a token for an admin user.

      Endpoint: POST /api/auth/login

      Base URL: https://automationintesting.online

      User Context

      User Role: Admin (default user)

      Credentials Used:

      • username: “admin”
      • password: “password”

      Request:

      Method: POST

      Headers: Content-Type: application/json

      Body:

      {
        "username": "admin",
        "password": "password"
      }

      Expected Response:

      HTTP Status: 200 OK

      / tests/authenticate.spec.js
      import pkg from 'pactum';
      const { spec, stash } = pkg;
      
      describe('/authenticate', () => {
      
          it('should succeed with valid credentials', async () => {
              await spec()
                  .post('https://automationintesting.online/api/auth/login')
                  .withJson({
                      username: 'admin',
                      password: 'password'
                  })
                  .expectStatus(200)
          });
      });

      While this test currently focuses on verifying the status code, future articles will enhance it by adding validations for the authentication token returned in the response.

      Manage Environment Variables

      Create .env file

      To keep sensitive data like URLs and credentials, create a .env.example file as a reference for required environment variables:

      BASE_URL=""
      USERNAME=""
      PASSWORD=""
      👉 Tip: Don’t commit your actual .env to version control
      • Use .env.example to document the required variables.
      • Add .env to your .gitignore file to keep credentials secure.
      • Share .env.example with your team so they can configure their environments consistently.

      Load Environment Variables in Tests

      Install dotenv and configure it in your test files or setup scripts:

      npm install --save-dev dotenv

      Example test with environment variables:

      // tests/authenticate.spec.js
      
      import pkg from 'pactum';
      const { spec } = pkg;
      import dotenv from 'dotenv';
      dotenv.config();
      
      describe('/authenticate', () => {
        it('should succeed with valid credentials', async () => {
          await spec()
            .post(`${process.env.BASE_URL}/auth/login`)
            .withJson({
              username: process.env.USERNAME,
              password: process.env.PASSWORD
            })
            .expectStatus(200);
        });
      });

      Execute Test Case

      Once your test files are set up and your .env file is configured with valid credentials and base URL, you’re ready to execute your test cases.

      PactumJS works seamlessly with test runners like Mocha, which means running your tests is as simple as triggering a test command defined in your package.json. Here’s how to proceed:

      Add a Test Script

      In your package.json, add a script under “scripts” to define how to run your tests. For example:

      // package.json
      
      "scripts": {
        "test": "mocha tests"
      }

      This tells Mocha to look for test files in the tests/ directory and run them.

      Run the Tests

      In your terminal, from the root of your project, run:

      npm test

      This will execute test specs and display results in the terminal. 

      You should see output indicating whether the test passed or failed, for example:

        /authenticate
          ✓ should succeed with valid credentials (150ms)
      
        1 passing (151ms)

      Add a Reporting Tool

      By default, PactumJS uses Mocha’s basic CLI output. For richer reporting—especially useful in CI/CD pipelines—you can use Mochawesome, a popular HTML and JSON reporter for Mocha.

      Install Mochawesome

      Install Mochawesome as a development dependency:

      npm install -D mochawesome

      Update Your Test Script

      Modify the scripts section in your package.json to include a command for generating reports:

      // package.json
      
      "scripts": {
        "test": "mocha tests"
        "test:report": "mocha tests --reporter mochawesome"
      }

      This script tells Mocha to run your tests using the Mochawesome reporter.

      Run the tests with reporting

      Execute your tests using the new script:

      npm run test:report

      This generates a mocha report in JSON and HTML format which you can review locally or attach in CI pipelines.

        /authenticate
          ✔ should succeed with valid credentials (364ms)
      
      
        1 passing (366ms)
      
      [mochawesome] Report JSON saved to ./pactum_test/mochawesome-report/mochawesome.json  [mochawesome] Report HTML saved to ./pactum_test/mochawesome-report/mochawesome.html

      View the report

      Open the HTML report in your browser to visually inspect test results:

      Configure Base Test Setup (base.js)

      Create a Shared Configuration

      Create a base.js file in the setup/ directory. This file is a shared configuration used to define reusable logic like setting the base URL, request headers, or global hooks (beforeEach, afterEach). 

      // setup/base.js
      
      import pactum from 'pactum';
      import dotenv from 'dotenv';
      dotenv.config();
      
      const { request } = pactum;
      
      before(() => {
        request.setBaseUrl(process.env.BASE_URL);
      });

      Load the Setup Automatically Using –file

      To ensure this configuration runs before any tests, register the setup file using Mocha’s –file option. This guarantees Mocha will execute base.js within its context, making all Mocha globals (like before) available.

      Example package.json script:

      "scripts": {
        "test": "mocha tests --file setup/base.js"
      }

      With this in place, run:

      npm test
      👉 Tip: Simplify and DRY Up Your Test Scripts

      To avoid repeating the full Mocha command in multiple scripts, define a single base script (e.g., test) that includes your common options. Then, reuse it for other variants by passing additional flags:

      "scripts": {
        "test": "mocha tests --file setup/base.js",
        "test:report": "npm run test -- --reporter mochawesome"
      }

      This approach keeps your scripts concise and easier to maintain by centralizing the core test command. It also allows you to easily extend or customize test runs with additional options without duplicating configuration. Overall, it reduces the chance of errors and inconsistencies when updating your test scripts.

      Conclusion

      By structuring your PactumJS repository with clear separation of tests, helpers, and setup files—and by leveraging environment variables, global setup, and reporting—you build a scalable and maintainable API testing framework. This approach supports growth, team collaboration, and integration with CI/CD pipelines.

    6. What makes PactumJS awesome? A quick look at its best features.

      What makes PactumJS awesome? A quick look at its best features.

      1. Introduction
        1. Fluent and expressive syntax
        2. Data Management
          1. Data Templates
          2. Data Store for Dynamic Values
        3. Built-In Schema Validation
        4. Flexible Assertions
        5. Default Configuration 
      2. Conclusion
      3. Resources

      Introduction

      I’ve spent a fair bit of time writing API test automation. After exploring a few JavaScript-based tools and libraries, I’ve found Pactum to be particularly powerful. I wanted to take a moment to share a brief overview of my experience and why I think it stands out.

      If you’re setting up a PactumJS project from scratch, I recommend starting with the official Quick Start guide, which covers installation and basic setup clearly. Additionally, this article by Marie Cruz offers a great walkthrough of writing API tests with PactumJS and Jest, especially useful for beginners.

      Fluent and expressive syntax

      One of the aspects I appreciate the most is how naturally you can chain descriptive methods from the spec object to build complex requests with support for headers, body payloads, query parameters, and more.

      Example: 

      it('POST with existing username and valid password', async () => {
              await spec()
                  .post('/auth/login')             .inspect()
                  .withHeaders('Content-Type', 'application/json')
                  .withJson({
                      '@DATA:TEMPLATE@': 'ExistingUser'
                  })
                  .expectStatus(200) # assertion
                  .expectJsonSchema(authenticationSchema) # assertion
          })
      

      More on request making: https://github.com/pactumjs/pactum/wiki/API-Testing#request-making 

      Data Management

      Data Management is a critical aspect of test automation and often one of the more challenging pain points in any automation project. Test suites frequently reuse similar request payloads, making it difficult to maintain and organize these payloads when they are scattered across different test files or folders. Without a structured approach, this can lead to duplication, inconsistency, and increased maintenance overhead. So, it is important to have an intuitive way to handle data in the test framework. 

      In PactumJS, data management is typically handled using data templates and data stores. These help you define reusable request bodies, dynamic data, or test user information in a clean and maintainable way.

      Data Templates

      Data Templates help you define reusable request bodies and user credentials. Templates can also be locally customized within individual tests without affecting the original definition.

      For example, in testing different authentication scenarios:

      1. Valid credentials
      2. Invalid password
      3. Non-existing user

      Rather than hard-coding values in each test, as it is done below: 

      describe('/authenticate', () => {
          it('POST with existing username and valid password', async () => {
              await spec()
                  .post('/auth/login')
                  .inspect()
                  .withHeaders('Content-Type', 'application/json')
                  .withJson({
                      username: process.env.USERNAME,
                      password: process.env.PASSWORD,
                  })
                  .expectStatus(200)
                  .expectJsonSchema(authenticationSchema)
          })
      
          it('POST with existing username and invalid password', async () => {
              await spec()
                  .post('/auth/login')
                  .inspect()
                  .withHeaders('Content-Type', 'application/json')
                  .withJson({
                      username: process.env.USERNAME,
                      password: faker.internet.password(),
                  })
                  .expectStatus(401)
                  .expectJsonMatch('error', 'Invalid credentials')
          })
      
          it('POST with non-existing username and password', async () => {
              await spec()
                  .post('/auth/login')
                  .inspect()
                  .withHeaders('Content-Type', 'application/json')
                  .withJson({
                      username: faker.internet.username(),
                      password: faker.internet.password(),
                  })
                  .expectStatus(401)
                  .expectJsonMatch('error', 'Invalid credentials')
          })
      })

      define reusable templates:

      // auth.js
      
      export function registerAuthTemplates() {
        stash.addDataTemplate({
          ExistingUser: {
              username: process.env.USERNAME,
              password: process.env.PASSWORD,
          },
          NonExistingUser: {
              username: faker.internet.username(),
              password: faker.internet.password(),
          }
      });
      }

      Then load them in global setup:

      // registerDataTemplates.js
      
      import { registerAuthTemplates } from "./auth.js";
      
      export function registerAllDataTemplates() {
          registerAuthTemplates();
        }

      Now, tests become cleaner and easier to maintain:

       it('POST with non-existing username and password', async () => {
              await spec()
                  .post('/auth/login')
                  .inspect()
                  .withHeaders('Content-Type', 'application/json')
                  .withJson({
                      '@DATA:TEMPLATE@': 'NonExistingUser'
                  })
                  .expectStatus(401)
                  .expectJsonMatch('error', 'Invalid credentials')
          })

      Want to override part of a template? 

      Use @OVERRIDES@:

       it('POST with existing username and invalid password', async () => {
              await spec()
                  .post('/auth/login')
                  .inspect()
                  .withHeaders('Content-Type', 'application/json')
                  .withJson({
                      '@DATA:TEMPLATE@': 'ExistingUser',
                      '@OVERRIDES@': {
                          'password': faker.internet.password()
                        }
                  })
                  .expectStatus(401)
                  .expectJsonMatch('error', 'Invalid credentials')
          })

      This approach improves consistency and reduces duplication. When credential details change, updates can be made centrally in the datafactory without touching individual tests. As a result, test logic remains clean, focused on validating behaviour rather than being cluttered with data setup.

      More information on data templates: https://pactumjs.github.io/guides/data-management.html#data-template 

      Data Store for Dynamic Values

      In integration and e2e API testing, one common challenge is managing dynamic data between requests. For example, you might need to extract an authentication token from an authentication response and use it in the header of subsequent requests. Without a clean way to store and reuse this data, tests can become messy, brittle, and hard to maintain.

      PactumJS provides a data store feature that allows you to save custom response data during test execution in a clean way.

      Example:

      Suppose you want to send a POST request to create a room, but the endpoint requires authentication. First, you make an authentication request and receive a token in the response. Using data store functionality, you can capture and store this token, then inject it into the headers of the room creation request. 

      describe('POST Create a New Room', () => {
      
          beforeEach(async () => {
              await spec()
                  .post('/auth/login')
                  .withHeaders('Content-Type', 'application/json')
                  .withJson({
                      '@DATA:TEMPLATE@': 'ExistingUser'
                  }).stores('token', 'token')
          });
      
      
          it('POST: Create a New Room', async () => {
              await spec()
                  .post('/room')
                  .inspect()
                  .withHeaders('Content-Type', 'application/json')
                  .withHeaders('Cookie', 'token=$S{token}')
                  .withJson({ '@DATA:TEMPLATE@': 'RandomRoom' })
                  .expectStatus(200)
                  .expectBody({
                      "success": true
                  })
      
      })

      Data store functionality also supports json-query libraries. It enables you to extract and store specific values from complex JSON responses. This is particularly helpful when dealing with nested structures, where you only need to capture a portion of the response—such as an ID, token, or status—from a larger payload.

      Example:

      await spec()
                  .get('/room')
                  .inspect()
                  .withHeaders('Content-Type', 'application/json')
                  .expectStatus(200)
                  .stores('roomId', `rooms[roomName=${roomName}].roomid`);
      
              await spec()
                  .get(`/room/$S{roomId}`)
                  .inspect()
                  .withHeaders('Content-Type', 'application/json')
                  .expectStatus(200)
                  .expectJson('roomName', roomName);
          })

      More on data store: https://pactumjs.github.io/guides/data-management.html#data-store 

      Built-In Schema Validation

      Unlike other setups that require integrating libraries like zod, ajv, or custom helper functions, PactumJS allows you to validate JSON responses using the expectJsonSchema method. All you need to do is define the expected schema and apply it directly in your test, no extra configuration needed.

      For example, in an authentication test case, the response schema is defined in a separate data factory:

      export const authenticationSchema = {
          "type": "object",
          "properties": {
              "token": {
                  "type": "string"
              }
          },
          "additionalProperties": false,
          "required": ["token"]
      }

      You can then validate the structure of the response like this:

      it('POST with existing username and valid password', async () => {
              await spec()
                  .post('/auth/login')
                  .inspect()
                  .withHeaders('Content-Type', 'application/json')
                  .withJson({
                      '@DATA:TEMPLATE@': 'ExistingUser'
                  })
                  .expectStatus(200)
                  .expectJsonSchema(authenticationSchema)
          })

      Flexible Assertions

      Most REST API responses return data in JSON format that must be validated. Fortunately, PactumJS provides a powerful and expressive assertion system that goes far beyond basic status code checks. Its assertion system allows for 

      1. Deep JSON matching:
      await spec()
          .get(`/room/$S{roomId}`)
          .inspect()
          .expectStatus(200)
          .expectJson('roomName', roomName);
      })
      it('POST with non-existing username and password', async () => {
           await spec()
              .post('/auth/login')
              .inspect()
              .withJson({
                  '@DATA:TEMPLATE@': 'NonExistingUser'
              })
              .expectStatus(401)
              .expectJsonMatch('error', 'Invalid credentials')
          })
      1. Partial comparisons:
      it('posts should have a item with title -"some title"', async () => {
        const response = await pactum.spec()
          .get('https://jsonplaceholder.typicode.com/posts')
          .expectStatus(200)
          .expectJsonLike([
            {
              "userId": /\d+/,
              "title": "some title"
            }
          ]);
      });
      1. Path-Based Validation:
      it('get people', async () => {
        const response = await pactum.spec()
          .get('https://some-api/people')
          .expectStatus(200)
          .expectJson({
            people: [
              { name: 'Matt', country: 'NZ' },
              { name: 'Pete', country: 'AU' },
              { name: 'Mike', country: 'NZ' }
            ]
          })
          .expectJsonAt('people[country=NZ].name', 'Matt')
          .expectJsonAt('people[*].name', ['Matt', 'Pete', 'Mike']);
      });
      1. Dynamic Runtime Expressions:
      it('get users', async () => {
        await pactum.spec()
          .get('/api/users')
          .expectJsonLike('$V.length === 10'); // api should return an array with length 10
          .expectJsonLike([
            {
              id: 'typeof $V === "string"',
              name: 'jon',
              age: '$V > 30' // age should be greater than 30
            }
          ]);
      });

      And all of them are in a clean and readable format. 

      For example, you can validate only parts of a response, use regex or custom matchers, and even plug in JavaScript expressions or reusable assertion handlers. In my opinion, this level of granularity is a game-changer compared to assertion styles in other frameworks.

      Check more in the official documentation: https://github.com/pactumjs/pactum/wiki/API-Testing#response-validation 

      Default Configuration 

      To reduce repetition and keep tests clean, PactumJS allows you to define default values that apply globally across your test suite — such as headers, base URL, and request timeouts. This helps maintain consistency and simplifies test configuration.

      Here’s how it can be implemented:

      before(() => {
        request.setBaseUrl(process.env.BASE_URL);
        request.setDefaultHeaders('Content-Type', 'application/json');
      });

      More information you can find here: https://github.com/pactumjs/pactum/wiki/API-Testing#request-settings 

      Conclusion

      In my experience, PactumJS has proven to be a well-designed and developer-friendly tool for API test automation. Its fluent syntax, robust data handling, and built-in features like schema validation and dynamic stores eliminate the need for developing third-party solutions for the test framework.

      If you’re working with API testing in JavaScript / Typescript, PactumJS is definitely worth a look.

      Resources

      1. You can find the complete set of test cases, data templates, and helper functions shown in this post in the GitHub Repo. 
      2. Official PactumJS Documentation: https://pactumjs.github.io/ 
      3. PactumJS WiKi Page: https://github.com/pactumjs/pactum/wiki/API-Testing 
      4. Code Examples in PactumJS GitHub: https://github.com/pactumjs/pactum-examples 
    7. Automating Contract Testing in a CI/CD Pipeline with GitHub Actions

      Automating Contract Testing in a CI/CD Pipeline with GitHub Actions

      Using a Pact Broker to Manage Contracts Across Microservices

      In the previous article, I raised an important question: What if the provider and consumer microservices do not share the same repository but still need access to the contract from a third-party source? The solution to this challenge is the Pact Broker.

      In this article, we will explore how the Pact Broker works and how to implement pipeline using GitHub Actions.

      When Do You Need a Pact Broker?

      A Pact Broker is essential in scenarios where:

      • The provider and consumer microservices are in separate repositories but must share the same contract.
      • You need to manage contracts across different branches and environments.
      • Coordinating releases between multiple teams is required.

      Options for Setting Up a Pact Broker

      There are multiple ways to set up a Pact Broker:

      1. Own Contract Storage Solution – Implement your own contract-sharing mechanism.
      2. Hosted Pact Broker (PactFlow) – A cloud-based solution provided by SmartBear.
      3. Self-Hosted Open-Source Pact Broker – Deploy and manage the Pact Broker on your infrastructure.

      As a starting point, PactFlow is a great solution due to its ease of use.

      Publishing Contracts to the Pact Broker

      For demonstration purposes, we will use the free version of PactFlow. Follow these steps to publish contracts:

      1. Sign Up for PactFlow

      Visit PactFlow and create a free account.

      2. Retrieve Required Credentials

      • Broker URL: Copy the URL from the address bar (e.g., https://custom.pactflow.io/).
      • Broker API Token: Navigate to Settings → API Tokens and copy the read/write token for CI/CD pipeline authentication.

      3. Setting Up a CI/CD Pipeline with GitHub Actions

      Setting up CI/CD pipeline using GitHub Actions.

      We will configure GitHub Actions to trigger on a push or merge to the main branch. The workflow consists of the steps displayed on the diagram.

      To set up GitHub Actions, create a .yml file in the .github/workflows directory. In this example, we’ll use contract-test-sample.yml:

      name: Run contract tests
      
      on: push
      
      env:
        PACT_BROKER_BASE_URL: ${{ secrets.PACT_BROKER_BASE_URL }}
        PACT_BROKER_TOKEN: ${{ secrets.PACT_BROKER_TOKEN }}
      
      jobs:
        contract-test:
          runs-on: ubuntu-latest
          steps:
            - uses: actions/checkout@v4
            - uses: actions/setup-node@v4
              with:
                node-version: 18
            - name: Install dependencies
              run: npm install
            - name: Run web consumer contract tests
              run: npm run test:consumer
            - name: Publish contract to PactFlow
              run: npm run publish:pact
            - name: Run provider contract tests
              run: npm run test:provider

      Before running the workflow, store the required secrets in your GitHub repository:

      1. Navigate to Repository → Settings → Secrets and Variables.
      2. Create two secrets:
        • PACT_BROKER_BASE_URL
        • PACT_BROKER_TOKEN

      Save, commit, and push your changes to the remote repository.

      Navigate to the Actions tab in GitHub to verify if the pipeline runs successfully.

      You should see all the steps running successfully like on the screenshot below:

      7. Verifying the Contract in PactFlow

      Once the pipeline runs successfully:

      • Navigate to PactFlow.
      • Verify if the contract has been published.
      • You should see two microservices and the contract established between them.
      Two microservices – Library Consumer and Library Provider
      Pact between two microservices, which is published and stored in PactFlow

      Configuring Contract Versioning

      If there are changes in the contract (e.g., if a new version of a consumer or provider is released), versioning should evolve too. Automating this process is crucial.

      A recommended approach is using GitHub Commit ID (SHA), ensuring that contract versions are traceable to relevant code changes.

      1. Define the Versioning Variable

      In the contract-test-sample.yml file, introduce a new environment variable GITHUB_SHA:

      GITHUB_SHA: ${{ github.sha }}

      2. Update the Pact Publish Script

      Modify the pact:publish script to use the automatically generated version:

      "publish:pact": "pact-broker publish ./pacts --consumer-app-version=$GITHUB_SHA --tag=main --broker-base-url=$PACT_BROKER_BASE_URL --broker-token=$PACT_BROKER_TOKEN"

      3. Update provider options with providerVersion value:

      const opts = {
                  provider: "LibraryProvider",
                  providerBaseUrl: "http://localhost:3000",
                  pactBrokerToken: process.env.PACT_BROKER_TOKEN,
                  providerVersion: process.env.GITHUB_SHA,
                  publishVerificationResult: true,
                  stateHandlers: {
                      "A book with ID 1 exists": () => {
                          return Promise.resolve("Book with ID 1 exists")
                      },
                  },
              }

      Configuring Branches for Contract Management

      If multiple people are working on the product in different branches, it is crucial to assign contracts to specific branches to ensure accurate verification.

      1. Define the Branching Variable

      Add GITHUB_BRANCH to the .yml file:

      GITHUB_BRANCH: ${{ github.ref_name }}

      2. Update the Pact Publish Script for Branching

      Modify pact:publish to associate contracts with specific branches:

      "publish:pact": "pact-broker publish ./pacts --consumer-app-version=$GITHUB_SHA --branch=$GITHUB_BRANCH --broker-base-url=$PACT_BROKER_BASE_URL --broker-token=$PACT_BROKER_TOKEN"

      3. Update provider options with providerVersionBranch value:

      const opts = {
                  provider: "LibraryProvider",
                  providerBaseUrl: "http://localhost:3000",
                  pactBrokerToken: process.env.PACT_BROKER_TOKEN,
                  providerVersion: process.env.GITHUB_SHA,
                  providerVersionBranch: process.env.GITHUB_BRANCH,
                  publishVerificationResult: true,
                  stateHandlers: {
                      "A book with ID 1 exists": () => {
                          return Promise.resolve("Book with ID 1 exists")
                      },
                  },
              }

      Using the can-i-deploy tool

      The can-i-deploy tool is a Pact feature that queries the matrix table to verify if a contract version is safe to deploy. This ensures that new changes are successfully verified against the currently deployed versions in the environment.

      Running can-i-deploy for consumer:

      pact-broker can-i-deploy --pacticipant LibraryConsumer --version=$GITHUB_SHA

      Running can-i-deploy for provider:

      pact-broker can-i-deploy --pacticipant LibraryProvider --version=$GITHUB_SHA

      If successful, it confirms that the contract is verified and ready for deployment.

      To reuse these commands, we will create scripts for verification in package.json file:

      "can:i:deploy:consumer": "pact-broker can-i-deploy --pacticipant LibraryConsumer --version=$GITHUB_SHA"
      
      "can:i:deploy:provider": "pact-broker can-i-deploy --pacticipant LibraryProvider --version=$GITHUB_SHA"

      And then update GitHub Actions pipeline:

      name: Run contract tests
      
      on: push
      
      env:
        PACT_BROKER_BASE_URL: ${{ secrets.PACT_BROKER_BASE_URL }}
        PACT_BROKER_TOKEN: ${{ secrets.PACT_BROKER_TOKEN }}
        GITHUB_SHA: ${{ github.sha }}
        GITHUB_BRANCH: ${{ github.ref_name }}
      
      jobs:
        contract-test:
          runs-on: ubuntu-latest
          steps:
            - uses: actions/checkout@v4
            - uses: actions/setup-node@v4
              with:
                node-version: 18
            - name: Install dependencies
              run: npm i
            - name: Run web consumer contract tests
              run: npm run test:consumer
            - name: Publish contract to Pactflow
              run: npm run publish:pact
            - name: Run provider contract tests
              run: npm run test:provider
            - name: Can I deploy consumer?
              run: npm run can:i:deploy:consumer
            - name: Can I deploy provider?
              run: npm run can:i:deploy:provider

      Add changes, commit and push. Navigate to the Actions tab in GitHub to verify if the pipeline runs successfully.

      You should see all the steps running successfully like on the screenshot below:

      GitHub Actions pipeline contains extra steps, which verify if a contract version is safe to deploy

      Conclusion

      The Pact Broker is important for managing contracts across microservices, ensuring smooth collaboration between independent services. By automating contract versioning, branch-based contract management, and deployment workflows using GitHub Actions, teams can can reduce deployment risks, improve service reliability, and speed-up release cycles.

      For a complete implementation, refer to the final version of the code in the repository.