Utilize faker Library to Compile Dynamic Test Data
Introduction
In Part 1, we explored how to make API tests more maintainable by introducing data templates for the /auth/login endpoint. We saw how to use @DATA:TEMPLATE, @OVERRIDES, and @REMOVES can simplify test logic and reduce duplication.
Now, in Part 2, we’ll apply the same approach to another key endpoint: POST /room – Create a new room
This endpoint typically requires structured input like room names, types, and status — perfect candidates for reusable templates. We’ll define a set of room templates using Faker for dynamic test data, register them alongside our auth templates, and write test cases that validate room creation.
Let’s dive into how data templates can help us test POST /room more effectively, with minimal boilerplate and maximum clarity.
Exploring the API Endpoint
Step 1: Inspecting the API with DevTools
Before automating, it’s helpful to understand the structure of the request and response. Visit https://automationintesting.online and follow the steps shown in the GIF below, or use the guide here:
Open DevTools: Press F12 or right-click anywhere on the page and select Inspect to open DevTools.
Navigate to the Network Tab. Go to the Network tab to monitor API requests.
Trigger the API Call: On the website, fill in the room creation form and submit it. Watch for a request to the /room endpoint using the POST method.
Inspect the API Details.
Once you click the POST rooms request, you will see the following details:
URL and method details.
Headers tab: Shows request URL and method
Payload tab: Shows the room data you sent (like number, type, price, etc.)
Response tab: Shows the response from the server (confirmation or error)
Example payload from this API request:
{
  "roomName":"111",
  "type":"Single",
  "accessible":false,
  "description":"Please enter a description for this room",
  "image":"https://www.mwtestconsultancy.co.uk/img/room1.jpg",
  "roomPrice":"200",
  "features":[
      "WiFi",
      "TV",
      "Radio"
  ]
}
Field Breakdown:
roomName: A string representing an identifier for the room (e.g., “111”).
type: Room type; must be one of the following values: “Single”, “Double”, “Twin”, “Family”, “Suite”.
accessible: A boolean (true or false) indicating whether the room is wheelchair accessible.
description: A text description of the room.
image: A URL to an image representing the room.
roomPrice: A string representing the price of the room.
features: An array of one or more of the following feature options: “WiFi“, “Refreshments“, “TV“, “Safe“, “Radio“, “Views“.
⚠️ Note: This breakdown is based on personal interpretation of the API structure and response; it is not taken from an official specification.
In order to generate payload for the room, we will use faker library. This library allows you to generate realistic test data such as names, prices, booleans, or even images on the fly. This helps reduce reliance on hardcoded values and ensures that each test run simulates real-world API usage.
Step 2: Installing the faker Library
To add the faker library to your project, run:
npm install @faker-js/faker
Step 3: Registering a Dynamic Room Template
Use faker to generate dynamic values for each room field:
As discussed in the previous article, PactumJS is an excellent choice for API automation testing.
As your API testing suite grows, maintaining a clean and organized repository structure becomes essential. We’ll explore a folder structure for your PactumJS-based testing framework, provide tips and tricks for configuration and scripting, and walk through executing tests with reporting.
To follow along, make sure you have the following:
Node.js v10 or above
Basic understanding of JavaScript or TypeScript
Node.js modules
Testing frameworks like Mocha
If you’re new to any of the above, it’s worth reviewing basic tutorials, for example, on Automation University: on Node.js and test runners like Mocha.
Install Dependencies
Start by creating a fresh Node.js project:
mkdir api_testing_with_pactumjs
cd api_testing_with_pactumjs
npm init -y
Then install necessary packages via NPM:
# install pactum
npm install -D pactum

# install a test runner
npm install -D mocha
tests/ folder contains your test specifications organized by feature or endpoint, such as auth.spec.ts. This keeps tests modular and easy to locate.
helpers/ folder houses centralized reusable logic and utilities. This separation keeps test files focused on what they test rather than how, improving readability and maintainability.
setup/ folder contains global setup files like base.js to configure common test environment settings, such as base URLs and global hooks.
.env.example — A sample environment configuration file listing required environment variables, serving as a reference and template for developers.
.env (not shown in repo) is used locally to store sensitive configuration and secrets, enabling easy environment switching without code changes.
.gitignore file includes folders and files like .env to prevent committing sensitive data to version control.
package.json is a central place for managing project dependencies (like pactum, dotenv, mocha) and defining test scripts (e.g., npm run test, npm run test:report). This facilitates CI/CD integration and consistent test execution.
While this test currently focuses on verifying the status code, future articles will enhance it by adding validations for the authentication token returned in the response.
Manage Environment Variables
Create .env file
To keep sensitive data like URLs and credentials, create a .env.example file as a reference for required environment variables:
BASE_URL=""
USERNAME=""
PASSWORD=""
👉 Tip: Don’t commit your actual .env to version control
Use .env.example to document the required variables.
Add .env to your .gitignore file to keep credentials secure.
Share .env.example with your team so they can configure their environments consistently.
Load Environment Variables in Tests
Install dotenv and configure it in your test files or setup scripts:
Once your test files are set up and your .env file is configured with valid credentials and base URL, you’re ready to execute your test cases.
PactumJS works seamlessly with test runners like Mocha, which means running your tests is as simple as triggering a test command defined in your package.json. Here’s how to proceed:
Add a Test Script
In your package.json, add a script under “scripts” to define how to run your tests. For example:
This tells Mocha to look for test files in the tests/ directory and run them.
Run the Tests
In your terminal, from the root of your project, run:
npm test
This will execute test specs and display results in the terminal.
You should see output indicating whether the test passed or failed, for example:
  /authenticate
    ✓ should succeed with valid credentials (150ms)

  1 passing (151ms)
Add a Reporting Tool
By default, PactumJS uses Mocha’s basic CLI output. For richer reporting—especially useful in CI/CD pipelines—you can use Mochawesome, a popular HTML and JSON reporter for Mocha.
Install Mochawesome
Install Mochawesome as a development dependency:
npm install -D mochawesome
Update Your Test Script
Modify the scripts section in your package.json to include a command for generating reports:
This script tells Mocha to run your tests using the Mochawesome reporter.
Run the tests with reporting
Execute your tests using the new script:
npm run test:report
This generates a mocha report in JSON and HTML format which you can review locally or attach in CI pipelines.
  /authenticate
    ✔ should succeed with valid credentials (364ms)


  1 passing (366ms)

[mochawesome] Report JSON saved to ./pactum_test/mochawesome-report/mochawesome.json  [mochawesome] Report HTML saved to ./pactum_test/mochawesome-report/mochawesome.html
View the report
Open the HTML report in your browser to visually inspect test results:
Configure Base Test Setup (base.js)
Create a Shared Configuration
Create a base.js file in the setup/ directory. This file is a shared configuration used to define reusable logic like setting the base URL, request headers, or global hooks (beforeEach, afterEach).
To ensure this configuration runs before any tests, register the setup file using Mocha’s –file option. This guarantees Mocha will execute base.js within its context, making all Mocha globals (like before) available.
To avoid repeating the full Mocha command in multiple scripts, define a single base script (e.g., test) that includes your common options. Then, reuse it for other variants by passing additional flags:
"scripts": {
  "test": "mocha tests --file setup/base.js",
  "test:report": "npm run test -- --reporter mochawesome"
}
This approach keeps your scripts concise and easier to maintain by centralizing the core test command. It also allows you to easily extend or customize test runs with additional options without duplicating configuration. Overall, it reduces the chance of errors and inconsistencies when updating your test scripts.
Conclusion
By structuring your PactumJS repository with clear separation of tests, helpers, and setup files—and by leveraging environment variables, global setup, and reporting—you build a scalable and maintainable API testing framework. This approach supports growth, team collaboration, and integration with CI/CD pipelines.
I’ve spent a fair bit of time writing API test automation. After exploring a few JavaScript-based tools and libraries, I’ve found Pactum to be particularly powerful. I wanted to take a moment to share a brief overview of my experience and why I think it stands out.
If you’re setting up a PactumJS project from scratch, I recommend starting with the official Quick Start guide, which covers installation and basic setup clearly. Additionally, this article by Marie Cruz offers a great walkthrough of writing API tests with PactumJS and Jest, especially useful for beginners.
Fluent and expressive syntax
One of the aspects I appreciate the most is how naturally you can chain descriptive methods from the spec object to build complex requests with support for headers, body payloads, query parameters, and more.
Data Management is a critical aspect of test automation and often one of the more challenging pain points in any automation project. Test suites frequently reuse similar request payloads, making it difficult to maintain and organize these payloads when they are scattered across different test files or folders. Without a structured approach, this can lead to duplication, inconsistency, and increased maintenance overhead. So, it is important to have an intuitive way to handle data in the test framework.
In PactumJS, data management is typically handled using data templates and data stores. These help you define reusable request bodies, dynamic data, or test user information in a clean and maintainable way.
Data Templates
Data Templates help you define reusable request bodies and user credentials. Templates can also be locally customized within individual tests without affecting the original definition.
For example, in testing different authentication scenarios:
Valid credentials
Invalid password
Non-existing user
Rather than hard-coding values in each test, as it is done below:
This approach improves consistency and reduces duplication. When credential details change, updates can be made centrally in the datafactory without touching individual tests. As a result, test logic remains clean, focused on validating behaviour rather than being cluttered with data setup.
In integration and e2e API testing, one common challenge is managing dynamic data between requests. For example, you might need to extract an authentication token from an authentication response and use it in the header of subsequent requests. Without a clean way to store and reuse this data, tests can become messy, brittle, and hard to maintain.
PactumJS provides a data store feature that allows you to save custom response data during test execution in a clean way.
Example:
Suppose you want to send a POST request to create a room, but the endpoint requires authentication. First, you make an authentication request and receive a token in the response. Using data store functionality, you can capture and store this token, then inject it into the headers of the room creation request.
Data store functionality also supports json-query libraries. It enables you to extract and store specific values from complex JSON responses. This is particularly helpful when dealing with nested structures, where you only need to capture a portion of the response—such as an ID, token, or status—from a larger payload.
Unlike other setups that require integrating libraries like zod, ajv, or custom helper functions, PactumJS allows you to validate JSON responses using the expectJsonSchema method. All you need to do is define the expected schema and apply it directly in your test, no extra configuration needed.
For example, in an authentication test case, the response schema is defined in a separate data factory:
Most REST API responses return data in JSON format that must be validated. Fortunately, PactumJS provides a powerful and expressive assertion system that goes far beyond basic status code checks. Its assertion system allows for
it('get users', async () => {
  await pactum.spec()
    .get('/api/users')
    .expectJsonLike('$V.length === 10'); // api should return an array with length 10
    .expectJsonLike([
      {
        id: 'typeof $V === "string"',
        name: 'jon',
        age: '$V > 30' // age should be greater than 30
      }
    ]);
});
And all of them are in a clean and readable format.
For example, you can validate only parts of a response, use regex or custom matchers, and even plug in JavaScript expressions or reusable assertion handlers. In my opinion, this level of granularity is a game-changer compared to assertion styles in other frameworks.
To reduce repetition and keep tests clean, PactumJS allows you to define default values that apply globally across your test suite — such as headers, base URL, and request timeouts. This helps maintain consistency and simplifies test configuration.
In my experience, PactumJS has proven to be a well-designed and developer-friendly tool for API test automation. Its fluent syntax, robust data handling, and built-in features like schema validation and dynamic stores eliminate the need for developing third-party solutions for the test framework.
If you’re working with API testing in JavaScript / Typescript, PactumJS is definitely worth a look.
Resources
You can find the complete set of test cases, data templates, and helper functions shown in this post in the GitHub Repo.
In the previous article consumer-driven contract testing has been introduced. And at this point, I am sure you can’t wait to start actual implementation. So let’s not delay any further!
Let’s start with the implementation using Pact.
Based on official documentation, Pact is a code-first tool for testing HTTP and message integrations using contract tests.
As a system under test we are going to use consumer-provider applications written in JavaScript. You can find the source code in the GitHub Repository.
Consumer Tests
The focus of the consumer test is the way to check if the consumer’s expectations match what the provider does. These tests are not supposed to verify any functionality of the provider, instead focus solely on what the consumer requires and validate whether those expectations are met.
Loose Matchers
To avoid brittle and flaky tests, it is important to use loose matchers as a best practice. This makes contract tests more resilient to minor changes in the provider’s response. Generally, the exact value returned by the provider during verification is not critical, as long as the data types match (Pact documentation). However, an exception can be made when verifying a specific value in the response.
Pact provides several matchers that allow flexible contract testing by validating data types and structures instead of exact values. Key loose matchers can be found in the Pact documentation.
Example without loose matchers (strict matching):
describe("getBook", () => {
    test("returns a book when a valid book id is provided", async () => {

        await provider.addInteraction({
            states: [{ description: "A book with ID 1 exists" }],
            uponReceiving: "a request for book 1",
            withRequest: {
                method: "GET",
                path: "/books/1",
            },
            willRespondWith: {
                status: 200,
                headers: { "Content-Type": "application/json" },
                body: {
                    id: 1,
                    title: "To Kill a Mockingbird",
                    author: "Harper Lee",
                    isbn: "9780446310789"
                },
            },
        })

        await provider.executeTest(async (mockService) => {
            const client = new LibraryClient(mockService.url)
            const book = await client.getBook(1)
            expect(book).toEqual(expectedBook)
        })
    })
})
Problem: This test will fail if id, title, or author, isbn changes even slightly.
Example with loose matchers (flexible and maintainable):
Using Pact matchers, we allow the provider to return any valid values of the expected types:
describe("getBook", () => {
    test("returns a book when a valid book id is provided", async () => {
      const expectedBook = { id: 1, title: "To Kill a Mockingbird", author: "Harper Lee", isbn: "9780446310789" }

      await provider.addInteraction({
        states: [{ description: "A book with ID 1 exists" }],
        uponReceiving: "a request for book 1",
        withRequest: {
          method: "GET",
          path: "/books/1",
        },
        willRespondWith: {
          status: 200,
          headers: { "Content-Type": "application/json" },
          body: like(expectedBook),
        },
      })

      await provider.executeTest(async (mockService) => {
        const client = new LibraryClient(mockService.url)
        const book = await client.getBook(1)
        expect(book).toEqual(expectedBook)
      })
    })
  })
In this case the contract remains valid even if actual values change, validation focused only on ensuring that data types and formats are correct.
Steps to write consumer contract tests
Scenarios:
Validate that LibraryClient.getAllBooks() retrieves a list of books.
Validate that LibraryClient.getBook(id) correctly fetches a single book when given a valid ID.
To start with consumer, open consumer.js file. Inside you can find the LibraryClient class represents the consumer in a consumer-driven contract testing setup. It acts as a client that interacts with an external Library API (provider) to fetch and manage book data.
There are a few functions present:
getBook(id) – Fetches a single book by its id. Returns the data in JSON format.
getAllBooks() – Fetches all books from the API. Returns a list of books in JSON format.
addBook(title, author, isbn) – Sends a POST request to add a new book. Returns the newly created book’s details.
Writing the first consumer contract test:
Importing the required dependencies and Consumer Class.
The code above creates a Pact mock provider (provider) using PactV3 library where specifies:
LibraryConsumer as the name of the consumer (the client making requests).
LibraryProvider as the name of the provider (the API responding to requests).
Passing parameter dir to define directory for the contract to be stored.
Setting up the interaction of the consumer and mock provider and register consumer expectations.
const EXPECTED_BOOK = { id: 1, title: "To Kill a Mockingbird", author: "Harper Lee", isbn: "9780446310789" }

describe("getAllBooks", () => {
    test("returns all books", async () => {

        provider
            .uponReceiving("a request for all books")
            .withRequest({
                method: "GET",
                path: "/books",
            })
            .willRespondWith({
                status: 200,
                body: MatchersV3.eachLike(EXPECTED_BOOK),
            })

        await provider.executeTest(async (mockService) => {
            const client = new LibraryClient(mockService.url)
            const books = await client.getAllBooks()
            expect(books[0]).toEqual(EXPECTED_BOOK)
        })
    })
})

describe("getBook", () => {
    test("returns a book when a valid book id is provided", async () => {

        provider
            .given('A book with ID 1 exists')
            .uponReceiving("a request for book 1")
            .withRequest({
                method: "GET",
                path: "/books/1",
            })
            .willRespondWith({
                status: 200,
                body: MatchersV3.like(EXPECTED_BOOK),
            }),

        await provider.executeTest(async mockProvider => {
            const libraryClient = new LibraryClient(mockProvider.url)
            const book = await libraryClient.getBook(1);
            expect(book).toEqual(EXPECTED_BOOK);
        })
    })
})
First we define the expected book. This object represents a single book that we expect the API to return. It acts as a template for what a book response should look like.
provider.addInteraction({...}) sets up a mock interaction.
uponReceiving: Describes what the test expects.
withRequest: Defines the expected request details:
Method: GET
Endpoint: /books
willRespondWith: Defines the expected response:
Status Code: 200
Body: MatchersV3.eachLike(EXPECTED_BOOK)
eachLike(EXPECTED_BOOK): Ensures the response contains an array of objects that match the structure of EXPECTED_BOOK.
4. Calling the consumer against the mock provider:
        await provider.executeTest(async mockProvider => {
            const libraryClient = new LibraryClient(mockProvider.url)
            const book = await libraryClient.getBook(1);
            expect(book).toEqual(EXPECTED_BOOK);
        })
Now, you are ready to run the test! First, create a new script in our package.json file called test:consumer, which uses jest command followed by the test file you want to execute:
Save the changes and run tests by executing this command:
npm run test:consumer
If everything set up correctly you should get one test passing:
If the test passes, a contract is generated and saved in the pacts folder. If it fails, the contract cannot be created.
The content of the contract should include the information about the consumer, provider, interaction which have been set up, the request and response details expected from the provider, matching rules and any other relevant information.
The primary goal of provider contract tests is to verify the contract generated by the consumer. Pact provides a framework to retrieve this contract and replay all registered consumer interactions to ensure compliance. The test is run against the real service.
Provider States
Before writing provider tests, I’d like to introduce another useful concept: provider states.
Following best practices, interactions should be verified in isolation, making it crucial to maintain context independently for each test case. Provider states allow you to set up data on the provider by injecting it directly into the data source before the interaction runs. This ensures the provider generates a response that aligns with the consumer’s expectations.
The provider state name is defined in the given clause of an interaction on the consumer side. This name is then used to locate the corresponding setup code in the provider, ensuring the correct data is in place.
Example
Consider the test case: “A book with ID 1 exists.”
To ensure the necessary data exists, we define a provider state inside stateHandlers, specifying the name from the consumer’s given clause:
            stateHandlers: {
                "A book with ID 1 exists": () => {
                    return Promise.resolve("Book with ID 1 exists")
                },
            },
On the consumer side, the provider state is referenced in the given clause:
        provider
            .given('A book with ID 1 exists')
            .uponReceiving("a request for book 1")
            .withRequest({
                method: "GET",
                path: "/books/1",
            })
            .willRespondWith({
                status: 200,
                body: MatchersV3.like(EXPECTED_BOOK),
            }),
This setup ensures that before the interaction runs, the provider has the necessary data, allowing it to return the expected response to the consumer.
4. Writing the provider contract test. After setting up the provider verifier options, let’s write the actual provider contract test using Jest framework.
Before running tests, you have to create a new script in the package.json file called test:provider, which uses jest command followed by the test file you want to execute:
Save the changes and run tests by executing this command:
npm run test:provider
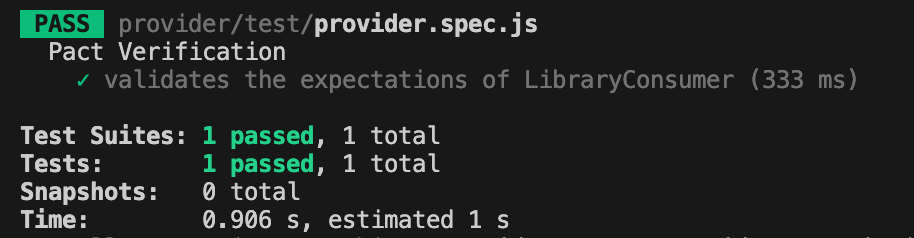
If everything set up correctly you should get one test passing:
Conclusion
Today, we explored a practical implementation of the consumer-driven contract testing approach. We created test cases for both the consumer and provider and stored the contract in the same repository.
But you might be wondering—what if the consumer’s and provider’s repositories are separate, unlike our case? Since these two microservices are independent, the contract needs to be accessible to both. So, where should it be stored?
Let’s to explore possible solution in the next part.
Recently, I’ve been involved in conducting code reviews for my team’s end-to-end test automation project, which utilizes Playwright technology. I dedicate about a couple of hours each day to this task, either by reviewing others’ code or by responding to feedback on my own pull requests.
I firmly believe that we as test automation engineers should approach test automation as any kind of software becausetest automation is software development. Software developers should have solid knowledge on tools and best practices like: coding and naming standards, configuration management, code review practices, modularization, abstraction, static analysis tools, SOLID and DRY principles, etc. A well-established code review process is one of the success points while working on the test automation projects. You might find a lot of best resources on how to conduct code review: code reviews best practices by Google, by GitLab and others. In this article, I would like to point out several aspects I pay attention to while reviewing test automation code in addition to standard guidelines.
Automate what can be automated!
Make your life easier 🙂 Automation can significantly simplify managing run-time errors, stylistic issues, formatting challenges, and more. Numerous tools are available to assist with this. For a Playwright project using TypeScript, I recommend installing and configure the following:
ESLint: This tool performs static analysis of your code to identify problems. ESLint integrates with most IDEs and can be implemented as part of your CI/CD pipeline.
Prettier: A code formatter that is helpful in enforcing a consistent format across your codebase.
Husky: Facilitates the easy implementation of Git hooks.
In this detailed guide by Butch Mayhew you can find all the information you need to install and configure these tools in your project.
Identify easy to spot issues first
First thing you have to look for is any preliminary checks required for the PR to be merged, like: merge conflicts, outdated branches, failed static analysis tools or formatter checks. Then you might briefly look for easy to spot poor coding practices and errors: naming convention, redundant debug lines (for example, console.log()), formatting, long or complex functions, unnecessary comments, typos and so on. Moreover, you might spot violation of agreed rules within the team, like test case id or description, etc.
Verify that each test should focus on a single aspect.
The general guideline is that tests should contain only one assertion, reflecting the primary objective of the test. For example, if you’re verifying that a button is correctly displayed and functional on the UI, the test should be limited to that specific check.
Here’s an example using Playwright for a TypeScript project:
Additionally, name the test to reflect its purpose, capturing the intent rather than the implementation details.
Separation of concerns
Separation of concerns is a fundamental design principle that we might need to stick to. When structuring code with functions and methods, it’s crucial to determine the appropriate scope for each. Ideally, a function should do one thing and one thing only. Following this approach, you will achieve a distinct and manageable codebase.
In UI testing, the most popular approach for maintaining separation of concerns is the Page Object Pattern. This pattern separates the code that interacts with the DOM from the code that contains the test steps and assertions.
Proper separation of concerns within tests also means placing setup and teardown steps in separate functions or methods or beforeEach or afterEach steps. This practice makes it easier to understand the core validation of the test without being distracted by the preparatory steps. Importantly, setup and teardown functions should avoid assertions; instead, they should throw exceptions if errors occur. This approach ensures that the primary focus of the test remains on its intended verification.
Is the locator / selector strategy solid?
A solid locator/selector strategy is crucial for ensuring that your tests are stable and maintainable. This means using selectors that are resilient to changes in the UI and are as specific as necessary to avoid false positives. It’s important to explore framework-specific best practices for locator or selector strategies. For example, Playwright best practices recommend using locators and user-facing attributes.
To make your test framework resilient to DOM changes, avoid relying on the DOM structure directly. Instead, use locators that are resistant to DOM modifications:
page.getByRole(‘button’, { name: ‘submit’ });
Different frameworks may have their own guidelines for building element locating strategies, so it’s beneficial to consult the tool-specific documentation for best practices.
Hard-coded values.
Hard-coded values might be dangerous to automation framework flexibility and maintainability in the future. There are a few questions you might ask while reviewing:
Can we use data models to verify data types at runtime? Consider implementing data models to validate data types during execution, ensuring robustness and reducing errors.
Should this variable be a shared constant? Evaluate if the value is used in multiple places and would benefit from being defined as a constant for easier maintenance.
Should we pass this parameter as an environment variable or external input? This approach can significantly improve configurability and adaptability.
Can we extract this value directly from the API interface? Investigate if the value can be dynamically retrieved from the API, reducing the need for hard-coding and improving reliability.
Is the code properly abstracted and structured?
As test automation code tends to grow rapidly, it is important to ensure that common code is properly abstracted and reusable by other tests. Data structures, page objects and API utilities should be separated and organized in the right way.
Code comments should not duplicate information the code can provide. Comments should provide context and rationale that the code alone cannot. Additionally, functions and classes should follow a self-explanatory naming convention, making their purpose clear without needing additional comments.
“Trust, but verify.”
Don’t rely on an automated test until you’ve seen it fail. If you can’t modify the test to produce a failure, it might not be testing what you intend. Additionally, be wary of unstable test cases that intermittently pass or fail. Such tests need to be improved, fixed, or removed altogether to ensure reliability.
I often engage with the code by asking clarifying questions. For example:
“How does this method work?”
“If this requirement changes, what else would need to be updated?”
“How could we make this more maintainable?”
Praise the good! Notice when people did something well and praise them for it. Positive feedback from peers is highly motivating.
Focus on the code, not the person. It’s important to frame discussions around the code itself rather than the person who wrote it. This helps reduce defensiveness and keeps the focus on improving the code quality.
Discuss detailed points in-person. Sometimes, a significant change is easier to discuss face-to-face rather than in written comments. If a discussion is becoming lengthy or complex, I’ll often suggest continuing it in person.
Explain your reasoning. When suggesting changes, it’s helpful to explain why you think the change is necessary and ask if there might be a better alternative. Providing context can prevent suggestions from seeming nit-picky.
Conclusion
This is not an exhaustive list of considerations for code reviews. For more guidance, I recommend checking out articles by Andrew Knight and Angie Jones. Their insights can provide additional strategies to enhance your code review process.
This is the first part of series about API Testing. I am going to start with general concepts, I will talk about fundamental concept of APIs, tracing their historical roots, exploring various types of protocols they employ, and understanding the essential components that constitute an API.
A Historical Perspective
Back in the 1950s, an API was understood as a potential method to facilitate communication between two computers. This term was first mentioned in a 1951 book written by Maurice Wilkes and David Wheeler called ‘The Preparation of Programs for an Electronic Digital Computer’. It outlined several key computing terms, including the first API. At this stage, an API was starting to exist, but they were limited to simple, command-line interfaces that enabled programmers to interact with computers.
The Preparation of Programs for an Electronic Digital Computer, Maurice Wilkes and David Wheeler
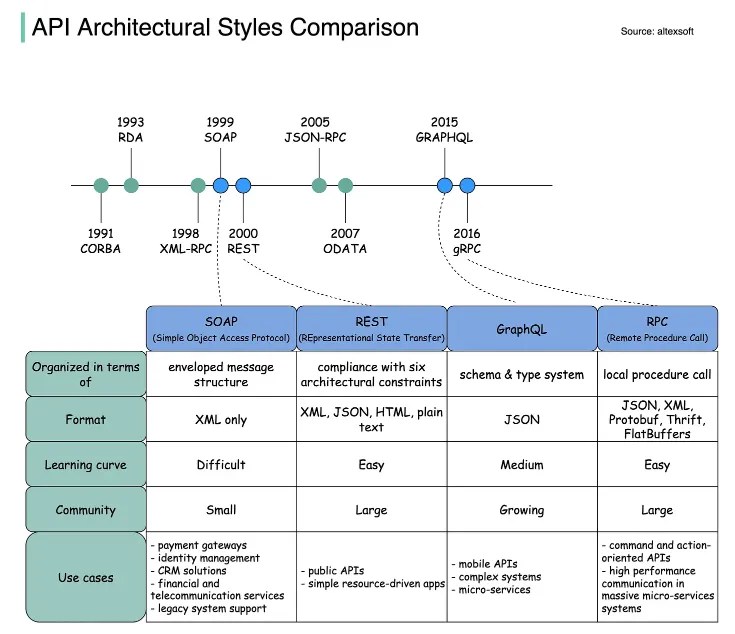
Throughout the time the internet has changed and evolved, applications and APIs evolved along with it. Many years ago APIs were built with strict rules to allow the two sides of the interface talking to each other. Over time, different API protocols have been released, each of them has its own pattern of standardizing data exchange.
SOAP is an XML-formatted, highly standardized web communication protocol. Released by Microsoft in the 1990s. XML data format drags behind a lot of formality. Paired with the massive message structure, it makes SOAP the most verbose API style.
In the early 2000s, the web started to shift towards a more consumer-based place. Some e-commerce sites, such as eBay and Amazon, started using APIs, which are more public and flexible. Twitter, Facebook and others joined them as well in using REST APIs. This API style was originally described in 2000 by Roy Fielding in his doctoral dissertation. REST is the Representational State Transfer Protocol. REST makes server-side data available representing it in simple formats, often JSON. It is the most commonly used protocol nowadays.
The internet continued to change, mobile applications were becoming popular. Companies faced challenges with the amount of data they wanted to transfer on mobile devices. So, Facebook created GraphQL. This query language helps to reduce the amount of data that gets transferred while introducing a slightly more rigid structure to the API.
4. gRPC was developed by Google for implementing distributed software systems that need to run fast on a massive scale. Initially, it was not standardized to be used as a generic framework as it was closely tied to Google’s internal infrastructure. In 2015 Google liberalized it as open source and standardized it for community use, under the name gRPC. During the first year of its launch, it was adopted by large companies such as Netflix, Docker or Cisco among others.
The working principle of API is commonly expressed through the request-response communication between a client and a server. In a web API, a client is on one side of the interface and sends requests, while a server (or servers) is on the other side of the interface and responds to the request.
Since the REST API is the most popular, we are going to talk about it in detail.
These are the general steps for any REST API call:
Client sends a request to the server. The client follows the API documentation to format the request in a way that the server understands.
The server authenticates the client and confirms that the client has the right to make that request.
The server receives the request and processes it internally.
The server returns a response to the client. The response contains information that tells the client whether the request was successful. The response also includes any information that the client requested.
1 — HTTP Methods
Request methods are the actions that the client wants to perform on the server resource. The most common methods are GET, POST, PUT, DELETE, others are: UPDATE, HEAD, CONNECT, OPTIONS, TRACE, PATCH.
GET: retrieves the information from the server
POST: used to add a new object to the server resource.
PUT: used to update the existing object on the server resource.
DELETE: used to delete the object on the server resource.
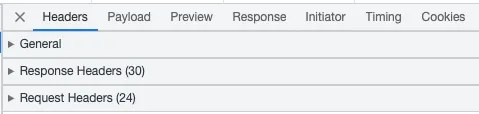
HTTP headers play a crucial role in how clients and servers send and receive data. They provide a structured way for these entities to communicate important metadata about the request or response. This metadata can contain various information like the type of data being sent, its length, how it’s compressed, and more.
Headers are logically grouped into three categories: request headers, response headers and general header. This can be seen in the network tab of the browser after sending the request.
Request headers are:
Authorization: request header can be used to provide credentials that authenticate a user agent with a server, allowing access to a protected resource.
Host: this is the domain name of the server
Accept-Language: request HTTP header indicates the natural language and locale that the client prefers.
Accept-Encoding: request HTTP header indicates the content encoding (usually a compression algorithm) that the client can understand.
Content-Type: this field tells the client the format of the data it’s receiving
Response headers:
Expires: this header contains the date/time after which the response is considered expired.
Content-Length: this field in the request or response header plays a crucial role in data transfer. It specifically indicates the size of the body of the request or response in bytes. This helps the receiver understand when the current message ends and potentially prepare for the next one, especially in cases where multiple HTTP messages are being sent over the same connection.
Content-Type: this field tells the client the format of the data it’s receiving
Cache-Control: HTTP header field holds directives (instructions) — in both requests and responses — that control caching in browsers and shared caches (e.g. Proxies, CDNs)
Date: HTTP header contains the date and time at which the message originated.
Keep-Alive: general header allows the sender to hint about how the connection may be used to set a timeout and a maximum amount of request
Request Body has a format to be followed, which is understood by the server resource or the service endpoint. Usually the response body is in JSON.
What is JSON?
JSON (JavaScript Object Notation) is an open-standard file format or data interchange format that uses human-readable text to transmit data objects.
A JSON object contains data in the form of a key/value pair. The keys are strings and the values are the JSON types. Keys and values are separated by a colon. Each entry (key/value pair) is separated by a comma. The { (curly brace) represents the JSON object. An example of JSON is provided below.
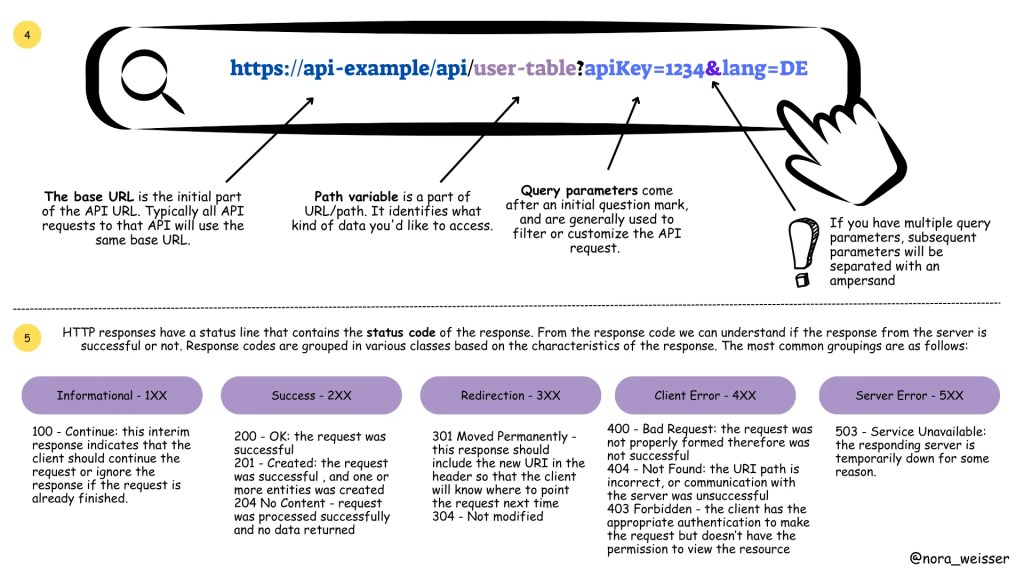
A REST API is accessed with a URL. The URL consists of a base URL, resource, path variables and query parameters. The base URL is the internet host name for the REST API. Resources are presented as sets of endpoints grouped on the basis of related data or the object they allow working with.
Difference between query parameters and path variables:
The difference between path variables and query parameters
5 — HTTP Status Codes
The REST responses includes a status code that indicates whether the request was successful, and if not, the type of the error that occurred.
Response codes are grouped in various classes based on the characteristics of the response. The most common groupings are as follows (with several examples)
1. Informational — 1XX
100 — Continue: this interim response indicates that the client should continue the request or ignore the response if the request is already finished.
2. Success — 2XX
200 — OK: the request was successful
201 — Created: the request was successful , and one or more entities was created
204 No Content — request was processed successfully and no data returned
3. Redirection — 3XX
301 Moved Permanently — this response should include the new URI in the header so that the client will know where to point the request next time
304 — Not modified
4. Client Error — 4XX
400 — Bad Request: the request was not properly formed therefore was not successful
404 — Not Found: the URI path is incorrect, or communication with the server was unsuccessful
403 Forbidden — the client has the appropriate authentication to make the request but doesn’t have the permission to view the resource
5. Server Error — 5XX
503 — Service Unavailable: the responding server is temporarily down for some reason.
We began by diving into the fundamental concepts, grasping the essence of Application Programming Interfaces.
Tracing their historical roots, we witnessed the evolutionary growth of APIs. From the early days of monolithic architectures to the rise of microservices, APIs have proven to be the backbone of seamless communication between various software components.
Furthermore, we explored the diverse types of protocols employed by APIs, including REST, SOAP, GraphQL, and more. Each protocol brings its unique strengths, ensuring that developers have the flexibility to choose the most suitable option for their projects.
Understanding the essential components of an API, such as endpoints, methods, headers, and payloads, has given us a deeper appreciation for the intricacies involved in API design and usage. These components act as the building blocks that facilitate data exchange, functionality integration, and ultimately, the seamless flow of information between different applications.
In the upcoming parts of this series, we will take a look at the world of API Testing. We will explore the best practices for testing APIs, the tools and frameworks available, and various testing methodologies to ensure the robustness, security, and efficiency of APIs.