As part of an open-source project by the Women Coding Community, we’re building a Playwright test suite to ensure our frontend works reliably. While functional tests cover most interactions, we noticed that for some static pages, like FAQs or other content-heavy sections, visual testing could add real value. Even minor CSS changes or layout shifts can break the page in ways users notice, but automated functional tests often miss these subtle regressions.
This is where visual testing comes in. It lets us capture screenshots of key pages and automatically compare them against a reference, so we can catch unintended visual changes before they reach our users.
Playwright makes it easy to implement visual testing in just a few lines of code:
The challenge: different machines, different results.
While this code works on a single machine, it may fail on another due to subtle rendering differences. Fonts, spacing, and other visual details vary between operating systems: Windows renders fonts differently than macOS, which renders differently than Linux. For users, this is expected and harmless. But for visual tests, it creates false positives when running on different developer machines or in our CI pipeline.
See the difference in the screenshots shared in this article:
Different rendering in Chromium on Ubuntu and Safari on macOS
For example, a screenshot taken on a macOS laptop may fail if the same test runs on a Linux-based CI environment.
The solution? Docker. It gives us a consistent environment so tests pass reliably everywhere.
We built DockerFile on the official Playwright image, which includes browsers and system dependencies. Then we installed our project dependencies and copied the code.
Docker Compose was introduced to make running visual tests easy and consistent. It lets developers start and run everything with a single command, using the same setup locally and in CI. This avoids environment differences and reduces “works on my machine” issues.
Our Compose file:
Defines a service playwright responsible for running the tests.
Builds the Docker image using our Dockerfile.
Sets /app as the default working directory.
Loads environment variables from .env.local for consistency with local development.
Mounts volumes for:
Project directory – so the container can access source code without copying it every time.
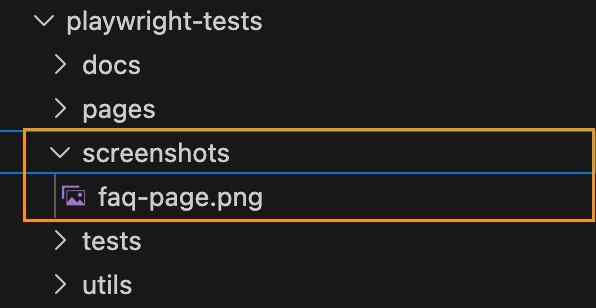
Screenshots – so new screenshots persist and visual diffs remain across container runs.
Playwright reports – so test reports are available locally and in CI artifacts.
"test:e2e": "playwright test --grep-invert @visual"
This prevents false positives during regular development, while maintaining reliable visual tests in Docker.
Why It Matters
With this setup, we can catch real visual regressions while ignoring harmless OS-level differences. Docker guarantees a consistent testing environment, and Playwright makes capturing and comparing screenshots simple.
Our users may see slightly different fonts depending on their OS—but our tests are now reliable, reproducible, and actionable, keeping our UI looking great everywhere.
When testing APIs that require authentication or involve dependent requests, hardcoding tokens and dynamic values can quickly lead to fragile and hard-to-maintain tests. PactumJS offers a solution for this – stores, which allow you to capture and reuse values like tokens, IDs, and other response data.
In this article, you’ll learn how to:
Handle authentication using Pactum stores
Chain requests by capturing and reusing dynamic values
Clean up test data using afterEach hooks
Recap: POST Add Room request resulting 401 status code
In the previous article, we created a test case Create a New Room but encountered a 401 Unauthorized error due to missing authentication:
This captures the token field from the login response and stores it under the key ‘token’.
To use the stored token in subsequent requests:
.withHeaders('Cookie', 'token=$S{token}')
Chaining Requests
You can also extract and store specific values like IDs from response bodies using the built-in json-query support in PactumJS. This allows you to query deeply nested JSON data with simple expressions.
For example, to capture a roomId based on a dynamic roomName from the response:
The stash object in Pactum provides access to test data and stored values during runtime. Specifically, stash.getDataTemplate() allows you to retrieve values generated from the data template used earlier in .withJson({ ‘@DATA:TEMPLATE@’: ‘RandomRoom’ }).
This is useful here to extract values from dynamically generated templates (like roomName) to use them in later requests.
Bonus: Fetching Rooms without authentication
Here’s a simple test for fetching all rooms without authentication:
Chain requests by dynamically storing and reusing values
By combining this with beforeEach and afterEach hooks, you can effectively manage test preconditions and postconditions, ensuring your test cases remain clean, maintainable.
Utilize faker Library to Compile Dynamic Test Data
Introduction
In Part 1, we explored how to make API tests more maintainable by introducing data templates for the /auth/login endpoint. We saw how to use @DATA:TEMPLATE, @OVERRIDES, and @REMOVES can simplify test logic and reduce duplication.
Now, in Part 2, we’ll apply the same approach to another key endpoint: POST /room – Create a new room
This endpoint typically requires structured input like room names, types, and status — perfect candidates for reusable templates. We’ll define a set of room templates using Faker for dynamic test data, register them alongside our auth templates, and write test cases that validate room creation.
Let’s dive into how data templates can help us test POST /room more effectively, with minimal boilerplate and maximum clarity.
Exploring the API Endpoint
Step 1: Inspecting the API with DevTools
Before automating, it’s helpful to understand the structure of the request and response. Visit https://automationintesting.online and follow the steps shown in the GIF below, or use the guide here:
Open DevTools: Press F12 or right-click anywhere on the page and select Inspect to open DevTools.
Navigate to the Network Tab. Go to the Network tab to monitor API requests.
Trigger the API Call: On the website, fill in the room creation form and submit it. Watch for a request to the /room endpoint using the POST method.
Inspect the API Details.
Once you click the POST rooms request, you will see the following details:
URL and method details.
Headers tab: Shows request URL and method
Payload tab: Shows the room data you sent (like number, type, price, etc.)
Response tab: Shows the response from the server (confirmation or error)
Example payload from this API request:
{
  "roomName":"111",
  "type":"Single",
  "accessible":false,
  "description":"Please enter a description for this room",
  "image":"https://www.mwtestconsultancy.co.uk/img/room1.jpg",
  "roomPrice":"200",
  "features":[
      "WiFi",
      "TV",
      "Radio"
  ]
}
Field Breakdown:
roomName: A string representing an identifier for the room (e.g., “111”).
type: Room type; must be one of the following values: “Single”, “Double”, “Twin”, “Family”, “Suite”.
accessible: A boolean (true or false) indicating whether the room is wheelchair accessible.
description: A text description of the room.
image: A URL to an image representing the room.
roomPrice: A string representing the price of the room.
features: An array of one or more of the following feature options: “WiFi“, “Refreshments“, “TV“, “Safe“, “Radio“, “Views“.
⚠️ Note: This breakdown is based on personal interpretation of the API structure and response; it is not taken from an official specification.
In order to generate payload for the room, we will use faker library. This library allows you to generate realistic test data such as names, prices, booleans, or even images on the fly. This helps reduce reliance on hardcoded values and ensures that each test run simulates real-world API usage.
Step 2: Installing the faker Library
To add the faker library to your project, run:
npm install @faker-js/faker
Step 3: Registering a Dynamic Room Template
Use faker to generate dynamic values for each room field:
In this hands-on guide, we’ll explore how to improve the maintainability and flexibility of your API tests using data templates in PactumJS. Our focus will be on the authentication endpoint: POST /auth/login
While this works for one case, hardcoding test data like this can quickly become difficult to manage as your test suite grows.
Improving Test Maintainability with Data Templates
To make our tests more scalable and easier to manage, we’ll introduce data templates — a PactumJS feature that allows you to centralize and reuse test data for different scenarios, such as valid and invalid logins.
Step 1: Define Auth Templates
Create a file auth.js inside your templates directory /helpers/datafactory/templates/ and register your authentication templates:
Data templates in PactumJS are a simple yet powerful way to make your API tests more maintainable and scalable. By centralizing test data, you reduce duplication, improve readability, and make your test suite easier to evolve as your API grows.
In this part, we focused on authentication. In the next article, we’ll explore how to apply the same pattern to other endpoints — like POST /room — and build more complex test scenarios using nested data and dynamic generation.
As discussed in the previous article, PactumJS is an excellent choice for API automation testing.
As your API testing suite grows, maintaining a clean and organized repository structure becomes essential. We’ll explore a folder structure for your PactumJS-based testing framework, provide tips and tricks for configuration and scripting, and walk through executing tests with reporting.
To follow along, make sure you have the following:
Node.js v10 or above
Basic understanding of JavaScript or TypeScript
Node.js modules
Testing frameworks like Mocha
If you’re new to any of the above, it’s worth reviewing basic tutorials, for example, on Automation University: on Node.js and test runners like Mocha.
Install Dependencies
Start by creating a fresh Node.js project:
mkdir api_testing_with_pactumjs
cd api_testing_with_pactumjs
npm init -y
Then install necessary packages via NPM:
# install pactum
npm install -D pactum

# install a test runner
npm install -D mocha
tests/ folder contains your test specifications organized by feature or endpoint, such as auth.spec.ts. This keeps tests modular and easy to locate.
helpers/ folder houses centralized reusable logic and utilities. This separation keeps test files focused on what they test rather than how, improving readability and maintainability.
setup/ folder contains global setup files like base.js to configure common test environment settings, such as base URLs and global hooks.
.env.example — A sample environment configuration file listing required environment variables, serving as a reference and template for developers.
.env (not shown in repo) is used locally to store sensitive configuration and secrets, enabling easy environment switching without code changes.
.gitignore file includes folders and files like .env to prevent committing sensitive data to version control.
package.json is a central place for managing project dependencies (like pactum, dotenv, mocha) and defining test scripts (e.g., npm run test, npm run test:report). This facilitates CI/CD integration and consistent test execution.
While this test currently focuses on verifying the status code, future articles will enhance it by adding validations for the authentication token returned in the response.
Manage Environment Variables
Create .env file
To keep sensitive data like URLs and credentials, create a .env.example file as a reference for required environment variables:
BASE_URL=""
USERNAME=""
PASSWORD=""
👉 Tip: Don’t commit your actual .env to version control
Use .env.example to document the required variables.
Add .env to your .gitignore file to keep credentials secure.
Share .env.example with your team so they can configure their environments consistently.
Load Environment Variables in Tests
Install dotenv and configure it in your test files or setup scripts:
Once your test files are set up and your .env file is configured with valid credentials and base URL, you’re ready to execute your test cases.
PactumJS works seamlessly with test runners like Mocha, which means running your tests is as simple as triggering a test command defined in your package.json. Here’s how to proceed:
Add a Test Script
In your package.json, add a script under “scripts” to define how to run your tests. For example:
This tells Mocha to look for test files in the tests/ directory and run them.
Run the Tests
In your terminal, from the root of your project, run:
npm test
This will execute test specs and display results in the terminal.
You should see output indicating whether the test passed or failed, for example:
  /authenticate
    ✓ should succeed with valid credentials (150ms)

  1 passing (151ms)
Add a Reporting Tool
By default, PactumJS uses Mocha’s basic CLI output. For richer reporting—especially useful in CI/CD pipelines—you can use Mochawesome, a popular HTML and JSON reporter for Mocha.
Install Mochawesome
Install Mochawesome as a development dependency:
npm install -D mochawesome
Update Your Test Script
Modify the scripts section in your package.json to include a command for generating reports:
This script tells Mocha to run your tests using the Mochawesome reporter.
Run the tests with reporting
Execute your tests using the new script:
npm run test:report
This generates a mocha report in JSON and HTML format which you can review locally or attach in CI pipelines.
  /authenticate
    ✔ should succeed with valid credentials (364ms)


  1 passing (366ms)

[mochawesome] Report JSON saved to ./pactum_test/mochawesome-report/mochawesome.json  [mochawesome] Report HTML saved to ./pactum_test/mochawesome-report/mochawesome.html
View the report
Open the HTML report in your browser to visually inspect test results:
Configure Base Test Setup (base.js)
Create a Shared Configuration
Create a base.js file in the setup/ directory. This file is a shared configuration used to define reusable logic like setting the base URL, request headers, or global hooks (beforeEach, afterEach).
To ensure this configuration runs before any tests, register the setup file using Mocha’s –file option. This guarantees Mocha will execute base.js within its context, making all Mocha globals (like before) available.
To avoid repeating the full Mocha command in multiple scripts, define a single base script (e.g., test) that includes your common options. Then, reuse it for other variants by passing additional flags:
"scripts": {
  "test": "mocha tests --file setup/base.js",
  "test:report": "npm run test -- --reporter mochawesome"
}
This approach keeps your scripts concise and easier to maintain by centralizing the core test command. It also allows you to easily extend or customize test runs with additional options without duplicating configuration. Overall, it reduces the chance of errors and inconsistencies when updating your test scripts.
Conclusion
By structuring your PactumJS repository with clear separation of tests, helpers, and setup files—and by leveraging environment variables, global setup, and reporting—you build a scalable and maintainable API testing framework. This approach supports growth, team collaboration, and integration with CI/CD pipelines.
I’ve spent a fair bit of time writing API test automation. After exploring a few JavaScript-based tools and libraries, I’ve found Pactum to be particularly powerful. I wanted to take a moment to share a brief overview of my experience and why I think it stands out.
If you’re setting up a PactumJS project from scratch, I recommend starting with the official Quick Start guide, which covers installation and basic setup clearly. Additionally, this article by Marie Cruz offers a great walkthrough of writing API tests with PactumJS and Jest, especially useful for beginners.
Fluent and expressive syntax
One of the aspects I appreciate the most is how naturally you can chain descriptive methods from the spec object to build complex requests with support for headers, body payloads, query parameters, and more.
Data Management is a critical aspect of test automation and often one of the more challenging pain points in any automation project. Test suites frequently reuse similar request payloads, making it difficult to maintain and organize these payloads when they are scattered across different test files or folders. Without a structured approach, this can lead to duplication, inconsistency, and increased maintenance overhead. So, it is important to have an intuitive way to handle data in the test framework.
In PactumJS, data management is typically handled using data templates and data stores. These help you define reusable request bodies, dynamic data, or test user information in a clean and maintainable way.
Data Templates
Data Templates help you define reusable request bodies and user credentials. Templates can also be locally customized within individual tests without affecting the original definition.
For example, in testing different authentication scenarios:
Valid credentials
Invalid password
Non-existing user
Rather than hard-coding values in each test, as it is done below:
This approach improves consistency and reduces duplication. When credential details change, updates can be made centrally in the datafactory without touching individual tests. As a result, test logic remains clean, focused on validating behaviour rather than being cluttered with data setup.
In integration and e2e API testing, one common challenge is managing dynamic data between requests. For example, you might need to extract an authentication token from an authentication response and use it in the header of subsequent requests. Without a clean way to store and reuse this data, tests can become messy, brittle, and hard to maintain.
PactumJS provides a data store feature that allows you to save custom response data during test execution in a clean way.
Example:
Suppose you want to send a POST request to create a room, but the endpoint requires authentication. First, you make an authentication request and receive a token in the response. Using data store functionality, you can capture and store this token, then inject it into the headers of the room creation request.
Data store functionality also supports json-query libraries. It enables you to extract and store specific values from complex JSON responses. This is particularly helpful when dealing with nested structures, where you only need to capture a portion of the response—such as an ID, token, or status—from a larger payload.
Unlike other setups that require integrating libraries like zod, ajv, or custom helper functions, PactumJS allows you to validate JSON responses using the expectJsonSchema method. All you need to do is define the expected schema and apply it directly in your test, no extra configuration needed.
For example, in an authentication test case, the response schema is defined in a separate data factory:
Most REST API responses return data in JSON format that must be validated. Fortunately, PactumJS provides a powerful and expressive assertion system that goes far beyond basic status code checks. Its assertion system allows for
it('get users', async () => {
  await pactum.spec()
    .get('/api/users')
    .expectJsonLike('$V.length === 10'); // api should return an array with length 10
    .expectJsonLike([
      {
        id: 'typeof $V === "string"',
        name: 'jon',
        age: '$V > 30' // age should be greater than 30
      }
    ]);
});
And all of them are in a clean and readable format.
For example, you can validate only parts of a response, use regex or custom matchers, and even plug in JavaScript expressions or reusable assertion handlers. In my opinion, this level of granularity is a game-changer compared to assertion styles in other frameworks.
To reduce repetition and keep tests clean, PactumJS allows you to define default values that apply globally across your test suite — such as headers, base URL, and request timeouts. This helps maintain consistency and simplifies test configuration.
In my experience, PactumJS has proven to be a well-designed and developer-friendly tool for API test automation. Its fluent syntax, robust data handling, and built-in features like schema validation and dynamic stores eliminate the need for developing third-party solutions for the test framework.
If you’re working with API testing in JavaScript / Typescript, PactumJS is definitely worth a look.
Resources
You can find the complete set of test cases, data templates, and helper functions shown in this post in the GitHub Repo.
Using a Pact Broker to Manage Contracts Across Microservices
In the previous article, I raised an important question: What if the provider and consumer microservices do not share the same repository but still need access to the contract from a third-party source? The solution to this challenge is the Pact Broker.
In this article, we will explore how the Pact Broker works and how to implement pipeline using GitHub Actions.
When Do You Need a Pact Broker?
A Pact Broker is essential in scenarios where:
The provider and consumer microservices are in separate repositories but must share the same contract.
You need to manage contracts across different branches and environments.
Coordinating releases between multiple teams is required.
Options for Setting Up a Pact Broker
There are multiple ways to set up a Pact Broker:
Own Contract Storage Solution – Implement your own contract-sharing mechanism.
Hosted Pact Broker (PactFlow) – A cloud-based solution provided by SmartBear.
Self-Hosted Open-Source Pact Broker – Deploy and manage the Pact Broker on your infrastructure.
As a starting point, PactFlow is a great solution due to its ease of use.
Publishing Contracts to the Pact Broker
For demonstration purposes, we will use the free version of PactFlow. Follow these steps to publish contracts:
Broker URL: Copy the URL from the address bar (e.g., https://custom.pactflow.io/).
Broker API Token: Navigate to Settings → API Tokens and copy the read/write token for CI/CD pipeline authentication.
3. Setting Up a CI/CD Pipeline with GitHub Actions
Setting up CI/CD pipeline using GitHub Actions.
We will configure GitHub Actions to trigger on a push or merge to the main branch. The workflow consists of the steps displayed on the diagram.
To set up GitHub Actions, create a .yml file in the .github/workflows directory. In this example, we’ll use contract-test-sample.yml:
name: Run contract tests

on: push

env:
  PACT_BROKER_BASE_URL: ${{ secrets.PACT_BROKER_BASE_URL }}
  PACT_BROKER_TOKEN: ${{ secrets.PACT_BROKER_TOKEN }}

jobs:
  contract-test:
    runs-on: ubuntu-latest
    steps:
      - uses: actions/checkout@v4
      - uses: actions/setup-node@v4
        with:
          node-version: 18
      - name: Install dependencies
        run: npm install
      - name: Run web consumer contract tests
        run: npm run test:consumer
      - name: Publish contract to PactFlow
        run: npm run publish:pact
      - name: Run provider contract tests
        run: npm run test:provider
Before running the workflow, store the required secrets in your GitHub repository:
Navigate to Repository → Settings → Secrets and Variables.
Create two secrets:
PACT_BROKER_BASE_URL
PACT_BROKER_TOKEN
Save, commit, and push your changes to the remote repository.
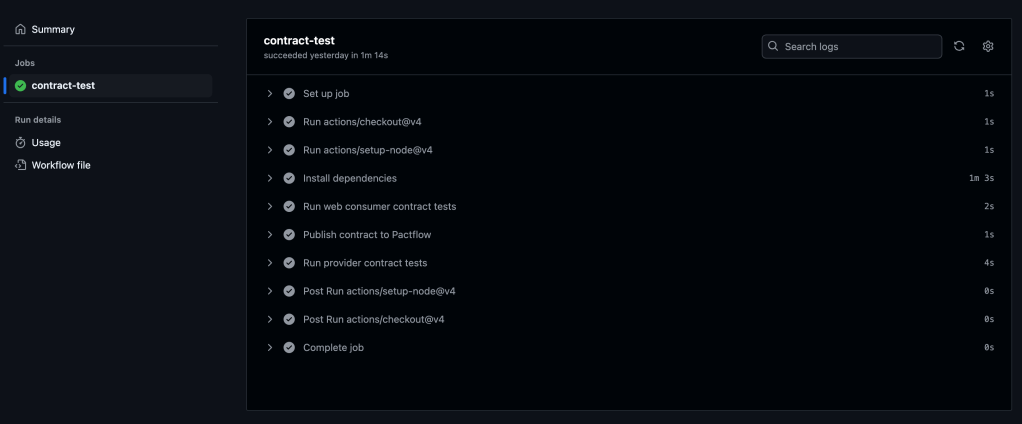
Navigate to the Actions tab in GitHub to verify if the pipeline runs successfully.
You should see all the steps running successfully like on the screenshot below:
7. Verifying the Contract in PactFlow
Once the pipeline runs successfully:
Navigate to PactFlow.
Verify if the contract has been published.
You should see two microservices and the contract established between them.
Two microservices – Library Consumer and Library ProviderPact between two microservices, which is published and stored in PactFlow
Configuring Contract Versioning
If there are changes in the contract (e.g., if a new version of a consumer or provider is released), versioning should evolve too. Automating this process is crucial.
A recommended approach is using GitHub Commit ID (SHA), ensuring that contract versions are traceable to relevant code changes.
1. Define the Versioning Variable
In the contract-test-sample.yml file, introduce a new environment variable GITHUB_SHA:
GITHUB_SHA: ${{ github.sha }}
2. Update the Pact Publish Script
Modify the pact:publish script to use the automatically generated version:
3. Update provider options with providerVersion value:
const opts = {
            provider: "LibraryProvider",
            providerBaseUrl: "http://localhost:3000",
            pactBrokerToken: process.env.PACT_BROKER_TOKEN,
            providerVersion: process.env.GITHUB_SHA,
            publishVerificationResult: true,
            stateHandlers: {
                "A book with ID 1 exists": () => {
                    return Promise.resolve("Book with ID 1 exists")
                },
            },
        }
Configuring Branches for Contract Management
If multiple people are working on the product in different branches, it is crucial to assign contracts to specific branches to ensure accurate verification.
1. Define the Branching Variable
Add GITHUB_BRANCH to the .yml file:
GITHUB_BRANCH: ${{ github.ref_name }}
2. Update the Pact Publish Script for Branching
Modify pact:publish to associate contracts with specific branches:
3. Update provider options with providerVersionBranch value:
const opts = {
            provider: "LibraryProvider",
            providerBaseUrl: "http://localhost:3000",
            pactBrokerToken: process.env.PACT_BROKER_TOKEN,
            providerVersion: process.env.GITHUB_SHA,
            providerVersionBranch: process.env.GITHUB_BRANCH,
            publishVerificationResult: true,
            stateHandlers: {
                "A book with ID 1 exists": () => {
                    return Promise.resolve("Book with ID 1 exists")
                },
            },
        }
Using the can-i-deploy tool
The can-i-deploy tool is a Pact feature that queries the matrix table to verify if a contract version is safe to deploy. This ensures that new changes are successfully verified against the currently deployed versions in the environment.
name: Run contract tests

on: push

env:
  PACT_BROKER_BASE_URL: ${{ secrets.PACT_BROKER_BASE_URL }}
  PACT_BROKER_TOKEN: ${{ secrets.PACT_BROKER_TOKEN }}
  GITHUB_SHA: ${{ github.sha }}
  GITHUB_BRANCH: ${{ github.ref_name }}

jobs:
  contract-test:
    runs-on: ubuntu-latest
    steps:
      - uses: actions/checkout@v4
      - uses: actions/setup-node@v4
        with:
          node-version: 18
      - name: Install dependencies
        run: npm i
      - name: Run web consumer contract tests
        run: npm run test:consumer
      - name: Publish contract to Pactflow
        run: npm run publish:pact
      - name: Run provider contract tests
        run: npm run test:provider
      - name: Can I deploy consumer?
        run: npm run can:i:deploy:consumer
      - name: Can I deploy provider?
        run: npm run can:i:deploy:provider
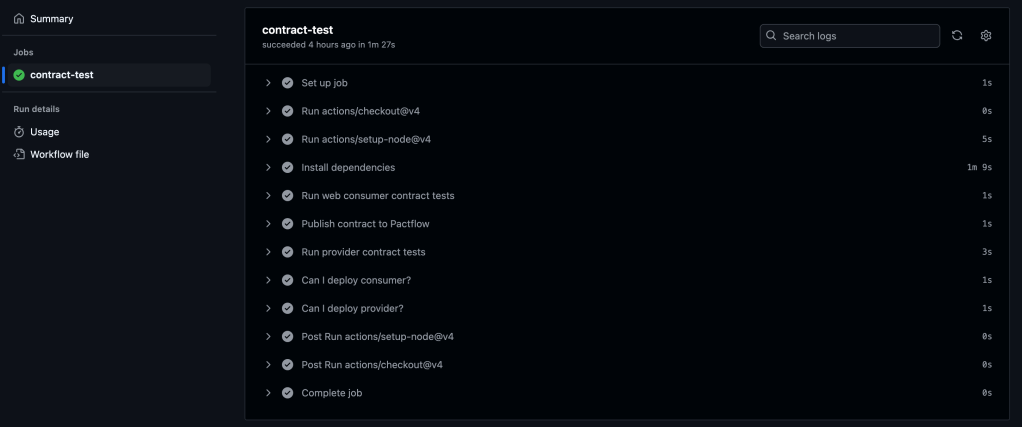
Add changes, commit and push. Navigate to the Actions tab in GitHub to verify if the pipeline runs successfully.
You should see all the steps running successfully like on the screenshot below:
GitHub Actions pipeline contains extra steps, which verify if a contract version is safe to deploy
Conclusion
The Pact Broker is important for managing contracts across microservices, ensuring smooth collaboration between independent services. By automating contract versioning, branch-based contract management, and deployment workflows using GitHub Actions, teams can can reduce deployment risks, improve service reliability, and speed-up release cycles.
For a complete implementation, refer to the final version of the code in the repository.
In the previous article consumer-driven contract testing has been introduced. And at this point, I am sure you can’t wait to start actual implementation. So let’s not delay any further!
Let’s start with the implementation using Pact.
Based on official documentation, Pact is a code-first tool for testing HTTP and message integrations using contract tests.
As a system under test we are going to use consumer-provider applications written in JavaScript. You can find the source code in the GitHub Repository.
Consumer Tests
The focus of the consumer test is the way to check if the consumer’s expectations match what the provider does. These tests are not supposed to verify any functionality of the provider, instead focus solely on what the consumer requires and validate whether those expectations are met.
Loose Matchers
To avoid brittle and flaky tests, it is important to use loose matchers as a best practice. This makes contract tests more resilient to minor changes in the provider’s response. Generally, the exact value returned by the provider during verification is not critical, as long as the data types match (Pact documentation). However, an exception can be made when verifying a specific value in the response.
Pact provides several matchers that allow flexible contract testing by validating data types and structures instead of exact values. Key loose matchers can be found in the Pact documentation.
Example without loose matchers (strict matching):
describe("getBook", () => {
    test("returns a book when a valid book id is provided", async () => {

        await provider.addInteraction({
            states: [{ description: "A book with ID 1 exists" }],
            uponReceiving: "a request for book 1",
            withRequest: {
                method: "GET",
                path: "/books/1",
            },
            willRespondWith: {
                status: 200,
                headers: { "Content-Type": "application/json" },
                body: {
                    id: 1,
                    title: "To Kill a Mockingbird",
                    author: "Harper Lee",
                    isbn: "9780446310789"
                },
            },
        })

        await provider.executeTest(async (mockService) => {
            const client = new LibraryClient(mockService.url)
            const book = await client.getBook(1)
            expect(book).toEqual(expectedBook)
        })
    })
})
Problem: This test will fail if id, title, or author, isbn changes even slightly.
Example with loose matchers (flexible and maintainable):
Using Pact matchers, we allow the provider to return any valid values of the expected types:
describe("getBook", () => {
    test("returns a book when a valid book id is provided", async () => {
      const expectedBook = { id: 1, title: "To Kill a Mockingbird", author: "Harper Lee", isbn: "9780446310789" }

      await provider.addInteraction({
        states: [{ description: "A book with ID 1 exists" }],
        uponReceiving: "a request for book 1",
        withRequest: {
          method: "GET",
          path: "/books/1",
        },
        willRespondWith: {
          status: 200,
          headers: { "Content-Type": "application/json" },
          body: like(expectedBook),
        },
      })

      await provider.executeTest(async (mockService) => {
        const client = new LibraryClient(mockService.url)
        const book = await client.getBook(1)
        expect(book).toEqual(expectedBook)
      })
    })
  })
In this case the contract remains valid even if actual values change, validation focused only on ensuring that data types and formats are correct.
Steps to write consumer contract tests
Scenarios:
Validate that LibraryClient.getAllBooks() retrieves a list of books.
Validate that LibraryClient.getBook(id) correctly fetches a single book when given a valid ID.
To start with consumer, open consumer.js file. Inside you can find the LibraryClient class represents the consumer in a consumer-driven contract testing setup. It acts as a client that interacts with an external Library API (provider) to fetch and manage book data.
There are a few functions present:
getBook(id) – Fetches a single book by its id. Returns the data in JSON format.
getAllBooks() – Fetches all books from the API. Returns a list of books in JSON format.
addBook(title, author, isbn) – Sends a POST request to add a new book. Returns the newly created book’s details.
Writing the first consumer contract test:
Importing the required dependencies and Consumer Class.
The code above creates a Pact mock provider (provider) using PactV3 library where specifies:
LibraryConsumer as the name of the consumer (the client making requests).
LibraryProvider as the name of the provider (the API responding to requests).
Passing parameter dir to define directory for the contract to be stored.
Setting up the interaction of the consumer and mock provider and register consumer expectations.
const EXPECTED_BOOK = { id: 1, title: "To Kill a Mockingbird", author: "Harper Lee", isbn: "9780446310789" }

describe("getAllBooks", () => {
    test("returns all books", async () => {

        provider
            .uponReceiving("a request for all books")
            .withRequest({
                method: "GET",
                path: "/books",
            })
            .willRespondWith({
                status: 200,
                body: MatchersV3.eachLike(EXPECTED_BOOK),
            })

        await provider.executeTest(async (mockService) => {
            const client = new LibraryClient(mockService.url)
            const books = await client.getAllBooks()
            expect(books[0]).toEqual(EXPECTED_BOOK)
        })
    })
})

describe("getBook", () => {
    test("returns a book when a valid book id is provided", async () => {

        provider
            .given('A book with ID 1 exists')
            .uponReceiving("a request for book 1")
            .withRequest({
                method: "GET",
                path: "/books/1",
            })
            .willRespondWith({
                status: 200,
                body: MatchersV3.like(EXPECTED_BOOK),
            }),

        await provider.executeTest(async mockProvider => {
            const libraryClient = new LibraryClient(mockProvider.url)
            const book = await libraryClient.getBook(1);
            expect(book).toEqual(EXPECTED_BOOK);
        })
    })
})
First we define the expected book. This object represents a single book that we expect the API to return. It acts as a template for what a book response should look like.
provider.addInteraction({...}) sets up a mock interaction.
uponReceiving: Describes what the test expects.
withRequest: Defines the expected request details:
Method: GET
Endpoint: /books
willRespondWith: Defines the expected response:
Status Code: 200
Body: MatchersV3.eachLike(EXPECTED_BOOK)
eachLike(EXPECTED_BOOK): Ensures the response contains an array of objects that match the structure of EXPECTED_BOOK.
4. Calling the consumer against the mock provider:
        await provider.executeTest(async mockProvider => {
            const libraryClient = new LibraryClient(mockProvider.url)
            const book = await libraryClient.getBook(1);
            expect(book).toEqual(EXPECTED_BOOK);
        })
Now, you are ready to run the test! First, create a new script in our package.json file called test:consumer, which uses jest command followed by the test file you want to execute:
Save the changes and run tests by executing this command:
npm run test:consumer
If everything set up correctly you should get one test passing:
If the test passes, a contract is generated and saved in the pacts folder. If it fails, the contract cannot be created.
The content of the contract should include the information about the consumer, provider, interaction which have been set up, the request and response details expected from the provider, matching rules and any other relevant information.
The primary goal of provider contract tests is to verify the contract generated by the consumer. Pact provides a framework to retrieve this contract and replay all registered consumer interactions to ensure compliance. The test is run against the real service.
Provider States
Before writing provider tests, I’d like to introduce another useful concept: provider states.
Following best practices, interactions should be verified in isolation, making it crucial to maintain context independently for each test case. Provider states allow you to set up data on the provider by injecting it directly into the data source before the interaction runs. This ensures the provider generates a response that aligns with the consumer’s expectations.
The provider state name is defined in the given clause of an interaction on the consumer side. This name is then used to locate the corresponding setup code in the provider, ensuring the correct data is in place.
Example
Consider the test case: “A book with ID 1 exists.”
To ensure the necessary data exists, we define a provider state inside stateHandlers, specifying the name from the consumer’s given clause:
            stateHandlers: {
                "A book with ID 1 exists": () => {
                    return Promise.resolve("Book with ID 1 exists")
                },
            },
On the consumer side, the provider state is referenced in the given clause:
        provider
            .given('A book with ID 1 exists')
            .uponReceiving("a request for book 1")
            .withRequest({
                method: "GET",
                path: "/books/1",
            })
            .willRespondWith({
                status: 200,
                body: MatchersV3.like(EXPECTED_BOOK),
            }),
This setup ensures that before the interaction runs, the provider has the necessary data, allowing it to return the expected response to the consumer.
4. Writing the provider contract test. After setting up the provider verifier options, let’s write the actual provider contract test using Jest framework.
Before running tests, you have to create a new script in the package.json file called test:provider, which uses jest command followed by the test file you want to execute:
Save the changes and run tests by executing this command:
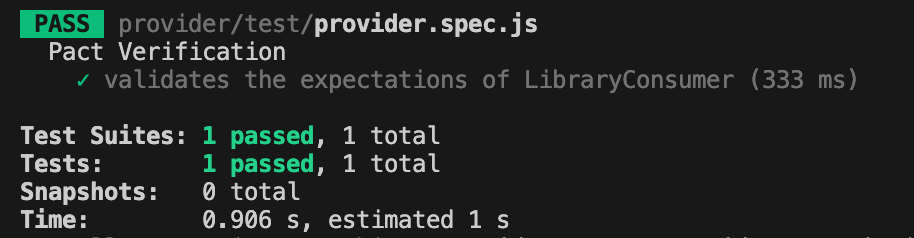
npm run test:provider
If everything set up correctly you should get one test passing:
Conclusion
Today, we explored a practical implementation of the consumer-driven contract testing approach. We created test cases for both the consumer and provider and stored the contract in the same repository.
But you might be wondering—what if the consumer’s and provider’s repositories are separate, unlike our case? Since these two microservices are independent, the contract needs to be accessible to both. So, where should it be stored?
Let’s to explore possible solution in the next part.
Today, I want to introduce you to the concept of contract testing using an analogy—buying the house of your dreams 🏡. Whether you already own your dream home or are still searching for it, you probably know the excitement and anticipation that comes with the process.
Imagine you’ve finally found the perfect house. You’re happy to move forward, but before the keys are in your hand, it’s crucial to set clear expectations with the seller. This involves agreeing on the details: the price, the condition of the house, and any other terms. To formalize this, a contract is drawn up, and a neutral party, like a notary or bank, helps ensure everything is clear and fair.
This scenario mirrors contract testing in software development, where a consumer (the buyer) and a provider (the seller) agree on a contract to ensure their interactions meet expectations.The contract broker (like the notary) acts as a mediator to validate and enforce these agreements.
Let’s break this analogy down further.
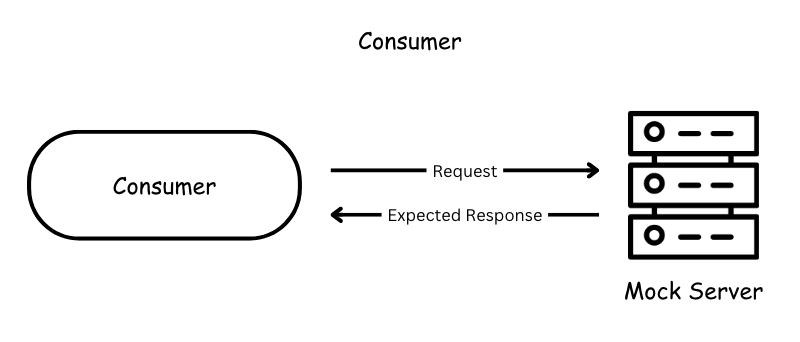
Consumer.
In this scenario you’re a consumer. You have specific expectations: size, number of rooms, location, price, neighbourhood, etc.
In contract testing, the consumer is a service or application that needs to consume data or services from a provider. The consumer is usually a web or mobile application making a request to a backend service, also it could be another service calling a backend service.
A consumer test verifies that the consumer correctly creates requests, handles provider responses as expected, and uncovers any misunderstandings about the provider’s behavior.
Provider
Then, the seller is the person offering the house. They promise certain features in the house: a garden, a modern kitchen, friendly neighbourhood and so on.
Provider on the other side of the consumer in contract testing that promises to deliver specific data or functionality. Usually it is a backend service.
Contract
The contract is the written agreement between you and the seller. It ensures both parties understand and agree on what is being provided and what is expected (e.g., the price, delivery date, features of the house).
The contract is no different in software. The contract is a formal agreement between the consumer and provider about how they will interact (e.g., API specifications, request/response formats).
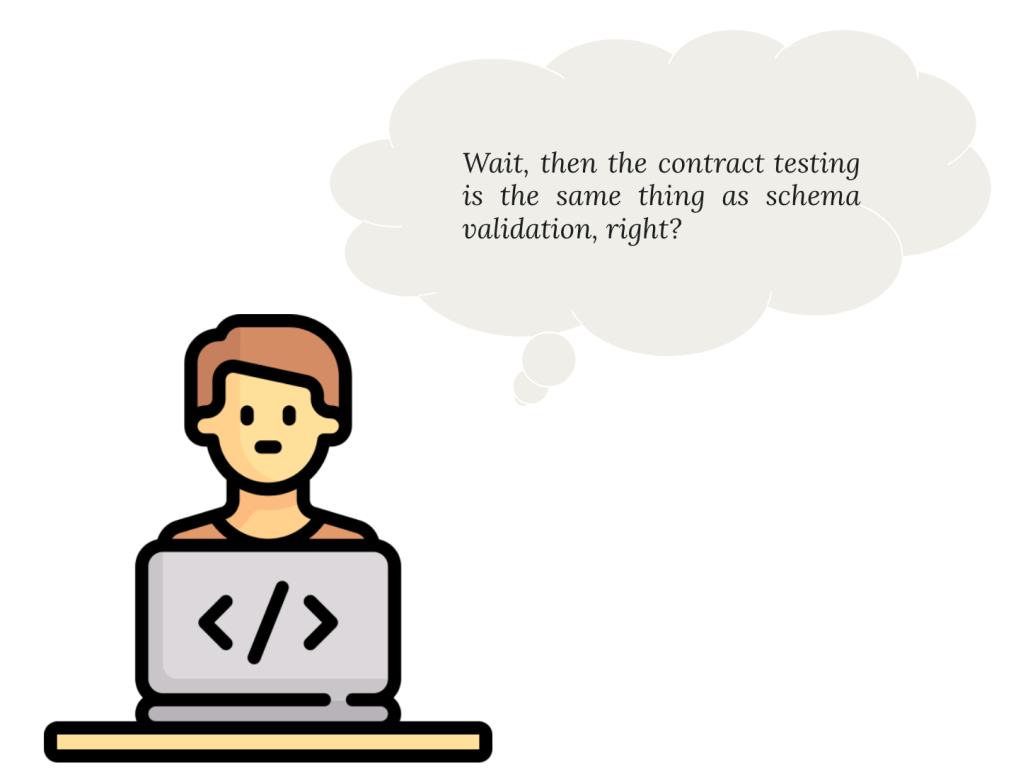
Hmmm.. not really! Contract isn’t the same as JSON Schema. This article explains well the difference between schema-based and contract-based testing.
In short: A schema is a structural blueprint or definition of how data in JSON is organized. It describes the structure, format, and relationships of data.
But the schema does not specify how the data should be used, when it should be provided, or how the interaction between the consumer and provider should behave. It’s purely about the data format and structure.
A contract includes the schema but also goes beyond it to define the behavioral and interaction agreements between the consumer and provider.
Contract includes following data:
The name of the consumer and provider
Data requirements for the request
Interactions between consumer and provider
Matching rules for the dynamic values
Environment and deployment information
Contract Broker
The contract broker, like a bank or notary, helps validate and mediate the agreement. They ensure that both parties adhere to their commitments.
In contract testing, the contract broker could be a tool or framework (e.g., Pact) that stores and validates contracts. It ensures the provider and consumer stick to their agreed-upon specifications.
The broker helps verify the compatibility between the two parties independently, ensuring that both can work together smoothly.
Can-I-Deploy Tool
To enable consumers and providers to check if they can deploy their changes to production, Pact provides a command-line interface (CLI) tool called can-i-deploy, which enables consumer and provider to determine the verification status of the contract.
Contract testing approaches
There are mainly two ways to approach contract testing:
The consumer-driven contract testing (CDCT) approach
The provider-driven contract testing (PDCT) approach
In these series I am going to discuss traditional CDCT approach.
Consumer-Driven Testing
In the consumer-driven approach the consumer is driving the contract. As a consumer before finalizing the house purchase, you might inspect the house to confirm it meets your expectations and publish your expectations as a contract to the broker. On another side, the seller must ensure their house is as described in the contract and ready for sale. This is like provider-side testing, ensuring they deliver what the contract specifies.
Contract testing ensures that consumers (buyers) and providers (sellers) are on the same page regarding their expectations and deliverables, with a broker (notary or bank) facilitating the process. This approach reduces the risk of miscommunication and ensures smooth collaboration—whether you’re buying a house or building software systems.
Conclusion
Contract testing acts as the bridge between consumers and providers, ensuring smooth collaboration. Much like finalizing the purchase of your dream house, both parties agree on a contract that outlines expectations and deliverables, with a broker ensuring everything aligns. Whether you’re buying a house or developing software, clear agreements lead to smoother outcomes!
Next, we’ll explore the application under test and hit the ground running with implementation!
At the end of 2024, I ordered a book Contract Testing in Action and had been waiting for the right moment to start exploring. Recently, I finally read through most of its chapters and found its insights to be handy for development teams working with microservice architectures. Inspired by the knowledge and ideas from the book, I decided to write a series of articles to share what I’ve learned and explore how these concepts can be effectively applied in real-world scenarios. This introductory article serves as the starting point, explaining what contract testing is and how it fits into a broader testing strategy.
Testing Strategy for Microservices.
Over the past few decades, microservice architecture became a crucial way of building modern, scalable, and reliable applications. Traditional monolithic systems, where the database and all business logic seats under a single, tightly coupled structure, have gradually taken a backseat. In their place, independently deployable and modular services—known as microservices — have became the foundation of contemporary software development. This shift enables product teams to deliver features faster and more efficiently. However, with this huge leap comes the challenge with ensuring that each microservice operates correctly both in isolation and as part of larger systems. So, planning and executing testing strategies becomes an important component of the development lifecycle.
The most widespread scheme of testing of any system is the one which is proposed by Mike Cohn in his book ‘Succeeding with Agile’.
Microservices often rely on APIs to exchange data, with some services acting as providers (offering data) and others as consumers (requesting and processing data). Without a clear and tested agreement—or contract—between these services, even minor changes in one service can lead to failures across the system. This is where contract testing becomes invaluable and should be included into the pyramid as well.
Here is the adjusted version of the pyramid:
Why is contract testing so important?
Let’s take a real-life example with a banking application. Imagine a banking application with the following teams and components:
Frontend Application (Consumer): Built by a frontend team, this React-based web app allows customers to view their account balance and transaction history by making API calls to the backend.
Backend API (Provider): Managed by a backend team, the API provides endpoints for account details, including:
/account/{id}/balance – Returns the account balance.
The frontend app is integrated with the backend API, expecting the following responses:
On Friday Evening the backend engineer decides to improve the /account/{id}/balance response to rename accountId to id. The new response structure looks like this:
{
  "id": "12345",
  "balance": 5000
}
The engineer deploys the change, thinking it’s a harmless addition. No contract tests are in place to verify compatibility with the frontend.
Result:
The frontend app’s code does not recognise the renamed accountId field and instead tries to access id under the old key. This results in an error when parsing the JSON response, as the frontend is still expecting the accountId field. As a result, the frontend fails to display the account balance and shows a blank page or an error message to customers.
Impact Over the Weekend:
Customers are unable to check their account balance, leading to frustration and confusion.
The frontend team was unaware of the backend change until Monday morning, as there were no contract tests in place to alert them about the breaking change.
The downtime disrupts the customer experience, potentially destroying trust in the banking application and impacting the reputation of the service.
What could be done better?
With contract testing, the frontend and backend teams define a clear agreement (the “contract”) about API interactions, specifying expected fields and data types. Before deployment, both consumer (frontend) and provider (backend) teams run tests to ensure compatibility, catching issues early. By integrating contract tests into the CI/CD pipeline, breaking changes are flagged during development or staging, preventing them from reaching production. This approach ensures smooth communication between services, reduces downtime, and enforces better collaboration between teams.
What is Contract Testing in a nutshell?
Contract testing is a technique for testing an integration point by checking each application in isolation to ensure the messages it sends or receives conform to a shared understanding that is documented in a “contract”.
The contract is a JSON file containing the names of the two interacting systems: in this case, the web application and backend server. The contract also lists all interactions between the two systems.
In the context of the test automation pyramid, contract testing bridges the gap between unit tests and end-to-end tests by focusing on the interactions between microservices. It ensures that the consumer and provider services adhere to a shared agreement (the “contract”) regarding APIs, such as expected request and response structures. By having contract testing in place, it proactively identifies and addresses these compatibility problems earlier in the development cycle.
There is an insightful diagram in the book “Contract Testing in Action” that illustrates how some test cases can be shifted to contract tests. This shift moves them lower in the test automation pyramid, enabling issues to be identified earlier in the development lifecycle.
As microservices continue to dominate the landscape of software development, adopting contract testing is no longer optional—it is essential. By incorporating this practice, teams can build scalable, reliable, and user-focused applications, providing a smooth experience for end users and ensuring strong collaboration across development teams.
In the upcoming articles, we will meet contract testing players and focus on the practical implementation of contract testing, exploring tools, techniques, and best practices to integrate testing strategy into development workflow.