Tag: software-testing

  • What is RAG and how to evaluate it.

    Understanding how LLMs work.

    When I first started learning about LLMs, it helped me to think of them in a very simple way: at their core is just a model trained on a massive amount of human-generated text, which ultimately tries to predict the next word (token). The scale of the training is huge, we are talking about billions of different sentences from websites, blogs, news, forums, etc. At their core, language models generate text by predicting the most probable next token, a paradigm popularized in large-scale models such as Language Models are Few-Shot Learners paper.

    How simple it is, and how powerful. It can present that knowledge in a coherent and understandable way. This ability is possible thanks to a neural network architecture based on an attention mechanism known as transformers, introduced in the paper Attention Is All You Need paper.

    Limitations of LLMs

    That said, while LLMs are impressive, they definitely have limitations that are important to keep in mind.

    First of all, the knowledge cut-off. Model training is an expensive and time-consuming process. It takes large volumes of data and months to train an LLM. Events happening after the training is finished are simply not part of its knowledge.

    Second, there’s the problem of hallucinations. This issue has been studied extensively, for example in benchmarks like TruthfulQA, which show that models can produce convincing but incorrect answers, even when they appear confident. This happens because the model generates statistically plausible responses rather than verifying facts against a reliable source.

    Finally, there’s a limitation around private or proprietary knowledge. LLMs don’t have access to internal company data, confidential documents, or anything that isn’t publicly available in their training data.

    So naturally, this raises a question: if LLMs have these limitations, can they really be adopted widely in real-world applications?

    Introducing Retrieval-Augmented Generation (RAG)

    This is where Retrieval-Augmented Generation (RAG), introduced in Retrieval-Augmented Generation for Knowledge-Intensive NLP Tasks paper (https://arxiv.org/abs/2005.11401), comes into the picture. As the creator of LlamaIndex, Jerry Liu, says:
    RAG is just a hack” , but a very powerful one.

    Building Intuition: How RAG Works

    What would you do to help an LLM answer a specific question? Logically, we would provide the information directly in the prompt, or maybe even link to a source like Wikipedia, right?

    What we can do is copy and paste a piece of information (context) together with our query directly into the LLM. And here it is, it is able to comprehend the additional information we provided, distill it, and respond with more precise and accurate information. This is an oversimplified example of what RAG is doing. 

    What is RAG and Why It Matters

    The main idea of RAG is to provide additional information, which can be achieved in different ways. A new LLM can be trained from scratch to include new data, or an existing model can be fine-tuned. However, both approaches require a significant amount of data and computational resources. Training models can therefore be costly and not always yield the best results. RAG, on the other hand, is often more cost-effective, flexible, and does not require powerful compute resources or long training times.

    As the name implies, retrieval-augmented generation can be explained in three steps:

    • It retrieves relevant information from a data source external to the LLM (Wikipedia, for example)
    • It augments the input to the LLM with that external information
    • Finally, the LLM generates a more accurate result

    What Does a RAG System Look Like?

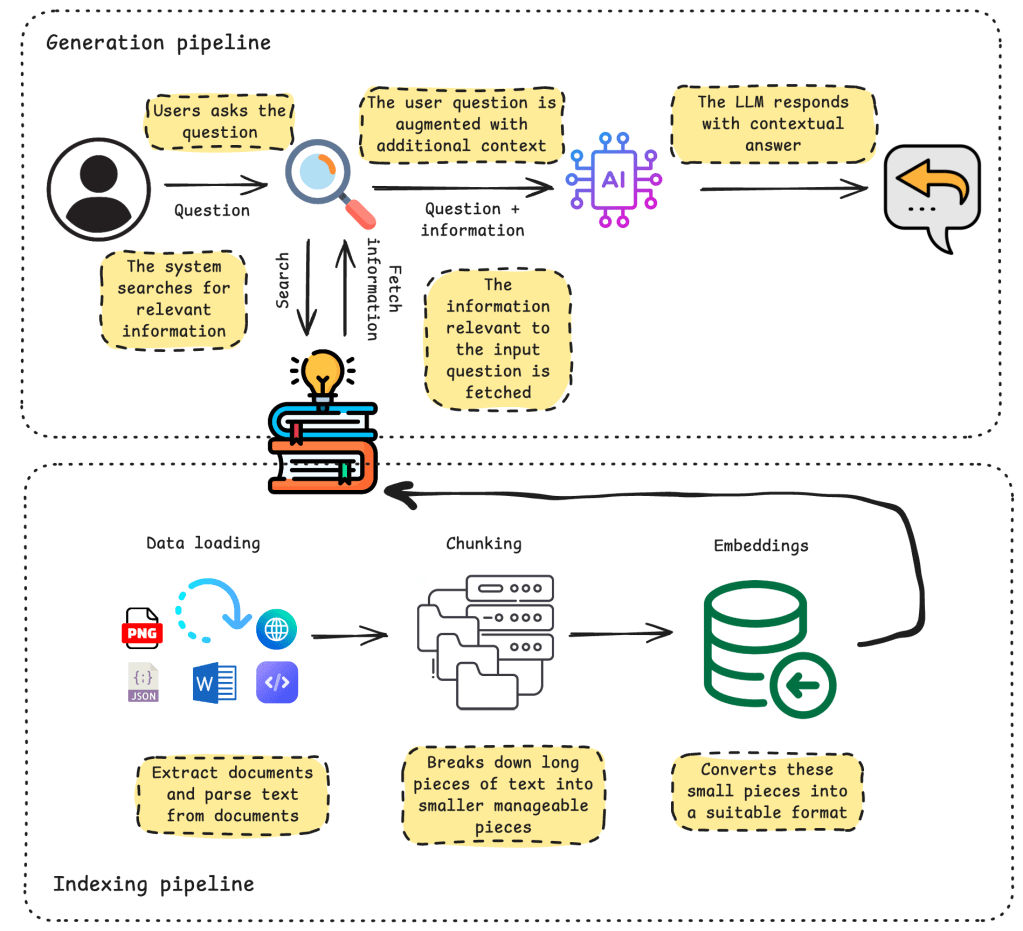
    The Generation Pipeline

    The main flow of RAG can be represented in five steps:

    • The user asks a question
    • The system searches for information relevant to the user input
    • The relevant information is retrieved and added to the input question
    • This enriched input is passed to an LLM
    • The LLM responds with a contextual answer

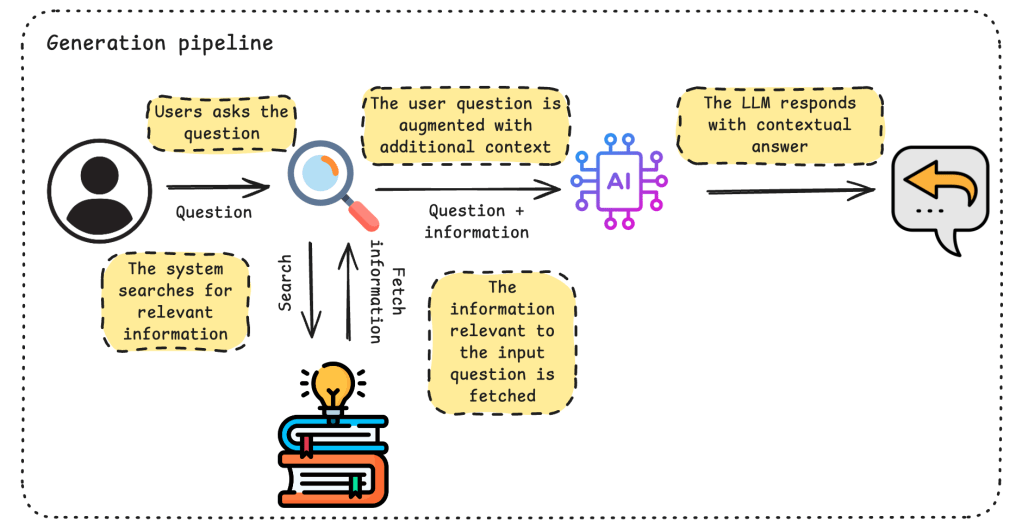
    A generation pipeline is the step-by-step process that takes a user’s input, optionally adds relevant context, and passes it through an LLM to produce a final answer. This is the generation pipeline in its simplest form. 

    Indexing pipeline

    Before the generation pipeline can work effectively, the system must first prepare and organize the external data sources. This involves answering key questions:

    Data source considerations

    • Where is the data located?
    • Is it publicly available (e.g., Wikipedia) or internal (e.g., company handbooks)?
    • Does it come from third-party databases?
    • Are we using a single source or multiple sources?

    Data characteristics

    • What formats are used (PDF, Word, JSON, plain text)?
    • Is the data accessed via APIs?
    • Is the information spread across multiple documents?

    To address these requirements, we need to implement another series of steps:

    • Connect to the identified external sources
    • Extract documents and parse text from them
    • Break down long pieces of information into smaller, manageable chunks
    • Convert these chunks into a suitable format (e.g., embeddings)
    • Store this information

    This process is commonly referred to as the indexing pipeline. Its goal is to transform raw, unstructured data into a format that can be efficiently searched and retrieved at query time. The quality of this step is critical, decisions made here, such as how documents are chunked or embedded, directly impact how well relevant information can be retrieved later.

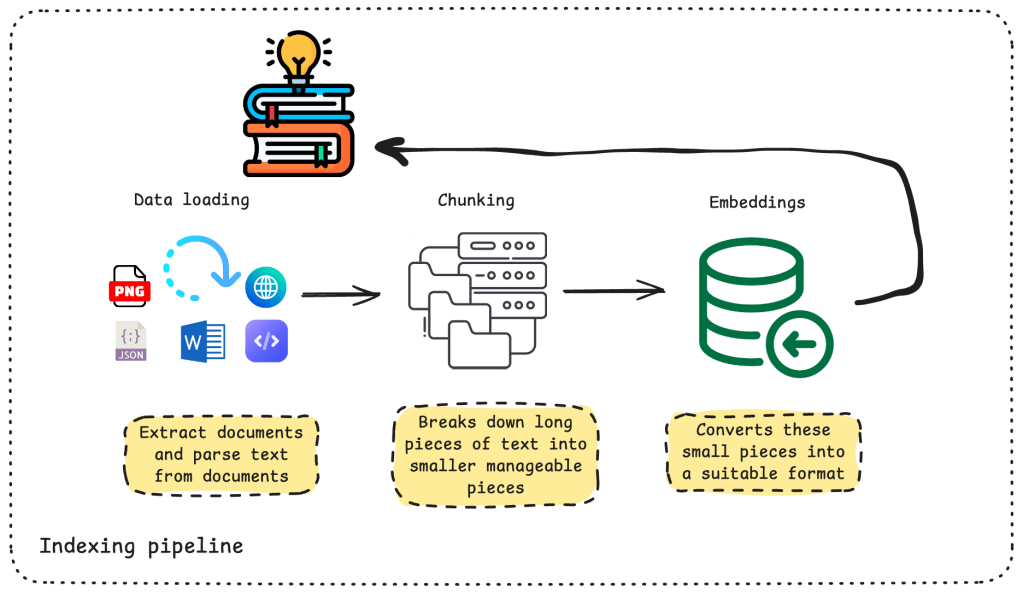
    The diagram above illustrates how raw data flows through the indexing pipeline and is transformed into a structured representation (typically a vector index) that the retrieval system can use.

    How Indexing and Generation Work Together

    In practice, the indexing and generation pipelines are tightly connected: the way data is prepared during indexing directly influences the quality of the retrieved context and, ultimately, the final answer generated by the LLM.

    Evaluating a RAG System

    When thinking about evaluating a RAG system, we need to look at what’s happening at every step along the way: the prompt, the retrieved context, and the generated response.

    Did we retrieve the right information?
    Is the context actually relevant to the user’s question? Because if the retriever brings back weak or unrelated information, even the best LLM won’t be able to produce a good answer. The output is only as good as the input it receives.

    Did the LLM actually pay attention to the retrieved context?
    Even though RAG is designed to reduce hallucinations, the model can still ignore or underuse the provided information. This can happen for several reasons, such as poor prompt design, noisy or overly long context, or limitations in how attention is distributed.

    Does the answer actually address the original question?
    At the end of the day, this is what matters most. Even if retrieval and generation seem correct in isolation, the final response needs to be clearly relevant and useful to the user’s intent.

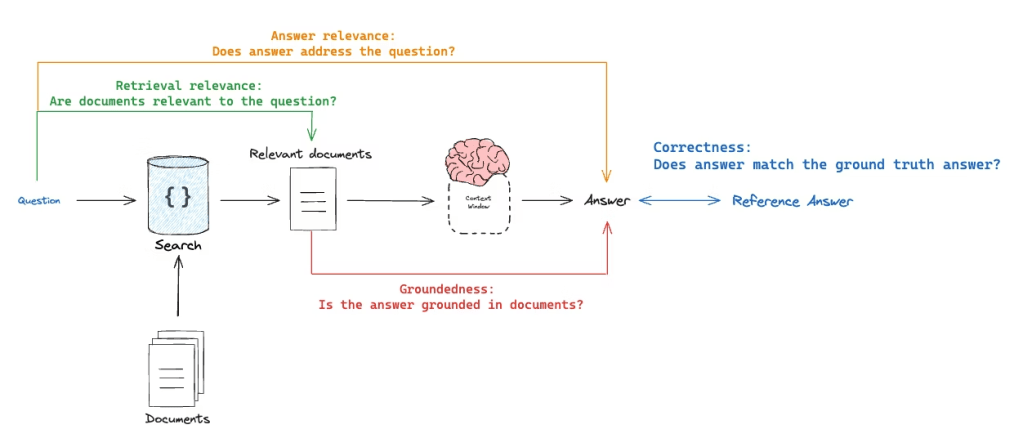
    Source: https://docs.langchain.com/langsmith/evaluate-rag-tutorial 

    What’s Next

    In the next article, I will introduce our RAG application and walk through a practical example of how to evaluate it using one of the popular frameworks.

  • Visual testing with Playwright and Docker

    1. Introduction
    2. The challenge: different machines, different results. 
    3. How we did it
      1. Dockerfile
      2. Docker Compose
      3. Standardized Screenshots
      4. CI Integration
      5. Exclude visual tests from regular execution
    4. Why It Matters

    Introduction

    As part of an open-source project by the Women Coding Community, we’re building a Playwright test suite to ensure our frontend works reliably. While functional tests cover most interactions, we noticed that for some static pages, like FAQs or other content-heavy sections, visual testing could add real value. Even minor CSS changes or layout shifts can break the page in ways users notice, but automated functional tests often miss these subtle regressions.

    This is where visual testing comes in. It lets us capture screenshots of key pages and automatically compare them against a reference, so we can catch unintended visual changes before they reach our users.

    Playwright makes it easy to implement visual testing in just a few lines of code:

    test('Verify FAQ Page Outline', async ({ page }) => {
      await page.goto('/mentorship/faqs');
      await expect(page).toHaveScreenshot('faq-page.png', { fullPage: true });
    });

    The challenge: different machines, different results. 

    While this code works on a single machine, it may fail on another due to subtle rendering differences. Fonts, spacing, and other visual details vary between operating systems: Windows renders fonts differently than macOS, which renders differently than Linux. For users, this is expected and harmless. But for visual tests, it creates false positives when running on different developer machines or in our CI pipeline.

    See the difference in the screenshots shared in this article:

    Different rendering in Chromium on Ubuntu and Safari on macOS

    For example, a screenshot taken on a macOS laptop may fail if the same test runs on a Linux-based CI environment. 

    The solution? Docker. It gives us a consistent environment so tests pass reliably everywhere.

    How we did it

    Reference: check PR here.

    Dockerfile

      We built DockerFile on the official Playwright image, which includes browsers and system dependencies. Then we installed our project dependencies and copied the code.

      FROM mcr.microsoft.com/playwright:v1.57.0-noble
      WORKDIR /app
      ENV CI=true
      RUN npm install -g pnpm
      COPY package.json pnpm-lock.yaml ./
      RUN pnpm install --frozen-lockfile
      COPY src ./src
      COPY public ./public
      COPY playwright-tests ./playwright-tests
      COPY next.config.mjs tsconfig.json jest.config.ts jest.setup.js ./
      USER pwuser

      Docker Compose

      Docker Compose was introduced to make running visual tests easy and consistent. It lets developers start and run everything with a single command, using the same setup locally and in CI. This avoids environment differences and reduces “works on my machine” issues.

      Our Compose file:

      • Defines a service playwright responsible for running the tests.
      • Builds the Docker image using our Dockerfile.
      • Sets /app as the default working directory.
      • Loads environment variables from .env.local for consistency with local development.
      • Mounts volumes for:
        • Project directory – so the container can access source code without copying it every time.
        • Screenshots – so new screenshots persist and visual diffs remain across container runs.
        • Playwright reports – so test reports are available locally and in CI artifacts.

      Standardized Screenshots

      We use a consistent viewport:

      use: {
        ...devices['Desktop Chrome'],
        viewport: { width: 1280, height: 720 },
      },

      And a predictable snapshot path:

      snapshotPathTemplate: 'playwright-tests/screenshots/{arg}{ext}',

      This eliminates layout differences caused by varying screen sizes and makes visual diffs easy to review.

      After test execution, screenshots are saved in the screenshot folder located inside the playwright-tests root directory.

      CI Integration

      To run visual tests inside Docker in CI, we configured environment variables:

      API_BASE_URL: https://wcc-backend.fly.dev/api
      API_KEY: ${{ secrets.API_KEY }}

      We updated CI commands.

      Run tests without updating screenshots:
      pnpm test:e2e:docker
      Run tests and update screenshots for intentional UI changes:
      pnpm test:e2e:docker:update

      These commands are defined in package.json:

      "test:e2e:docker": "docker compose run --rm playwright pnpm playwright test",
      "test:e2e:docker:update": "docker compose run --rm playwright pnpm playwright test --update-snapshots"

      This setup ensures tests run consistently in CI and locally, while keeping secrets secure and allowing controlled screenshot updates when needed.

      Exclude visual tests from regular execution

      Visual tests can be slower and more prone to false positives compared to regular tests. 

      To manage this:

      • Introduced an @visual tag for all visual tests.
      • Excluded these tests from standard runs using –grep-invert.
      • Only run them in the controlled Docker environment.

      Example test:

      test('Verify FAQ Page Outline', { tag: '@visual' }, async ({ page }) => {
        await page.goto('/mentorship/faqs');
        await expect(page).toHaveScreenshot('faq-page.png', { fullPage: true });
      });

      Standard test command in package.json:

      "test:e2e": "playwright test --grep-invert @visual"

      This prevents false positives during regular development, while maintaining reliable visual tests in Docker.

      Why It Matters

      With this setup, we can catch real visual regressions while ignoring harmless OS-level differences. Docker guarantees a consistent testing environment, and Playwright makes capturing and comparing screenshots simple.

      Our users may see slightly different fonts depending on their OS—but our tests are now reliable, reproducible, and actionable, keeping our UI looking great everywhere.

      PR: https://github.com/Women-Coding-Community/wcc-frontend/pull/186

    1. PactumJS in Practice: Using Data Templates to Manage Test Data – Part 2

      PactumJS in Practice: Using Data Templates to Manage Test Data – Part 2

      Utilize faker Library to Compile Dynamic Test Data

      Introduction

      In Part 1, we explored how to make API tests more maintainable by introducing data templates for the /auth/login endpoint. We saw how to use @DATA:TEMPLATE, @OVERRIDES, and @REMOVES can simplify test logic and reduce duplication.

      Now, in Part 2, we’ll apply the same approach to another key endpoint: POST /room – Create a new room

      This endpoint typically requires structured input like room names, types, and status — perfect candidates for reusable templates. We’ll define a set of room templates using Faker for dynamic test data, register them alongside our auth templates, and write test cases that validate room creation.

      Let’s dive into how data templates can help us test POST /room more effectively, with minimal boilerplate and maximum clarity.

      Exploring the API Endpoint

      Step 1: Inspecting the API with DevTools

      Before automating, it’s helpful to understand the structure of the request and response. Visit https://automationintesting.online and follow the steps shown in the GIF below, or use the guide here:

      1. Open DevTools: Press F12 or right-click anywhere on the page and select Inspect to open DevTools.
      2. Navigate to the Network Tab. Go to the Network tab to monitor API requests.
      3. Trigger the API Call: On the website, fill in the room creation form and submit it. Watch for a request to the /room endpoint using the POST method.

      Inspect the API Details. 

      Once you click the POST rooms request, you will see the following details:

      1. URL and method details.
      1. Headers tab: Shows request URL and method
      2. Payload tab: Shows the room data you sent (like number, type, price, etc.)
      1. Response tab: Shows the response from the server (confirmation or error)

      Example payload from this API request:

      {
        "roomName":"111",
        "type":"Single",
        "accessible":false,
        "description":"Please enter a description for this room",
        "image":"https://www.mwtestconsultancy.co.uk/img/room1.jpg",
        "roomPrice":"200",
        "features":[
            "WiFi",
            "TV",
            "Radio"
        ]
      }

      Field Breakdown:

      • roomName: A string representing an identifier for the room (e.g., “111”).
      • type: Room type; must be one of the following values: “Single”, “Double”, “Twin”, “Family”, “Suite”.
      • accessible: A boolean (true or false) indicating whether the room is wheelchair accessible.
      • description: A text description of the room.
      • image: A URL to an image representing the room.
      • roomPrice: A string representing the price of the room.
      • features: An array of one or more of the following feature options: “WiFi“, “Refreshments“, “TV“, “Safe“, “Radio“, “Views“.

      ⚠️ Note: This breakdown is based on personal interpretation of the API structure and response; it is not taken from an official specification.

      In order to generate payload for the room, we will use faker library. This library allows you to generate realistic test data such as names, prices, booleans, or even images on the fly. This helps reduce reliance on hardcoded values and ensures that each test run simulates real-world API usage.

      Step 2: Installing the faker Library

      To add the faker library to your project, run:

      npm install @faker-js/faker

      Step 3: Registering a Dynamic Room Template

      Use faker to generate dynamic values for each room field:

      // helpers/datafactory/templates/randomRoom.js
      
      import { faker } from '@faker-js/faker/locale/en';
      import pkg from 'pactum';
      const { stash } = pkg;
      
      const roomType = ["Single", "Double", "Twin", "Family", "Suite"];
      const features = ['WiFi', 'Refreshment', 'TV', 'Safe', 'Radio', 'Views'];
      
      export function registerRoomTemplates() {
        stash.addDataTemplate({
          RandomRoom: {
            roomName: faker.word.adjective() + '-' + faker.number.int({ min: 100, max: 999 }),
            type: faker.helpers.arrayElement(roomType),
            description: faker.lorem.sentence(),
            accessible: faker.datatype.boolean(),
            image: faker.image.urlPicsumPhotos(),
            features: faker.helpers.arrayElements(features, { min: 1, max: 6 }),
            roomPrice: faker.commerce.price({ min: 100, max: 500, dec: 0 })
          }
        });
      }

      Step 4: Writing the Test Case

      Register the template:

      //helpers/datafactory/templates/registerDataTemplates.js
      
      import { registerAuthTemplates } from "./auth.js";
      
      export function registerAllDataTemplates() {
          registerAuthTemplates();
          registerRoomTemplates();
        }

      With the template registered, you can now use it in your test:

      import pactum from 'pactum';
      const { spec, stash } = pactum;
      
      it('POST: Create a New Room', async () => {
          await spec()
              .post('/room')
              .withJson({ '@DATA:TEMPLATE@': 'RandomRoom' })
              .expectStatus(200)
              .expectJson({
                  "success": true
              })
      })

      This approach ensures that each test scenario works with fresh, random input — increasing coverage and reliability.

      Step 5: Running the Test

      Run your tests using:

      npm run test

      Most likely you got 401 Unauthorized response, which means authentication is required.

      Don’t worry — we’ll handle authentication, by passing the token from the login endpoint to other calls, in the next article.

    2. PactumJS in Practice: Using Data Templates to Manage Test Data – Part 1

      PactumJS in Practice: Using Data Templates to Manage Test Data – Part 1

      Introduction

      In this hands-on guide, we’ll explore how to improve the maintainability and flexibility of your API tests using data templates in PactumJS. Our focus will be on the authentication endpoint: POST /auth/login

      Recap: A Basic Login Test

      In the previous article we wrote a basic test case for a successful login:

      it('should succeed with valid credentials', async () => {
        await spec()
          .post('/auth/login')
          .inspect()
          .withJson({
            username: process.env.USERNAME,
            password: process.env.PASSWORD,
          })
          .expectStatus(200);
      });

      While this works for one case, hardcoding test data like this can quickly become difficult to manage as your test suite grows.

      Improving Test Maintainability with Data Templates

      To make our tests more scalable and easier to manage, we’ll introduce data templates — a PactumJS feature that allows you to centralize and reuse test data for different scenarios, such as valid and invalid logins.

      Step 1: Define Auth Templates

      Create a file auth.js inside your templates directory /helpers/datafactory/templates/ and register your authentication templates:

      // helpers/datafactory/templates/auth.js
      
      import pkg from 'pactum';
      const { stash } = pkg;
      import { faker } from '@faker-js/faker/locale/en';
      import dotenv from 'dotenv';
      dotenv.config();
      
      export function registerAuthTemplates() {
        stash.addDataTemplate({
          ExistingUser: {
              username: process.env.USERNAME,
              password: process.env.PASSWORD,
          },
          NonExistingUser: {
              username: 'non-existing-user',
              password: 'password',
          }
      });
      }
      

      Step 2: Register All Templates in a Central File

      Next, create a registerDataTemplates.js file to consolidate all your template registrations:

      //helpers/datafactory/templates/registerDataTemplates.js
      import { registerAuthTemplates } from "./auth.js";
      
      export function registerAllDataTemplates() {
          registerAuthTemplates();
          registerRoomTemplates();
        }

      Step 3: Use Templates in Your Test Setup

      Finally, import and register all templates in your test suite’s base configuration:

      // tests/base.js
      
      import pactum from 'pactum';
      import dotenv from 'dotenv';
      dotenv.config();
      import { registerAllDataTemplates } from '../helpers/datafactory/templates/registerDataTemplates.js';
      
      const { request } = pactum;
      
      before(() => {
        request.setBaseUrl(process.env.BASE_URL);
        registerAllDataTemplates()
      });
      

      Writing Login Tests with Templates

      Now let’s implement test cases for three core scenarios:

      // tests/auth.test.js
      
      describe('/auth/login', () => {
      
        it('should succeed with valid credentials', async () => {
          await spec()
            .post('/auth/login')
            .withJson({ '@DATA:TEMPLATE@': 'ExistingUser' })
            .expectStatus(200)
            .expectJsonSchema(authenticationSchema);
        });
      
        it('should fail with non-existing user', async () => {
          await spec()
            .post('/auth/login')
            .withJson({ '@DATA:TEMPLATE@': 'NonExistingUser' })
            .expectStatus(401)
            .expectJsonMatch('error', 'Invalid credentials');
        });
      
        it('should fail with invalid password', async () => {
          await spec()
            .post('/auth/login')
            .withJson({
              '@DATA:TEMPLATE@': 'ExistingUser',
              '@OVERRIDES@': {
                password: faker.internet.password(),
              },
            })
            .expectStatus(401)
            .expectJsonMatch('error', 'Invalid credentials');
        });
      
      });

      💡 Did You Know?

      You can use:

      • @OVERRIDES@ to override fields in your template (e.g. testing invalid passwords)
      • @REMOVES@ to remove fields from the payload (e.g. simulating missing inputs)

      Example:

      it('should return 400 when username is missing', async () => {
        await spec()
          .post('/auth/login')
          .withJson({
            '@DATA:TEMPLATE@': 'ExistingUser',
            '@REMOVES@': ['username']
          })
          .expectStatus(400);
      });

      Conclusion

      Data templates in PactumJS are a simple yet powerful way to make your API tests more maintainable and scalable. By centralizing test data, you reduce duplication, improve readability, and make your test suite easier to evolve as your API grows.

      In this part, we focused on authentication. In the next article, we’ll explore how to apply the same pattern to other endpoints — like POST /room — and build more complex test scenarios using nested data and dynamic generation.

    3. Getting started with PactumJS: Project Structure and Your First Test Case

      Getting started with PactumJS: Project Structure and Your First Test Case

      Introduction

      As discussed in the previous article, PactumJS is an excellent choice for API automation testing. 

      As your API testing suite grows, maintaining a clean and organized repository structure becomes essential. We’ll explore a folder structure for your PactumJS-based testing framework, provide tips and tricks for configuration and scripting, and walk through executing tests with reporting.

      For demonstration, we’ll use the Restful Booker API as our test target.

      Set Up Your Project and Install Dependencies

      Prerequisites

      To follow along, make sure you have the following:

      1. Node.js v10 or above
      2. Basic understanding of JavaScript or TypeScript
      3. Node.js modules
      4. Testing frameworks like Mocha

      If you’re new to any of the above, it’s worth reviewing basic tutorials, for example, on Automation University: on Node.js and test runners like Mocha.

      Install Dependencies

      Start by creating a fresh Node.js project:

      mkdir api_testing_with_pactumjs
      cd api_testing_with_pactumjs
      npm init -y

      Then install necessary packages via NPM:

      # install pactum
      npm install -D pactum
      
      # install a test runner
      npm install -D mocha

      Organise your files

      api_testing_with_pactumjs/
      ├── helpers/
      │   └── datafactory/
      ├── tests/
      │   └── auth.spec.ts
      ├── setup/
      │   └── base.js
      ├── .env.example
      ├── .gitignore
      ├── README.md
      ├── package-lock.json
      └── package.json
      1. tests/ folder contains your test specifications organized by feature or endpoint, such as auth.spec.ts. This keeps tests modular and easy to locate.
      2. helpers/ folder houses centralized reusable logic and utilities. This separation keeps test files focused on what they test rather than how, improving readability and maintainability.
      3. setup/ folder contains global setup files like base.js to configure common test environment settings, such as base URLs and global hooks.
      4. .env.example — A sample environment configuration file listing required environment variables, serving as a reference and template for developers.
      5. .env (not shown in repo) is used locally to store sensitive configuration and secrets, enabling easy environment switching without code changes.
      6. .gitignore file includes folders and files like .env to prevent committing sensitive data to version control.
      7. package.json is a central place for managing project dependencies (like pactum, dotenv, mocha) and defining test scripts (e.g., npm run test, npm run test:report). This facilitates CI/CD integration and consistent test execution.

      Write a Basic Test

      As an example for our demo we will take the Restful-Booker Platform built by Mark Winteringham. This application has been created for bed-and-breakfast (B&B) owners to manage their bookings.

      To explore and test the available API endpoints, you can use the official Postman Collection.

      Let’s write our first set of API tests for the /auth/login endpoint which generates a token for an admin user.

      Endpoint: POST /api/auth/login

      Base URL: https://automationintesting.online

      User Context

      User Role: Admin (default user)

      Credentials Used:

      • username: “admin”
      • password: “password”

      Request:

      Method: POST

      Headers: Content-Type: application/json

      Body:

      {
        "username": "admin",
        "password": "password"
      }

      Expected Response:

      HTTP Status: 200 OK

      / tests/authenticate.spec.js
      import pkg from 'pactum';
      const { spec, stash } = pkg;
      
      describe('/authenticate', () => {
      
          it('should succeed with valid credentials', async () => {
              await spec()
                  .post('https://automationintesting.online/api/auth/login')
                  .withJson({
                      username: 'admin',
                      password: 'password'
                  })
                  .expectStatus(200)
          });
      });

      While this test currently focuses on verifying the status code, future articles will enhance it by adding validations for the authentication token returned in the response.

      Manage Environment Variables

      Create .env file

      To keep sensitive data like URLs and credentials, create a .env.example file as a reference for required environment variables:

      BASE_URL=""
      USERNAME=""
      PASSWORD=""
      👉 Tip: Don’t commit your actual .env to version control
      • Use .env.example to document the required variables.
      • Add .env to your .gitignore file to keep credentials secure.
      • Share .env.example with your team so they can configure their environments consistently.

      Load Environment Variables in Tests

      Install dotenv and configure it in your test files or setup scripts:

      npm install --save-dev dotenv

      Example test with environment variables:

      // tests/authenticate.spec.js
      
      import pkg from 'pactum';
      const { spec } = pkg;
      import dotenv from 'dotenv';
      dotenv.config();
      
      describe('/authenticate', () => {
        it('should succeed with valid credentials', async () => {
          await spec()
            .post(`${process.env.BASE_URL}/auth/login`)
            .withJson({
              username: process.env.USERNAME,
              password: process.env.PASSWORD
            })
            .expectStatus(200);
        });
      });

      Execute Test Case

      Once your test files are set up and your .env file is configured with valid credentials and base URL, you’re ready to execute your test cases.

      PactumJS works seamlessly with test runners like Mocha, which means running your tests is as simple as triggering a test command defined in your package.json. Here’s how to proceed:

      Add a Test Script

      In your package.json, add a script under “scripts” to define how to run your tests. For example:

      // package.json
      
      "scripts": {
        "test": "mocha tests"
      }

      This tells Mocha to look for test files in the tests/ directory and run them.

      Run the Tests

      In your terminal, from the root of your project, run:

      npm test

      This will execute test specs and display results in the terminal. 

      You should see output indicating whether the test passed or failed, for example:

        /authenticate
          ✓ should succeed with valid credentials (150ms)
      
        1 passing (151ms)

      Add a Reporting Tool

      By default, PactumJS uses Mocha’s basic CLI output. For richer reporting—especially useful in CI/CD pipelines—you can use Mochawesome, a popular HTML and JSON reporter for Mocha.

      Install Mochawesome

      Install Mochawesome as a development dependency:

      npm install -D mochawesome

      Update Your Test Script

      Modify the scripts section in your package.json to include a command for generating reports:

      // package.json
      
      "scripts": {
        "test": "mocha tests"
        "test:report": "mocha tests --reporter mochawesome"
      }

      This script tells Mocha to run your tests using the Mochawesome reporter.

      Run the tests with reporting

      Execute your tests using the new script:

      npm run test:report

      This generates a mocha report in JSON and HTML format which you can review locally or attach in CI pipelines.

        /authenticate
          ✔ should succeed with valid credentials (364ms)
      
      
        1 passing (366ms)
      
      [mochawesome] Report JSON saved to ./pactum_test/mochawesome-report/mochawesome.json  [mochawesome] Report HTML saved to ./pactum_test/mochawesome-report/mochawesome.html

      View the report

      Open the HTML report in your browser to visually inspect test results:

      Configure Base Test Setup (base.js)

      Create a Shared Configuration

      Create a base.js file in the setup/ directory. This file is a shared configuration used to define reusable logic like setting the base URL, request headers, or global hooks (beforeEach, afterEach). 

      // setup/base.js
      
      import pactum from 'pactum';
      import dotenv from 'dotenv';
      dotenv.config();
      
      const { request } = pactum;
      
      before(() => {
        request.setBaseUrl(process.env.BASE_URL);
      });

      Load the Setup Automatically Using –file

      To ensure this configuration runs before any tests, register the setup file using Mocha’s –file option. This guarantees Mocha will execute base.js within its context, making all Mocha globals (like before) available.

      Example package.json script:

      "scripts": {
        "test": "mocha tests --file setup/base.js"
      }

      With this in place, run:

      npm test
      👉 Tip: Simplify and DRY Up Your Test Scripts

      To avoid repeating the full Mocha command in multiple scripts, define a single base script (e.g., test) that includes your common options. Then, reuse it for other variants by passing additional flags:

      "scripts": {
        "test": "mocha tests --file setup/base.js",
        "test:report": "npm run test -- --reporter mochawesome"
      }

      This approach keeps your scripts concise and easier to maintain by centralizing the core test command. It also allows you to easily extend or customize test runs with additional options without duplicating configuration. Overall, it reduces the chance of errors and inconsistencies when updating your test scripts.

      Conclusion

      By structuring your PactumJS repository with clear separation of tests, helpers, and setup files—and by leveraging environment variables, global setup, and reporting—you build a scalable and maintainable API testing framework. This approach supports growth, team collaboration, and integration with CI/CD pipelines.

    4. What makes PactumJS awesome? A quick look at its best features.

      What makes PactumJS awesome? A quick look at its best features.

      1. Introduction
        1. Fluent and expressive syntax
        2. Data Management
          1. Data Templates
          2. Data Store for Dynamic Values
        3. Built-In Schema Validation
        4. Flexible Assertions
        5. Default Configuration 
      2. Conclusion
      3. Resources

      Introduction

      I’ve spent a fair bit of time writing API test automation. After exploring a few JavaScript-based tools and libraries, I’ve found Pactum to be particularly powerful. I wanted to take a moment to share a brief overview of my experience and why I think it stands out.

      If you’re setting up a PactumJS project from scratch, I recommend starting with the official Quick Start guide, which covers installation and basic setup clearly. Additionally, this article by Marie Cruz offers a great walkthrough of writing API tests with PactumJS and Jest, especially useful for beginners.

      Fluent and expressive syntax

      One of the aspects I appreciate the most is how naturally you can chain descriptive methods from the spec object to build complex requests with support for headers, body payloads, query parameters, and more.

      Example: 

      it('POST with existing username and valid password', async () => {
              await spec()
                  .post('/auth/login')             .inspect()
                  .withHeaders('Content-Type', 'application/json')
                  .withJson({
                      '@DATA:TEMPLATE@': 'ExistingUser'
                  })
                  .expectStatus(200) # assertion
                  .expectJsonSchema(authenticationSchema) # assertion
          })
      

      More on request making: https://github.com/pactumjs/pactum/wiki/API-Testing#request-making 

      Data Management

      Data Management is a critical aspect of test automation and often one of the more challenging pain points in any automation project. Test suites frequently reuse similar request payloads, making it difficult to maintain and organize these payloads when they are scattered across different test files or folders. Without a structured approach, this can lead to duplication, inconsistency, and increased maintenance overhead. So, it is important to have an intuitive way to handle data in the test framework. 

      In PactumJS, data management is typically handled using data templates and data stores. These help you define reusable request bodies, dynamic data, or test user information in a clean and maintainable way.

      Data Templates

      Data Templates help you define reusable request bodies and user credentials. Templates can also be locally customized within individual tests without affecting the original definition.

      For example, in testing different authentication scenarios:

      1. Valid credentials
      2. Invalid password
      3. Non-existing user

      Rather than hard-coding values in each test, as it is done below: 

      describe('/authenticate', () => {
          it('POST with existing username and valid password', async () => {
              await spec()
                  .post('/auth/login')
                  .inspect()
                  .withHeaders('Content-Type', 'application/json')
                  .withJson({
                      username: process.env.USERNAME,
                      password: process.env.PASSWORD,
                  })
                  .expectStatus(200)
                  .expectJsonSchema(authenticationSchema)
          })
      
          it('POST with existing username and invalid password', async () => {
              await spec()
                  .post('/auth/login')
                  .inspect()
                  .withHeaders('Content-Type', 'application/json')
                  .withJson({
                      username: process.env.USERNAME,
                      password: faker.internet.password(),
                  })
                  .expectStatus(401)
                  .expectJsonMatch('error', 'Invalid credentials')
          })
      
          it('POST with non-existing username and password', async () => {
              await spec()
                  .post('/auth/login')
                  .inspect()
                  .withHeaders('Content-Type', 'application/json')
                  .withJson({
                      username: faker.internet.username(),
                      password: faker.internet.password(),
                  })
                  .expectStatus(401)
                  .expectJsonMatch('error', 'Invalid credentials')
          })
      })

      define reusable templates:

      // auth.js
      
      export function registerAuthTemplates() {
        stash.addDataTemplate({
          ExistingUser: {
              username: process.env.USERNAME,
              password: process.env.PASSWORD,
          },
          NonExistingUser: {
              username: faker.internet.username(),
              password: faker.internet.password(),
          }
      });
      }

      Then load them in global setup:

      // registerDataTemplates.js
      
      import { registerAuthTemplates } from "./auth.js";
      
      export function registerAllDataTemplates() {
          registerAuthTemplates();
        }

      Now, tests become cleaner and easier to maintain:

       it('POST with non-existing username and password', async () => {
              await spec()
                  .post('/auth/login')
                  .inspect()
                  .withHeaders('Content-Type', 'application/json')
                  .withJson({
                      '@DATA:TEMPLATE@': 'NonExistingUser'
                  })
                  .expectStatus(401)
                  .expectJsonMatch('error', 'Invalid credentials')
          })

      Want to override part of a template? 

      Use @OVERRIDES@:

       it('POST with existing username and invalid password', async () => {
              await spec()
                  .post('/auth/login')
                  .inspect()
                  .withHeaders('Content-Type', 'application/json')
                  .withJson({
                      '@DATA:TEMPLATE@': 'ExistingUser',
                      '@OVERRIDES@': {
                          'password': faker.internet.password()
                        }
                  })
                  .expectStatus(401)
                  .expectJsonMatch('error', 'Invalid credentials')
          })

      This approach improves consistency and reduces duplication. When credential details change, updates can be made centrally in the datafactory without touching individual tests. As a result, test logic remains clean, focused on validating behaviour rather than being cluttered with data setup.

      More information on data templates: https://pactumjs.github.io/guides/data-management.html#data-template 

      Data Store for Dynamic Values

      In integration and e2e API testing, one common challenge is managing dynamic data between requests. For example, you might need to extract an authentication token from an authentication response and use it in the header of subsequent requests. Without a clean way to store and reuse this data, tests can become messy, brittle, and hard to maintain.

      PactumJS provides a data store feature that allows you to save custom response data during test execution in a clean way.

      Example:

      Suppose you want to send a POST request to create a room, but the endpoint requires authentication. First, you make an authentication request and receive a token in the response. Using data store functionality, you can capture and store this token, then inject it into the headers of the room creation request. 

      describe('POST Create a New Room', () => {
      
          beforeEach(async () => {
              await spec()
                  .post('/auth/login')
                  .withHeaders('Content-Type', 'application/json')
                  .withJson({
                      '@DATA:TEMPLATE@': 'ExistingUser'
                  }).stores('token', 'token')
          });
      
      
          it('POST: Create a New Room', async () => {
              await spec()
                  .post('/room')
                  .inspect()
                  .withHeaders('Content-Type', 'application/json')
                  .withHeaders('Cookie', 'token=$S{token}')
                  .withJson({ '@DATA:TEMPLATE@': 'RandomRoom' })
                  .expectStatus(200)
                  .expectBody({
                      "success": true
                  })
      
      })

      Data store functionality also supports json-query libraries. It enables you to extract and store specific values from complex JSON responses. This is particularly helpful when dealing with nested structures, where you only need to capture a portion of the response—such as an ID, token, or status—from a larger payload.

      Example:

      await spec()
                  .get('/room')
                  .inspect()
                  .withHeaders('Content-Type', 'application/json')
                  .expectStatus(200)
                  .stores('roomId', `rooms[roomName=${roomName}].roomid`);
      
              await spec()
                  .get(`/room/$S{roomId}`)
                  .inspect()
                  .withHeaders('Content-Type', 'application/json')
                  .expectStatus(200)
                  .expectJson('roomName', roomName);
          })

      More on data store: https://pactumjs.github.io/guides/data-management.html#data-store 

      Built-In Schema Validation

      Unlike other setups that require integrating libraries like zod, ajv, or custom helper functions, PactumJS allows you to validate JSON responses using the expectJsonSchema method. All you need to do is define the expected schema and apply it directly in your test, no extra configuration needed.

      For example, in an authentication test case, the response schema is defined in a separate data factory:

      export const authenticationSchema = {
          "type": "object",
          "properties": {
              "token": {
                  "type": "string"
              }
          },
          "additionalProperties": false,
          "required": ["token"]
      }

      You can then validate the structure of the response like this:

      it('POST with existing username and valid password', async () => {
              await spec()
                  .post('/auth/login')
                  .inspect()
                  .withHeaders('Content-Type', 'application/json')
                  .withJson({
                      '@DATA:TEMPLATE@': 'ExistingUser'
                  })
                  .expectStatus(200)
                  .expectJsonSchema(authenticationSchema)
          })

      Flexible Assertions

      Most REST API responses return data in JSON format that must be validated. Fortunately, PactumJS provides a powerful and expressive assertion system that goes far beyond basic status code checks. Its assertion system allows for 

      1. Deep JSON matching:
      await spec()
          .get(`/room/$S{roomId}`)
          .inspect()
          .expectStatus(200)
          .expectJson('roomName', roomName);
      })
      it('POST with non-existing username and password', async () => {
           await spec()
              .post('/auth/login')
              .inspect()
              .withJson({
                  '@DATA:TEMPLATE@': 'NonExistingUser'
              })
              .expectStatus(401)
              .expectJsonMatch('error', 'Invalid credentials')
          })
      1. Partial comparisons:
      it('posts should have a item with title -"some title"', async () => {
        const response = await pactum.spec()
          .get('https://jsonplaceholder.typicode.com/posts')
          .expectStatus(200)
          .expectJsonLike([
            {
              "userId": /\d+/,
              "title": "some title"
            }
          ]);
      });
      1. Path-Based Validation:
      it('get people', async () => {
        const response = await pactum.spec()
          .get('https://some-api/people')
          .expectStatus(200)
          .expectJson({
            people: [
              { name: 'Matt', country: 'NZ' },
              { name: 'Pete', country: 'AU' },
              { name: 'Mike', country: 'NZ' }
            ]
          })
          .expectJsonAt('people[country=NZ].name', 'Matt')
          .expectJsonAt('people[*].name', ['Matt', 'Pete', 'Mike']);
      });
      1. Dynamic Runtime Expressions:
      it('get users', async () => {
        await pactum.spec()
          .get('/api/users')
          .expectJsonLike('$V.length === 10'); // api should return an array with length 10
          .expectJsonLike([
            {
              id: 'typeof $V === "string"',
              name: 'jon',
              age: '$V > 30' // age should be greater than 30
            }
          ]);
      });

      And all of them are in a clean and readable format. 

      For example, you can validate only parts of a response, use regex or custom matchers, and even plug in JavaScript expressions or reusable assertion handlers. In my opinion, this level of granularity is a game-changer compared to assertion styles in other frameworks.

      Check more in the official documentation: https://github.com/pactumjs/pactum/wiki/API-Testing#response-validation 

      Default Configuration 

      To reduce repetition and keep tests clean, PactumJS allows you to define default values that apply globally across your test suite — such as headers, base URL, and request timeouts. This helps maintain consistency and simplifies test configuration.

      Here’s how it can be implemented:

      before(() => {
        request.setBaseUrl(process.env.BASE_URL);
        request.setDefaultHeaders('Content-Type', 'application/json');
      });

      More information you can find here: https://github.com/pactumjs/pactum/wiki/API-Testing#request-settings 

      Conclusion

      In my experience, PactumJS has proven to be a well-designed and developer-friendly tool for API test automation. Its fluent syntax, robust data handling, and built-in features like schema validation and dynamic stores eliminate the need for developing third-party solutions for the test framework.

      If you’re working with API testing in JavaScript / Typescript, PactumJS is definitely worth a look.

      Resources

      1. You can find the complete set of test cases, data templates, and helper functions shown in this post in the GitHub Repo
      2. Official PactumJS Documentation: https://pactumjs.github.io/ 
      3. PactumJS WiKi Page: https://github.com/pactumjs/pactum/wiki/API-Testing 
      4. Code Examples in PactumJS GitHub: https://github.com/pactumjs/pactum-examples 
    5. Automating Contract Testing in a CI/CD Pipeline with GitHub Actions

      Automating Contract Testing in a CI/CD Pipeline with GitHub Actions

      Using a Pact Broker to Manage Contracts Across Microservices

      In the previous article, I raised an important question: What if the provider and consumer microservices do not share the same repository but still need access to the contract from a third-party source? The solution to this challenge is the Pact Broker.

      In this article, we will explore how the Pact Broker works and how to implement pipeline using GitHub Actions.

      When Do You Need a Pact Broker?

      A Pact Broker is essential in scenarios where:

      • The provider and consumer microservices are in separate repositories but must share the same contract.
      • You need to manage contracts across different branches and environments.
      • Coordinating releases between multiple teams is required.

      Options for Setting Up a Pact Broker

      There are multiple ways to set up a Pact Broker:

      1. Own Contract Storage Solution – Implement your own contract-sharing mechanism.
      2. Hosted Pact Broker (PactFlow) – A cloud-based solution provided by SmartBear.
      3. Self-Hosted Open-Source Pact Broker – Deploy and manage the Pact Broker on your infrastructure.

      As a starting point, PactFlow is a great solution due to its ease of use.

      Publishing Contracts to the Pact Broker

      For demonstration purposes, we will use the free version of PactFlow. Follow these steps to publish contracts:

      1. Sign Up for PactFlow

      Visit PactFlow and create a free account.

      2. Retrieve Required Credentials

      • Broker URL: Copy the URL from the address bar (e.g., https://custom.pactflow.io/).
      • Broker API Token: Navigate to Settings → API Tokens and copy the read/write token for CI/CD pipeline authentication.

      3. Setting Up a CI/CD Pipeline with GitHub Actions

      Setting up CI/CD pipeline using GitHub Actions.

      We will configure GitHub Actions to trigger on a push or merge to the main branch. The workflow consists of the steps displayed on the diagram.

      To set up GitHub Actions, create a .yml file in the .github/workflows directory. In this example, we’ll use contract-test-sample.yml:

      name: Run contract tests
      
      on: push
      
      env:
        PACT_BROKER_BASE_URL: ${{ secrets.PACT_BROKER_BASE_URL }}
        PACT_BROKER_TOKEN: ${{ secrets.PACT_BROKER_TOKEN }}
      
      jobs:
        contract-test:
          runs-on: ubuntu-latest
          steps:
            - uses: actions/checkout@v4
            - uses: actions/setup-node@v4
              with:
                node-version: 18
            - name: Install dependencies
              run: npm install
            - name: Run web consumer contract tests
              run: npm run test:consumer
            - name: Publish contract to PactFlow
              run: npm run publish:pact
            - name: Run provider contract tests
              run: npm run test:provider

      Before running the workflow, store the required secrets in your GitHub repository:

      1. Navigate to Repository → Settings → Secrets and Variables.
      2. Create two secrets:
        • PACT_BROKER_BASE_URL
        • PACT_BROKER_TOKEN

      Save, commit, and push your changes to the remote repository.

      Navigate to the Actions tab in GitHub to verify if the pipeline runs successfully.

      You should see all the steps running successfully like on the screenshot below:

      7. Verifying the Contract in PactFlow

      Once the pipeline runs successfully:

      • Navigate to PactFlow.
      • Verify if the contract has been published.
      • You should see two microservices and the contract established between them.
      Two microservices – Library Consumer and Library Provider
      Pact between two microservices, which is published and stored in PactFlow

      Configuring Contract Versioning

      If there are changes in the contract (e.g., if a new version of a consumer or provider is released), versioning should evolve too. Automating this process is crucial.

      A recommended approach is using GitHub Commit ID (SHA), ensuring that contract versions are traceable to relevant code changes.

      1. Define the Versioning Variable

      In the contract-test-sample.yml file, introduce a new environment variable GITHUB_SHA:

      GITHUB_SHA: ${{ github.sha }}

      2. Update the Pact Publish Script

      Modify the pact:publish script to use the automatically generated version:

      "publish:pact": "pact-broker publish ./pacts --consumer-app-version=$GITHUB_SHA --tag=main --broker-base-url=$PACT_BROKER_BASE_URL --broker-token=$PACT_BROKER_TOKEN"

      3. Update provider options with providerVersion value:

      const opts = {
                  provider: "LibraryProvider",
                  providerBaseUrl: "http://localhost:3000",
                  pactBrokerToken: process.env.PACT_BROKER_TOKEN,
                  providerVersion: process.env.GITHUB_SHA,
                  publishVerificationResult: true,
                  stateHandlers: {
                      "A book with ID 1 exists": () => {
                          return Promise.resolve("Book with ID 1 exists")
                      },
                  },
              }

      Configuring Branches for Contract Management

      If multiple people are working on the product in different branches, it is crucial to assign contracts to specific branches to ensure accurate verification.

      1. Define the Branching Variable

      Add GITHUB_BRANCH to the .yml file:

      GITHUB_BRANCH: ${{ github.ref_name }}

      2. Update the Pact Publish Script for Branching

      Modify pact:publish to associate contracts with specific branches:

      "publish:pact": "pact-broker publish ./pacts --consumer-app-version=$GITHUB_SHA --branch=$GITHUB_BRANCH --broker-base-url=$PACT_BROKER_BASE_URL --broker-token=$PACT_BROKER_TOKEN"

      3. Update provider options with providerVersionBranch value:

      const opts = {
                  provider: "LibraryProvider",
                  providerBaseUrl: "http://localhost:3000",
                  pactBrokerToken: process.env.PACT_BROKER_TOKEN,
                  providerVersion: process.env.GITHUB_SHA,
                  providerVersionBranch: process.env.GITHUB_BRANCH,
                  publishVerificationResult: true,
                  stateHandlers: {
                      "A book with ID 1 exists": () => {
                          return Promise.resolve("Book with ID 1 exists")
                      },
                  },
              }

      Using the can-i-deploy tool

      The can-i-deploy tool is a Pact feature that queries the matrix table to verify if a contract version is safe to deploy. This ensures that new changes are successfully verified against the currently deployed versions in the environment.

      Running can-i-deploy for consumer:

      pact-broker can-i-deploy --pacticipant LibraryConsumer --version=$GITHUB_SHA

      Running can-i-deploy for provider:

      pact-broker can-i-deploy --pacticipant LibraryProvider --version=$GITHUB_SHA

      If successful, it confirms that the contract is verified and ready for deployment.

      To reuse these commands, we will create scripts for verification in package.json file:

      "can:i:deploy:consumer": "pact-broker can-i-deploy --pacticipant LibraryConsumer --version=$GITHUB_SHA"
      
      "can:i:deploy:provider": "pact-broker can-i-deploy --pacticipant LibraryProvider --version=$GITHUB_SHA"

      And then update GitHub Actions pipeline:

      name: Run contract tests
      
      on: push
      
      env:
        PACT_BROKER_BASE_URL: ${{ secrets.PACT_BROKER_BASE_URL }}
        PACT_BROKER_TOKEN: ${{ secrets.PACT_BROKER_TOKEN }}
        GITHUB_SHA: ${{ github.sha }}
        GITHUB_BRANCH: ${{ github.ref_name }}
      
      jobs:
        contract-test:
          runs-on: ubuntu-latest
          steps:
            - uses: actions/checkout@v4
            - uses: actions/setup-node@v4
              with:
                node-version: 18
            - name: Install dependencies
              run: npm i
            - name: Run web consumer contract tests
              run: npm run test:consumer
            - name: Publish contract to Pactflow
              run: npm run publish:pact
            - name: Run provider contract tests
              run: npm run test:provider
            - name: Can I deploy consumer?
              run: npm run can:i:deploy:consumer
            - name: Can I deploy provider?
              run: npm run can:i:deploy:provider

      Add changes, commit and push. Navigate to the Actions tab in GitHub to verify if the pipeline runs successfully.

      You should see all the steps running successfully like on the screenshot below:

      GitHub Actions pipeline contains extra steps, which verify if a contract version is safe to deploy

      Conclusion

      The Pact Broker is important for managing contracts across microservices, ensuring smooth collaboration between independent services. By automating contract versioning, branch-based contract management, and deployment workflows using GitHub Actions, teams can can reduce deployment risks, improve service reliability, and speed-up release cycles.

      For a complete implementation, refer to the final version of the code in the repository.

    6. Consumer-Driven Contract Testing in Practice

      Consumer-Driven Contract Testing in Practice

      Introduction

      In the previous article consumer-driven contract testing has been introduced. And at this point, I am sure you can’t wait to start actual implementation. So let’s not delay any further!

      Let’s start with the implementation using Pact. 

      Based on official documentation, Pact is a code-first tool for testing HTTP and message integrations using contract tests.

      As a system under test we are going to use consumer-provider applications written in JavaScript. You can find the source code in the GitHub Repository.

      Consumer Tests

      The focus of the consumer test is the way to check if the consumer’s expectations match what the provider does. These tests are not supposed to verify any functionality of the provider, instead focus solely on what the consumer requires and validate whether those expectations are met.

      Loose Matchers

      To avoid brittle and flaky tests, it is important to use loose matchers as a best practice. This makes contract tests more resilient to minor changes in the provider’s response. Generally, the exact value returned by the provider during verification is not critical, as long as the data types match (Pact documentation). However, an exception can be made when verifying a specific value in the response.

      Pact provides several matchers that allow flexible contract testing by validating data types and structures instead of exact values. Key loose matchers can be found in the Pact documentation.

      Example without loose matchers (strict matching):

      describe("getBook", () => {
          test("returns a book when a valid book id is provided", async () => {
      
              await provider.addInteraction({
                  states: [{ description: "A book with ID 1 exists" }],
                  uponReceiving: "a request for book 1",
                  withRequest: {
                      method: "GET",
                      path: "/books/1",
                  },
                  willRespondWith: {
                      status: 200,
                      headers: { "Content-Type": "application/json" },
                      body: {
                          id: 1,
                          title: "To Kill a Mockingbird",
                          author: "Harper Lee",
                          isbn: "9780446310789"
                      },
                  },
              })
      
              await provider.executeTest(async (mockService) => {
                  const client = new LibraryClient(mockService.url)
                  const book = await client.getBook(1)
                  expect(book).toEqual(expectedBook)
              })
          })
      })

      Problem: This test will fail if id, title, or author, isbn  changes even slightly.

      Example with loose matchers (flexible and maintainable):

      Using Pact matchers, we allow the provider to return any valid values of the expected types:

      describe("getBook", () => {
          test("returns a book when a valid book id is provided", async () => {
            const expectedBook = { id: 1, title: "To Kill a Mockingbird", author: "Harper Lee", isbn: "9780446310789" }
      
            await provider.addInteraction({
              states: [{ description: "A book with ID 1 exists" }],
              uponReceiving: "a request for book 1",
              withRequest: {
                method: "GET",
                path: "/books/1",
              },
              willRespondWith: {
                status: 200,
                headers: { "Content-Type": "application/json" },
                body: like(expectedBook),
              },
            })
      
            await provider.executeTest(async (mockService) => {
              const client = new LibraryClient(mockService.url)
              const book = await client.getBook(1)
              expect(book).toEqual(expectedBook)
            })
          })
        })
      

      In this case the contract remains valid even if actual values change, validation focused only on ensuring that data types and formats are correct.

      Steps to write consumer contract tests

      Scenarios:

      1. Validate that LibraryClient.getAllBooks() retrieves a list of books.
      2. Validate that LibraryClient.getBook(id) correctly fetches a single book when given a valid ID.

      To start with hands-on, you have to clone the repository with the consumer and provider.

      To start with consumer, open consumer.js file. Inside you can find the LibraryClient class represents the consumer in a consumer-driven contract testing setup. It acts as a client that interacts with an external Library API (provider) to fetch and manage book data.

      There are a few functions present:

      1. getBook(id) – Fetches a single book by its id. Returns the data in JSON format.
      2. getAllBooks() – Fetches all books from the API. Returns a list of books in JSON format.
      3. addBook(title, author, isbn) – Sends a POST request to add a new book. Returns the newly created book’s details.

      Writing the first consumer contract test:

      1. Importing the required dependencies and Consumer Class.
      const path = require('path');
      const { PactV3, MatchersV3 } = require('@pact-foundation/pact');
      const LibraryClient = require('../src/client');
      1. Setting up the mock provider
      const provider = new PactV3({
          dir: path.resolve(process.cwd(), 'pacts'),
          consumer: "LibraryConsumer",
          provider: "LibraryProvider"
      })

      The code above creates a Pact mock provider (provider) using PactV3 library where specifies:

      • LibraryConsumer as the name of the consumer (the client making requests).
      • LibraryProvider as the name of the provider (the API responding to requests).
      • Passing parameter dir to define directory for the contract to be stored. 
      1. Setting up the interaction of the consumer and mock provider and register consumer expectations.
      const EXPECTED_BOOK = { id: 1, title: "To Kill a Mockingbird", author: "Harper Lee", isbn: "9780446310789" }
      
      describe("getAllBooks", () => {
          test("returns all books", async () => {
      
              provider
                  .uponReceiving("a request for all books")
                  .withRequest({
                      method: "GET",
                      path: "/books",
                  })
                  .willRespondWith({
                      status: 200,
                      body: MatchersV3.eachLike(EXPECTED_BOOK),
                  })
      
              await provider.executeTest(async (mockService) => {
                  const client = new LibraryClient(mockService.url)
                  const books = await client.getAllBooks()
                  expect(books[0]).toEqual(EXPECTED_BOOK)
              })
          })
      })
      
      describe("getBook", () => {
          test("returns a book when a valid book id is provided", async () => {
      
              provider
                  .given('A book with ID 1 exists')
                  .uponReceiving("a request for book 1")
                  .withRequest({
                      method: "GET",
                      path: "/books/1",
                  })
                  .willRespondWith({
                      status: 200,
                      body: MatchersV3.like(EXPECTED_BOOK),
                  }),
      
              await provider.executeTest(async mockProvider => {
                  const libraryClient = new LibraryClient(mockProvider.url)
                  const book = await libraryClient.getBook(1);
                  expect(book).toEqual(EXPECTED_BOOK);
              })
          })
      })
      • First we define the expected book. This object represents a single book that we expect the API to return. It acts as a template for what a book response should look like.
      • provider.addInteraction({...}) sets up a mock interaction.
      • uponReceiving: Describes what the test expects.
      • withRequest: Defines the expected request details:
      1. Method: GET
      2. Endpoint: /books
      • willRespondWith: Defines the expected response:
      1. Status Code: 200
      2. Body: MatchersV3.eachLike(EXPECTED_BOOK)
      3. eachLike(EXPECTED_BOOK): Ensures the response contains an array of objects that match the structure of EXPECTED_BOOK.

      4. Calling the consumer against the mock provider:

              await provider.executeTest(async mockProvider => {
                  const libraryClient = new LibraryClient(mockProvider.url)
                  const book = await libraryClient.getBook(1);
                  expect(book).toEqual(EXPECTED_BOOK);
              })

      Now, you are ready to run the test! First, create a new script in our package.json file called test:consumer, which uses jest command followed by the test file you want to execute: 

      "test:consumer": "jest consumer/test/consumer.test.js",

      Save the changes and run tests by executing this command:

      npm run test:consumer

      If everything set up correctly you should get one test passing:

      If the test passes, a contract is generated and saved in the pacts folder. If it fails, the contract cannot be created.

      The content of the contract should include the information about the consumer, provider, interaction which have been set up, the request and response details expected from the provider, matching rules and any other relevant information. 

      {
        "consumer": {
          "name": "LibraryConsumer"
        },
        "interactions": [
          {
            "description": "a request for all books",
            "request": {
              "method": "GET",
              "path": "/books"
            },
            "response": {
              "body": [
                {
                  "author": "Harper Lee",
                  "id": 1,
                  "isbn": "9780446310789",
                  "title": "To Kill a Mockingbird"
                }
              ],
              "headers": {
                "Content-Type": "application/json"
              },
              "matchingRules": {
                "body": {
                  "$": {
                    "combine": "AND",
                    "matchers": [
                      {
                        "match": "type",
                        "min": 1
                      }
                    ]
                  }
                }
              },
              "status": 200
            }
          },
          {
            "description": "a request for book 1",
            "providerStates": [
              {
                "name": "A book with ID 1 exists"
              }
            ],
            "request": {
              "method": "GET",
              "path": "/books/1"
            },
            "response": {
              "body": {
                "author": "Harper Lee",
                "id": 1,
                "isbn": "9780446310789",
                "title": "To Kill a Mockingbird"
              },
              "headers": {
                "Content-Type": "application/json"
              },
              "matchingRules": {
                "body": {
                  "$": {
                    "combine": "AND",
                    "matchers": [
                      {
                        "match": "type"
                      }
                    ]
                  }
                }
              },
              "status": 200
            }
          }
        ],
        "metadata": {
          "pact-js": {
            "version": "11.0.2"
          },
          "pactRust": {
            "ffi": "0.4.0",
            "models": "1.0.4"
          },
          "pactSpecification": {
            "version": "3.0.0"
          }
        },
        "provider": {
          "name": "LibraryProvider"
        }
      }

      Provider tests

      The primary goal of provider contract tests is to verify the contract generated by the consumer. Pact provides a framework to retrieve this contract and replay all registered consumer interactions to ensure compliance. The test is run against the real service.

      Provider States

      Before writing provider tests, I’d like to introduce another useful concept: provider states.

      Following best practices, interactions should be verified in isolation, making it crucial to maintain context independently for each test case. Provider states allow you to set up data on the provider by injecting it directly into the data source before the interaction runs. This ensures the provider generates a response that aligns with the consumer’s expectations.

      The provider state name is defined in the given clause of an interaction on the consumer side. This name is then used to locate the corresponding setup code in the provider, ensuring the correct data is in place.

      Example

      Consider the test case: “A book with ID 1 exists.”

      To ensure the necessary data exists, we define a provider state inside stateHandlers, specifying the name from the consumer’s given clause:

                  stateHandlers: {
                      "A book with ID 1 exists": () => {
                          return Promise.resolve("Book with ID 1 exists")
                      },
                  },

      On the consumer side, the provider state is referenced in the given clause:

              provider
                  .given('A book with ID 1 exists')
                  .uponReceiving("a request for book 1")
                  .withRequest({
                      method: "GET",
                      path: "/books/1",
                  })
                  .willRespondWith({
                      status: 200,
                      body: MatchersV3.like(EXPECTED_BOOK),
                  }),

      This setup ensures that before the interaction runs, the provider has the necessary data, allowing it to return the expected response to the consumer.

      Writing provider tests

      1. Importing the required dependencies
      const { Verifier } = require('@pact-foundation/pact');
      const app = require("../src/server.js");

      2. Running the provider service

      const server = app.listen(3000)

      3. Setting up the provider options

              const opts = {
                  provider: "LibraryProvider",
                  providerBaseUrl: "http://localhost:3000",
                  publishVerificationResult: true,
                  providerVersion: "1.0.0",
              }

      4. Writing the provider contract test. After setting up the provider verifier options, let’s write the actual provider contract test using Jest framework. 

              const verifier = new Verifier(opts);
      
              return verifier
                  .verifyProvider()
                  .then(output => {
                      console.log('Pact Verification Complete!');
                      console.log('Result:', output);
                  })

      5. Running the provider contract test

      Before running tests, you have to create a new script in the package.json file called test:provider, which uses jest command followed by the test file you want to execute: 

      "test:provider": "jest provider/test/provider.spec.js"

      Save the changes and run tests by executing this command:

      npm run test:provider

      If everything set up correctly you should get one test passing:

      Conclusion

      Today, we explored a practical implementation of the consumer-driven contract testing approach. We created test cases for both the consumer and provider and stored the contract in the same repository.

      But you might be wondering—what if the consumer’s and provider’s repositories are separate, unlike our case? Since these two microservices are independent, the contract needs to be accessible to both. So, where should it be stored?

      Let’s to explore possible solution in the next part.

      Bye for now! Hope you enjoyed it!

    7. Contract Testing: Who’s Who in the Process

      Contract Testing: Who’s Who in the Process

      Introduction

      Today, I want to introduce you to the concept of contract testing using an analogy—buying the house of your dreams 🏡. Whether you already own your dream home or are still searching for it, you probably know the excitement and anticipation that comes with the process.

      Imagine you’ve finally found the perfect house. You’re happy to move forward, but before the keys are in your hand, it’s crucial to set clear expectations with the seller. This involves agreeing on the details: the price, the condition of the house, and any other terms. To formalize this, a contract is drawn up, and a neutral party, like a notary or bank, helps ensure everything is clear and fair.

      This scenario mirrors contract testing in software development, where a consumer (the buyer) and a provider (the seller) agree on a contract to ensure their interactions meet expectations. The contract broker (like the notary) acts as a mediator to validate and enforce these agreements.

      Let’s break this analogy down further.

      Consumer.

      In this scenario you’re a consumer. You have specific expectations: size, number of rooms, location, price, neighbourhood, etc. 

      In contract testing, the consumer is a service or application that needs to consume data or services from a provider. The consumer is usually a web or mobile application making a request to a backend service, also it could be another service calling a backend service.  

      A consumer test verifies that the consumer correctly creates requests, handles provider responses as expected, and uncovers any misunderstandings about the provider’s behavior.

      Provider

      Then, the seller is the person offering the house. They promise certain features in the house: a garden, a modern kitchen, friendly neighbourhood and so on. 

      Provider on the other side of the consumer in contract testing that promises to deliver specific data or functionality. Usually it is a backend service. 

      Contract

      The contract is the written agreement between you and the seller. It ensures both parties understand and agree on what is being provided and what is expected (e.g., the price, delivery date, features of the house).

      The contract is no different in software. The contract is a formal agreement between the consumer and provider about how they will interact (e.g., API specifications, request/response formats).

      Hmmm.. not really! Contract isn’t the same as JSON Schema. This article explains well the difference between schema-based and contract-based testing. 

      In short: A schema is a structural blueprint or definition of how data in JSON is organized. It describes the structure, format, and relationships of data. 

      But the schema does not specify how the data should be used, when it should be provided, or how the interaction between the consumer and provider should behave. It’s purely about the data format and structure.

      A contract includes the schema but also goes beyond it to define the behavioral and interaction agreements between the consumer and provider.

      Contract includes following data:

      • The name of the consumer and provider
      • Data requirements for the request
      • Interactions between consumer and provider
      • Matching rules for the dynamic values
      • Environment and deployment information

      Contract Broker

      The contract broker, like a bank or notary, helps validate and mediate the agreement. They ensure that both parties adhere to their commitments.

      In contract testing, the contract broker could be a tool or framework (e.g., Pact) that stores and validates contracts. It ensures the provider and consumer stick to their agreed-upon specifications.

      The broker helps verify the compatibility between the two parties independently, ensuring that both can work together smoothly.

      Can-I-Deploy Tool

      To enable consumers and providers to check if they can deploy their changes to production, Pact provides a command-line interface (CLI) tool called can-i-deploy, which enables consumer and provider to determine the verification status of the contract.

      Contract testing approaches

      There are mainly two ways to approach contract testing:

      • The consumer-driven contract testing (CDCT) approach
      • The provider-driven contract testing (PDCT) approach

      In these series I am going to discuss traditional CDCT approach.

      Consumer-Driven Testing

      In the consumer-driven approach the consumer is driving the contract. As a consumer before finalizing the house purchase, you might inspect the house to confirm it meets your expectations and publish your expectations as a contract to the broker. On another side,  the seller must ensure their house is as described in the contract and ready for sale. This is like provider-side testing, ensuring they deliver what the contract specifies.

      Contract testing ensures that consumers (buyers) and providers (sellers) are on the same page regarding their expectations and deliverables, with a broker (notary or bank) facilitating the process. This approach reduces the risk of miscommunication and ensures smooth collaboration—whether you’re buying a house or building software systems.

      Conclusion

      Contract testing acts as the bridge between consumers and providers, ensuring smooth collaboration. Much like finalizing the purchase of your dream house, both parties agree on a contract that outlines expectations and deliverables, with a broker ensuring everything aligns. Whether you’re buying a house or developing software, clear agreements lead to smoother outcomes!

      Next, we’ll explore the application under test and hit the ground running with implementation!

    8. Part3. Writing your first test case.

      Part3. Writing your first test case.

      Introduction:

      In this tutorial, we are going to explore public website: https://practicesoftwaretesting.com

      More examples of automation testing friendly websites you can find in the repo throughly curated by Butch Mayhew.

      In Playwright, structuring a test suite involves organizing your test cases within descriptive blocks (test.describe) and utilizing setup and teardown functions (test.beforeEach and test.afterEach) to ensure consistent test environments. Here’s a brief description of each component and an example:

      1. test.describe block provides a high-level description of the test suite, allowing you to group related test cases together. It helps in organizing tests based on functionality or feature sets.
      2. Inside test.describe, individual test cases are defined using the test block. Each test block represents a specific scenario or behavior that you want to verify.
      3. test.beforeEach block is used to define setup actions that need to be executed before each test case within the test.describe block. It ensures that the test environment is in a consistent state before each test runs.
      4. test.afterEach block is utilized for defining teardown actions that need to be executed after each test case within the test.describe block. It helps in cleaning up the test environment and ensuring that resources are properly released.

      Here’s an example demonstrating the structure of a test suite in Playwright:

      import { chromium, Browser, Page } from 'playwright';
      
      // Define the test suite
      test.describe('Login functionality', () => {
        let browser: Browser;
        let page: Page;
      
        // Setup before each test case
        test.beforeEach(async () => {
          browser = await chromium.launch();
          page = await browser.newPage();
          await page.goto('https://example.com/login');
        });
      
        // Teardown after each test case
        test.afterEach(async () => {
          await browser.close();
        });
      
        // Test case 1: Verify successful login
        test('Successful login', async () => {
          // Test logic for successful login
        });
      
        // Test case 2: Verify error message on invalid credentials
        test('Error message on invalid credentials', async () => {
          // Test logic for error message on invalid credentials
        });
      });
      

      DOM Terminology

      Before we start writing test cases, it will be useful to brush up our memory on DOM Terminology

      1. HTML tags are simple instructions that tell a web browser how to format text. You can use tags to format italics, line breaks, objects, bullet points, and more. Examples: <input>, <div>, <p>
      2. Elements in HTML have attributes; these are additional values that configure the elements or adjust their behavior in various ways to meet the criteria the users want. Sometimes these attributes can have a value and sometimes doesn’t. Refer to Developer Mozilla Website for more information.”Class” and “id” are the most used attributes in HTML. (image: show class attribute, class value)
      3. Value in between angle braces is a plain text
      4. HTML tags usually come in pairs of Opening and Closing Tags.

      Locator Syntax Rules

      Locate Element by tag name:

      page.locator('img');

      Locate by id:

      page.locator('.img-fluid');

      Locate by class value:

      page.locator('.img-fluid');

      Locate by attribute:

      page.locator('[data-test="nav-home"]');

      Combine several selectors:

      page.locator('img.img-fluid');

      Locate by full class value:

      page.locator('[class=collapse d-md-block col-md-3 mb-3]');

      Locate by partial text match:

      page.locator(':text("Combination")');

      Locate by exact text match:

      page.locator(':text-is("Combination Pliers")');

      XPATH:

      As for XPath: it is not recommended approach to locate elements according to Playwright Best Practices:

      Source: https://playwright.dev/docs/other-locators#xpath-locator

      User-facing Locators.

      There are other ways to locate elements by using built-in APIs Playwright provides.

      There is one best practice we have to keep in mind: automated tests must focus on verifying that the application code functions as intended for end users, while avoiding reliance on implementation specifics that are not typically visible, accessible, or known to users. Users will only see or interact with the rendered output on the page; therefore, tests should primarily interact with this same rendered output. Playwright documentation: https://playwright.dev/docs/best-practices#test-user-visible-behavior.

      There are recommended built-in locators:

      1. page.getByRole() to locate by explicit and implicit accessibility attributes.
      2. page.getByText() to locate by text content.
      3. page.getByLabel() to locate a form control by associated label’s text.
      4. page.getByPlaceholder() to locate an input by placeholder.
      5. page.getByAltText() to locate an element, usually image, by its text alternative.
      6. page.getByTitle() to locate an element by its title attribute.
      7. page.getByTestId() to locate an element based on its data-testid attribute (other attributes can be configured).

      Let’s check out the example:

      test('User facing locators', async({page}) => {
      await page.getByPlaceholder('Search').click();
      await page.getByPlaceholder('Search').fill("Hand Tools");
      await page.getByRole('button', {name: "Search"}).click();
      await expect (page.getByRole('heading', {name: "Searched for: Hand Tools"})).toBeVisible();
      })

      where we would like to explore search functional test:

      Part of the page to be tested
      1. click on the Search Placeholder
      Search placeholder HTML

      await page.getByPlaceholder('Search').click();

      2. enter “Hand Tools” text to search for available items.

      await page.getByPlaceholder('Search').fill("Hand Tools");

      3. locate Search button and click it to confirm.

      Search button HTML

      4. Then we have to verify if no items have been found by asserting text on this page:

      Result after clicking on Search button
      No Result Found HTML

      await expect (page.getByRole('heading', {name: "Searched for: Hand Tools"})).toBeVisible();

      5. Run this test case and make sure test is passing.

      Assertions

      Playwright incorporates test assertions utilizing the expect function. To perform an assertion, utilize expect(value) and select a matcher that best represents the expectation. Various generic matchers such as toEqual, toContain, and toBeTruthy are available to assert various conditions.

      General Assertions

      // Using toEqual matcher
      test('Adding numbers', async () => {
      const result = 10 + 5;
      expect(result).toEqual(15);
      });

      Assert that the title of the product is “Combination Pliers”.

      Element on the page
      Element HTML
      const element = page.locator('.col-md-9 .container').first().locator('.card-title');
      const text = element.textContent();
      expect(text).toEqual('Combination Pliers');

      Locator Assertions

      Playwright provides asynchronous matchers, ensuring they wait until the expected condition is fulfilled. For instance, in the following scenario:

      const element = page.locator('.col-md-9 .container').first().locator('.card-title');
      await expect(element).toHaveText('Combination Pliers');

      !Note: do not forget to use await when asserting locators

      Playwright continuously checks the element with the test id of “status” until it contains the text “Combination Pliers”. This process involves repeated fetching and verification of the element until either the condition is satisfied or the timeout limit is reached. You have the option to either specify a custom timeout or configure it globally using the testConfig.expect value in the test configuration.

      By default, the timeout duration for assertions is set to 5 seconds.

      There are two types assertion though: Auto-Retrying Assertions and Non-Retrying Assertions.

      Auto-Retrying assertions provided below will automatically retry until they pass successfully or until the assertion timeout is exceeded. It’s important to note that these retrying assertions operate asynchronously, necessitating the use of the await keyword before them.

      Non-Retrying assertions enable testing various conditions but do not automatically retry.

      It’s advisable to prioritize auto-retrying assertions whenever feasible.

      Soft Assertions

      As a default behavior, when an assertion fails, it terminates the test execution. However, Playwright offers support for soft assertions. In soft assertions, failure doesn’t immediately stop the test execution; instead, it marks the test as failed while allowing further execution.

      For example, if we take the previous example and put .soft it assertion, in case assertion fails, it will not lead to termination of test execution.

      const element = page.locator('.col-md-9 .container').first().locator('.card-title');
      await expect.soft(element).toHaveText('Combination Pliers');

      Conclusion.

      In conclusion, we’ve explored the aspects of writing test cases using Playwright. We delved into the standard structure of a test case, incorporating essential elements such as hooks and grouping for efficient test management. Additionally, we examined various strategies for locating elements within web pages. Lastly, we discussed the importance of assertions in verifying expected behaviors, covering different assertion techniques to ensure robust and reliable testing. Examples of code, you can see in repository.