The Inspiration Behind This Series
At the end of 2024, I ordered a book Contract Testing in Action and had been waiting for the right moment to start exploring. Recently, I finally read through most of its chapters and found its insights to be handy for development teams working with microservice architectures. Inspired by the knowledge and ideas from the book, I decided to write a series of articles to share what I’ve learned and explore how these concepts can be effectively applied in real-world scenarios. This introductory article serves as the starting point, explaining what contract testing is and how it fits into a broader testing strategy.
Testing Strategy for Microservices.
Over the past few decades, microservice architecture became a crucial way of building modern, scalable, and reliable applications. Traditional monolithic systems, where the database and all business logic seats under a single, tightly coupled structure, have gradually taken a backseat. In their place, independently deployable and modular services—known as microservices — have became the foundation of contemporary software development. This shift enables product teams to deliver features faster and more efficiently. However, with this huge leap comes the challenge with ensuring that each microservice operates correctly both in isolation and as part of larger systems. So, planning and executing testing strategies becomes an important component of the development lifecycle.
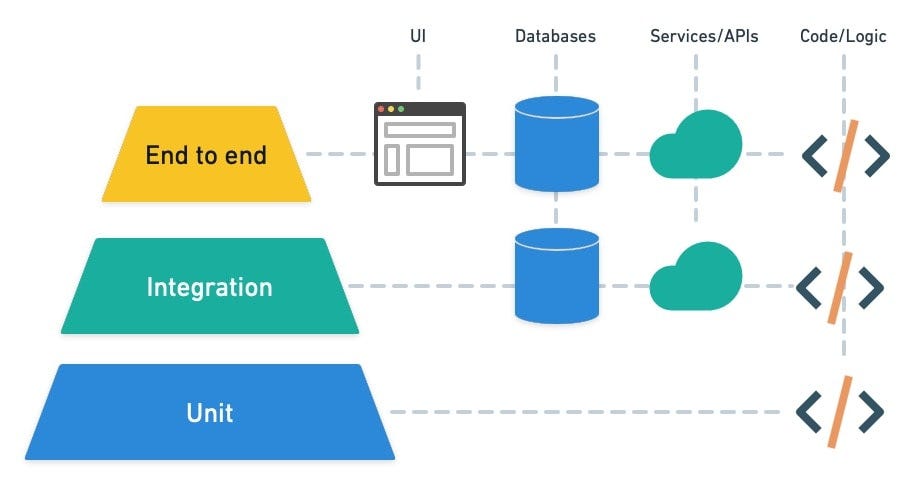
The most widespread scheme of testing of any system is the one which is proposed by Mike Cohn in his book ‘Succeeding with Agile’.

Source: https://semaphoreci.com/blog/testing-pyramid
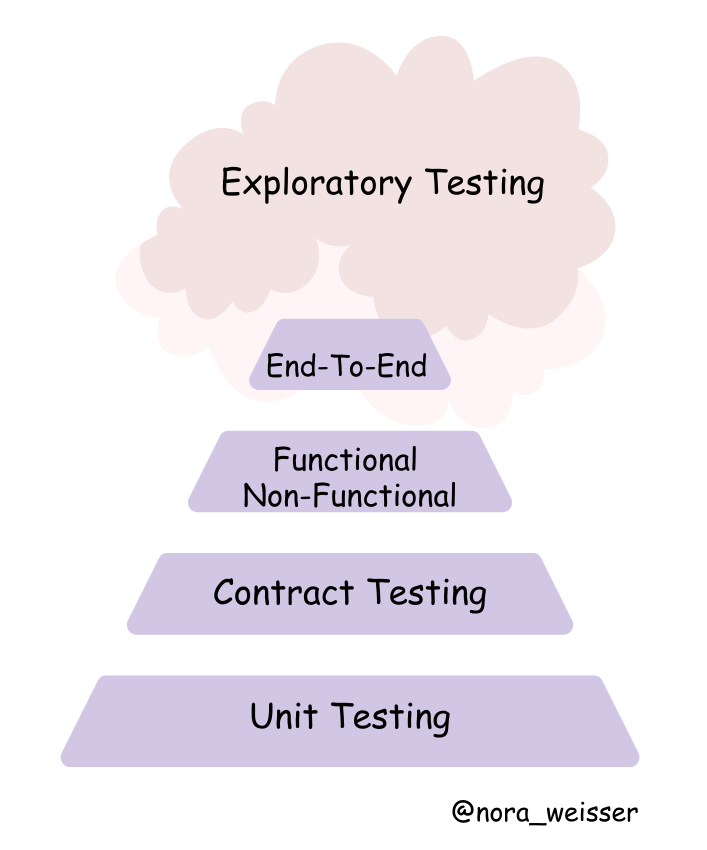
Microservices often rely on APIs to exchange data, with some services acting as providers (offering data) and others as consumers (requesting and processing data). Without a clear and tested agreement—or contract—between these services, even minor changes in one service can lead to failures across the system. This is where contract testing becomes invaluable and should be included into the pyramid as well.
Here is the adjusted version of the pyramid:

Why is contract testing so important?
Let’s take a real-life example with a banking application. Imagine a banking application with the following teams and components:
- Frontend Application (Consumer):
Built by a frontend team, this React-based web app allows customers to view their account balance and transaction history by making API calls to the backend. - Backend API (Provider):
Managed by a backend team, the API provides endpoints for account details, including:- /account/{id}/balance – Returns the account balance.
The frontend app is integrated with the backend API, expecting the following responses:
Account Balance Endpoint (GET /account/{id}/balance):
{
  "accountId": "12345",
  "balance": 5000
}
On Friday Evening the backend engineer decides to improve the /account/{id}/balance response to rename accountId to id. The new response structure looks like this:
{
  "id": "12345",
  "balance": 5000
}
The engineer deploys the change, thinking it’s a harmless addition. No contract tests are in place to verify compatibility with the frontend.
Result:
The frontend app’s code does not recognise the renamed accountId field and instead tries to access id under the old key. This results in an error when parsing the JSON response, as the frontend is still expecting the accountId field. As a result, the frontend fails to display the account balance and shows a blank page or an error message to customers.

Impact Over the Weekend:
- Customers are unable to check their account balance, leading to frustration and confusion.
- The frontend team was unaware of the backend change until Monday morning, as there were no contract tests in place to alert them about the breaking change.
- The downtime disrupts the customer experience, potentially destroying trust in the banking application and impacting the reputation of the service.
What could be done better?
With contract testing, the frontend and backend teams define a clear agreement (the “contract”) about API interactions, specifying expected fields and data types. Before deployment, both consumer (frontend) and provider (backend) teams run tests to ensure compatibility, catching issues early. By integrating contract tests into the CI/CD pipeline, breaking changes are flagged during development or staging, preventing them from reaching production. This approach ensures smooth communication between services, reduces downtime, and enforces better collaboration between teams.
What is Contract Testing in a nutshell?
Contract testing is a technique for testing an integration point by checking each application in isolation to ensure the messages it sends or receives conform to a shared understanding that is documented in a “contract”.
Source: Pact Documentation.
The contract is a JSON file containing the names of the two interacting systems: in this case, the web application and backend server. The contract also lists all interactions between the two systems.

In the context of the test automation pyramid, contract testing bridges the gap between unit tests and end-to-end tests by focusing on the interactions between microservices. It ensures that the consumer and provider services adhere to a shared agreement (the “contract”) regarding APIs, such as expected request and response structures. By having contract testing in place, it proactively identifies and addresses these compatibility problems earlier in the development cycle.
There is an insightful diagram in the book “Contract Testing in Action” that illustrates how some test cases can be shifted to contract tests. This shift moves them lower in the test automation pyramid, enabling issues to be identified earlier in the development lifecycle.

Source: Contract Testing in Action book
As microservices continue to dominate the landscape of software development, adopting contract testing is no longer optional—it is essential. By incorporating this practice, teams can build scalable, reliable, and user-focused applications, providing a smooth experience for end users and ensuring strong collaboration across development teams.
In the upcoming articles, we will meet contract testing players and focus on the practical implementation of contract testing, exploring tools, techniques, and best practices to integrate testing strategy into development workflow.
As I continue learning, I also began compiling a repository of helpful resources on contract testing to serve as a reference for myself and others exploring this topic.